273: Getting Data From Your Assets
This course is for Platform Administrators who need to connect Kelvin to physical assets and start collecting real-time data.
By the end, you will understand what Connections are, know how to create an OPC UA import connection step by step, understand what protocols are available, know enough to brief a developer on building a custom connection, and be able to manage connections day to day.
Where this course fits
Before you can do anything useful in Kelvin, you need data. Data comes from your assets through Connections. This course covers everything you need to know about setting up and managing that pipeline.
- 270: Exploring the Kelvin UI for Platform Administrators — the Administration area overview
- 271: Setting Up Platform Infrastructure — clusters, nodes, and users
- 272: Setting Up Assets and Data Streams Quickly — creating assets in bulk
- This course — connecting those assets to real data
- 274: Asset Data Assurance — data quality and guardrails
What is a Connection?
A Connection (also called a Connector) is a software component that runs at the edge and bridges the gap between your physical assets and the Kelvin Platform.
Your asset speaks its own language. A PLC might speak Modbus. A SCADA system might speak OPC UA. Kelvin speaks its own language: Assets and Data Streams. The Connection is the translator between the two.
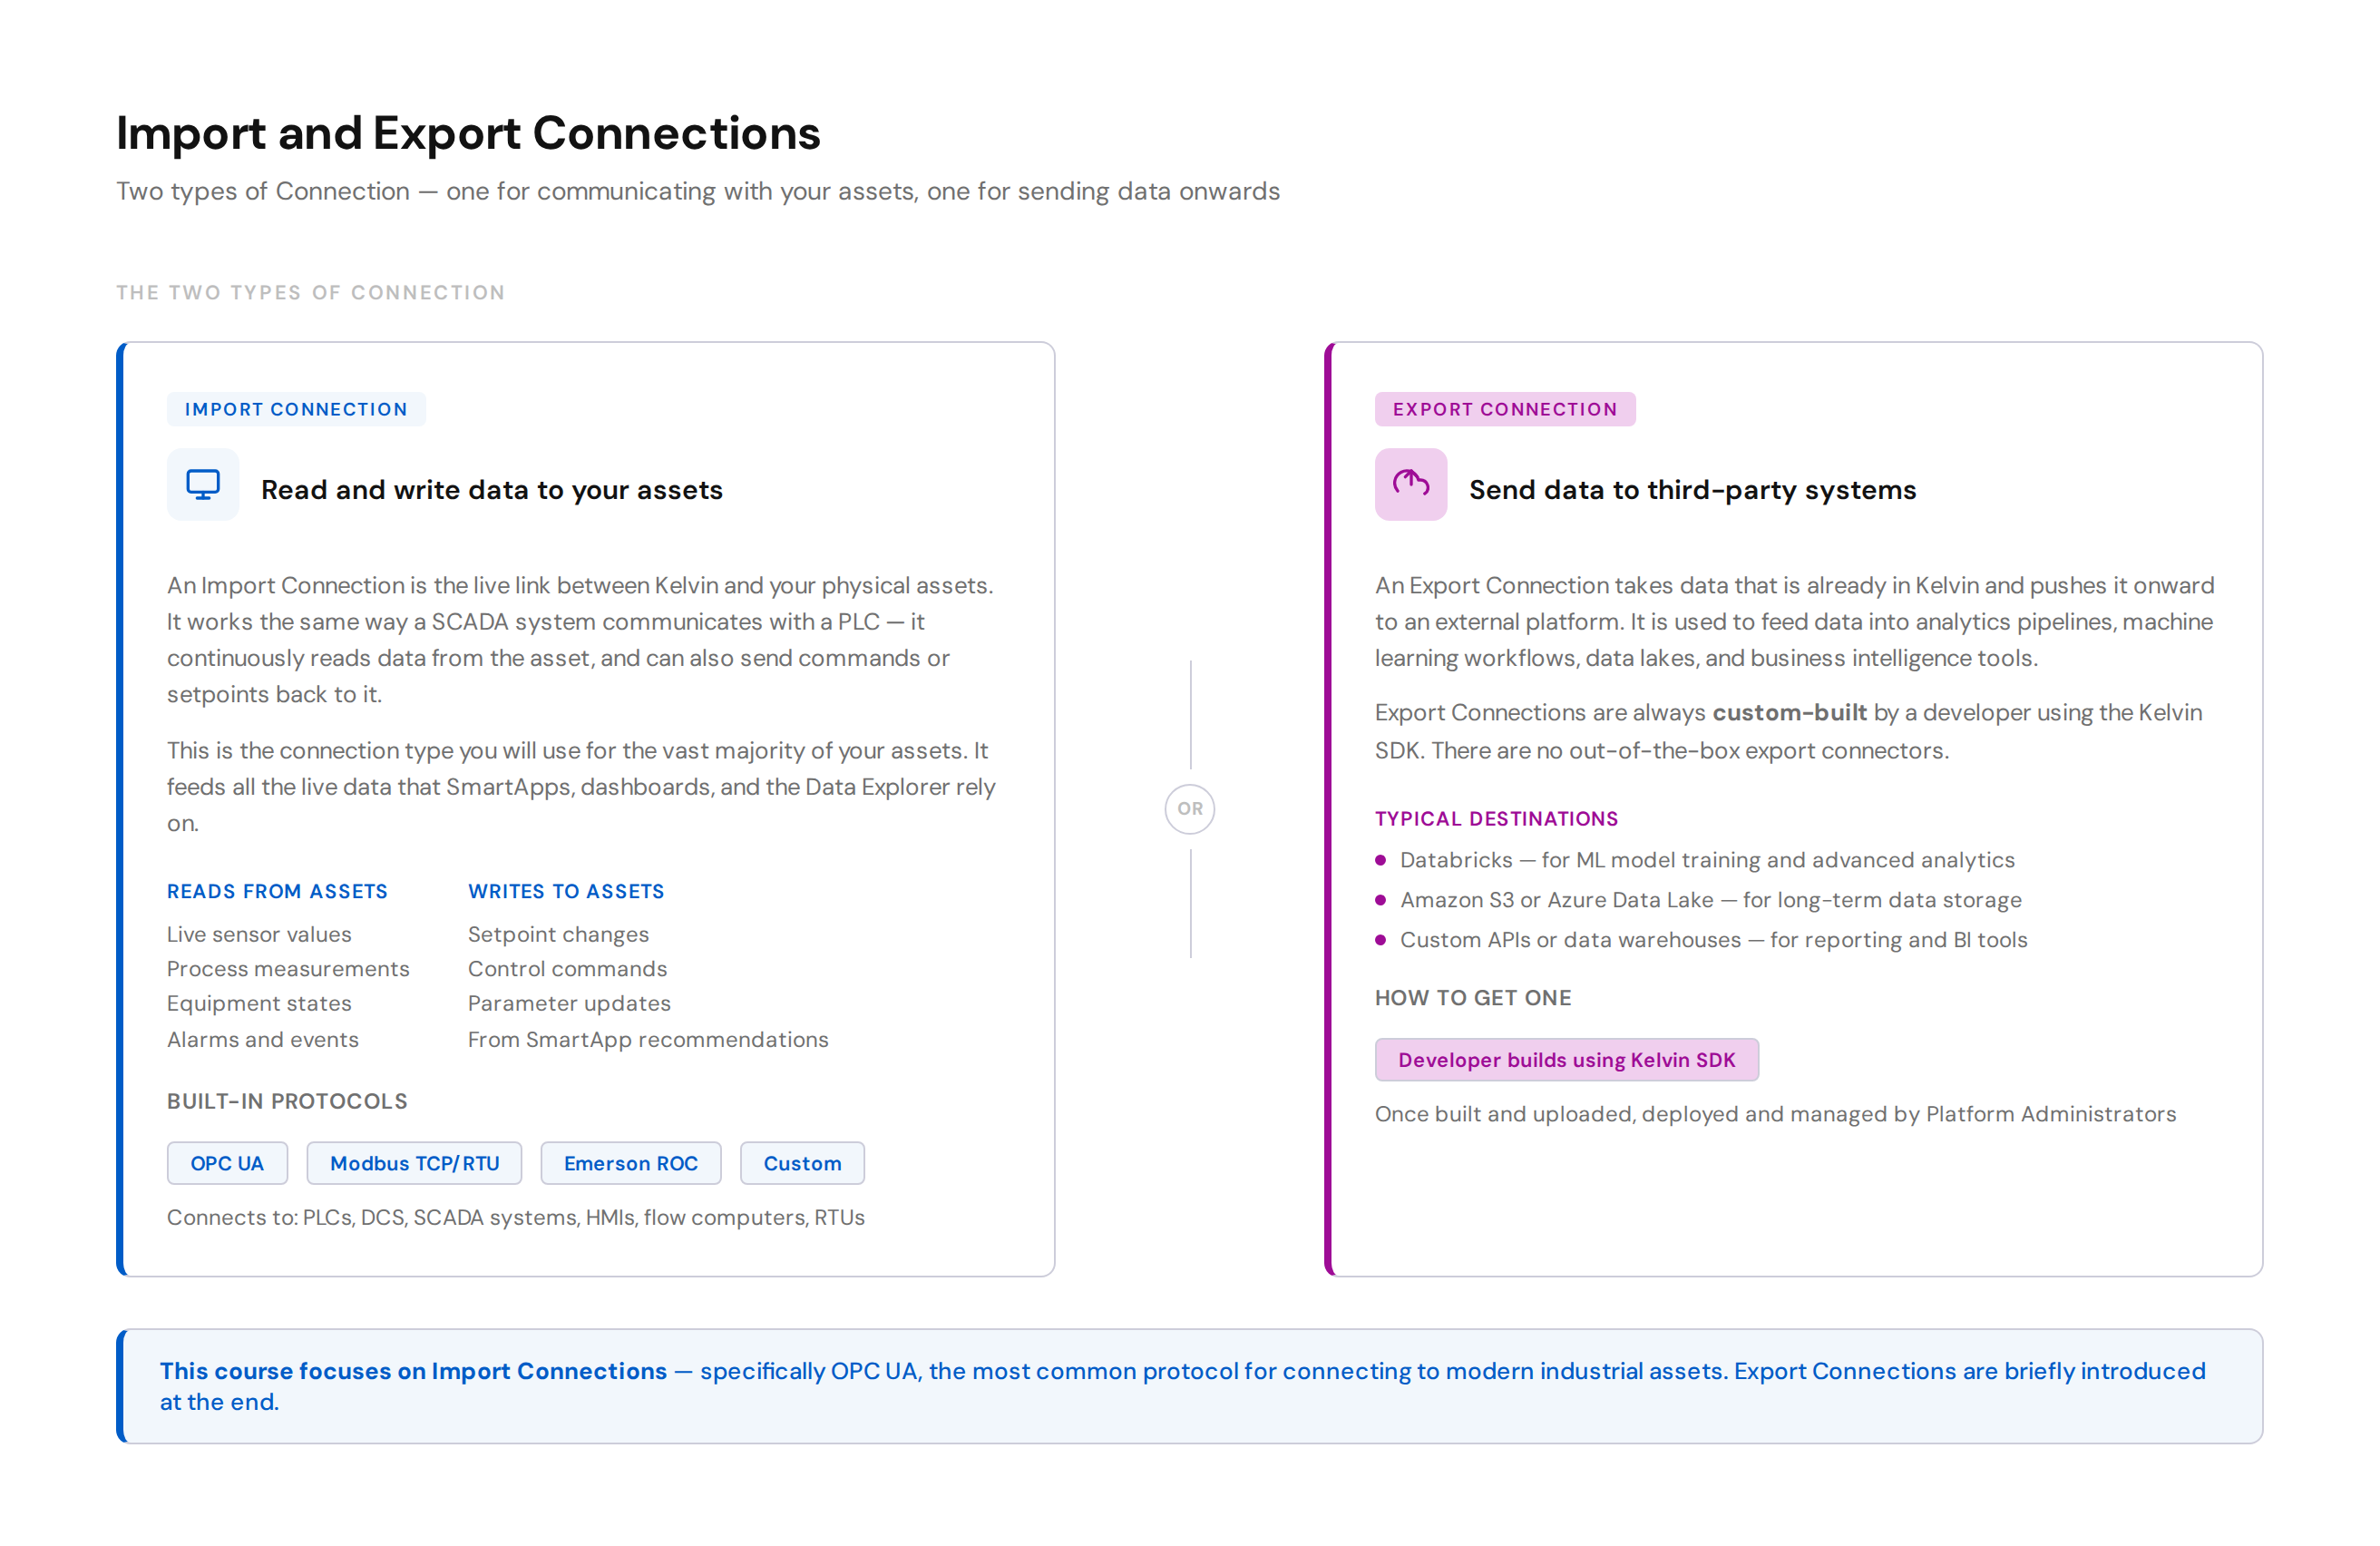
There are two types of Connection:
Import Connections are the live link between Kelvin and your physical assets — exactly like how a SCADA system communicates with a PLC. They read real-time data from your assets continuously, and can also write commands or setpoints back to them. This is the connection type you will use for your assets.
Export Connections take data that is already in Kelvin and push it to a third-party system — for example, sending historical process data to Databricks for ML model training, or to an Azure Data Lake for long-term storage. Export Connections are always custom-built by a developer.
This course focuses entirely on Import Connections using OPC UA. Export Connections are briefly introduced at the end.
How an Import Connection Works
When you deploy an Import Connection, it runs as a workload on your edge cluster. It polls your asset at a configurable rate, reads the data, and stores it temporarily on the node and then sends it to the cloud.

Note
The nodes are fault tolerant meaning that data is not lost if the connection to the cloud is unavailable. The node will retain the data and sync when the connection is restored.
It also means the Kelvin SmartApps can still run and use the data locally, allowing seamless offline operations even with intermittent Internet connections.
Data also flows the other way. When a SmartApp generates a recommendation and an Operations Engineer approves a control change, Kelvin sends the new setpoint back down through the same Import Connection to the physical asset. This is the write direction — just like a SCADA system sending a new target value to a PLC.
The four things you configure when creating a connection:
| Setting | What it means |
|---|---|
| Polling Rate | How often (in seconds) to read data from the asset |
| Storage Location | Node only, or node and cloud sync |
| IO Mapping | Which physical data points map to which Kelvin Asset and Data Stream |
| Control Writable | Whether a Data Stream is Read Only (RO) or Read/Write (RW) |
Pro Tip
The Control Writable setting controls whether Kelvin can send commands back to the asset for that data stream. Set a stream to Read/Write (RW) only on data points where you want SmartApps to be able to change the value on the physical asset — for example, a setpoint or target pressure. For monitoring-only data points, use Read Only (RO) to make sure nothing can accidentally change the asset.
Available Protocols
Kelvin ships with built-in connectors for the most common industrial protocols. You do not need to write any code to use these.
| Protocol | Best for | Notes |
|---|---|---|
| OPC UA | Modern PLCs, DCS systems | Recommended starting point. Secure, platform-independent, widely supported |
| Modbus TCP | Older devices on Ethernet | Very common in industrial environments. TCP variant uses standard networking |
| Modbus RTU | Older devices on serial | Serial communication. Requires direct hardware connection to the node |
| Emerson ROC | Emerson flow computers and RTUs | ROC and ROC Plus protocols. Supports TCP, serial, radio, and dialup |
| Custom | Anything else | Built by developers using the Kelvin SDK — APIs, databases, custom hardware |
For Operations
If your assets use a protocol not listed above, your development team can build a custom connection using the Kelvin SDK. This is covered later in this course.
Pro Tip
If you are unsure which connector to start with, OPC UA is the safest choice for modern equipment. It is the most widely supported industrial protocol and handles security, encryption, and authentication natively.
Creating a Connection: Step by Step
This walkthrough uses OPC UA as the example. The process for Modbus and Emerson ROC follows the same steps with different configuration parameters.
Before you start
You will need:
- A running edge cluster with at least one node (covered in Course 271)
- Assets and Data Streams already created in Kelvin (covered in Course 272)
- The OPC UA endpoint URL for your asset (for example:
opc.tcp://192.168.1.100:48010) - The Node IDs for the data points you want to read
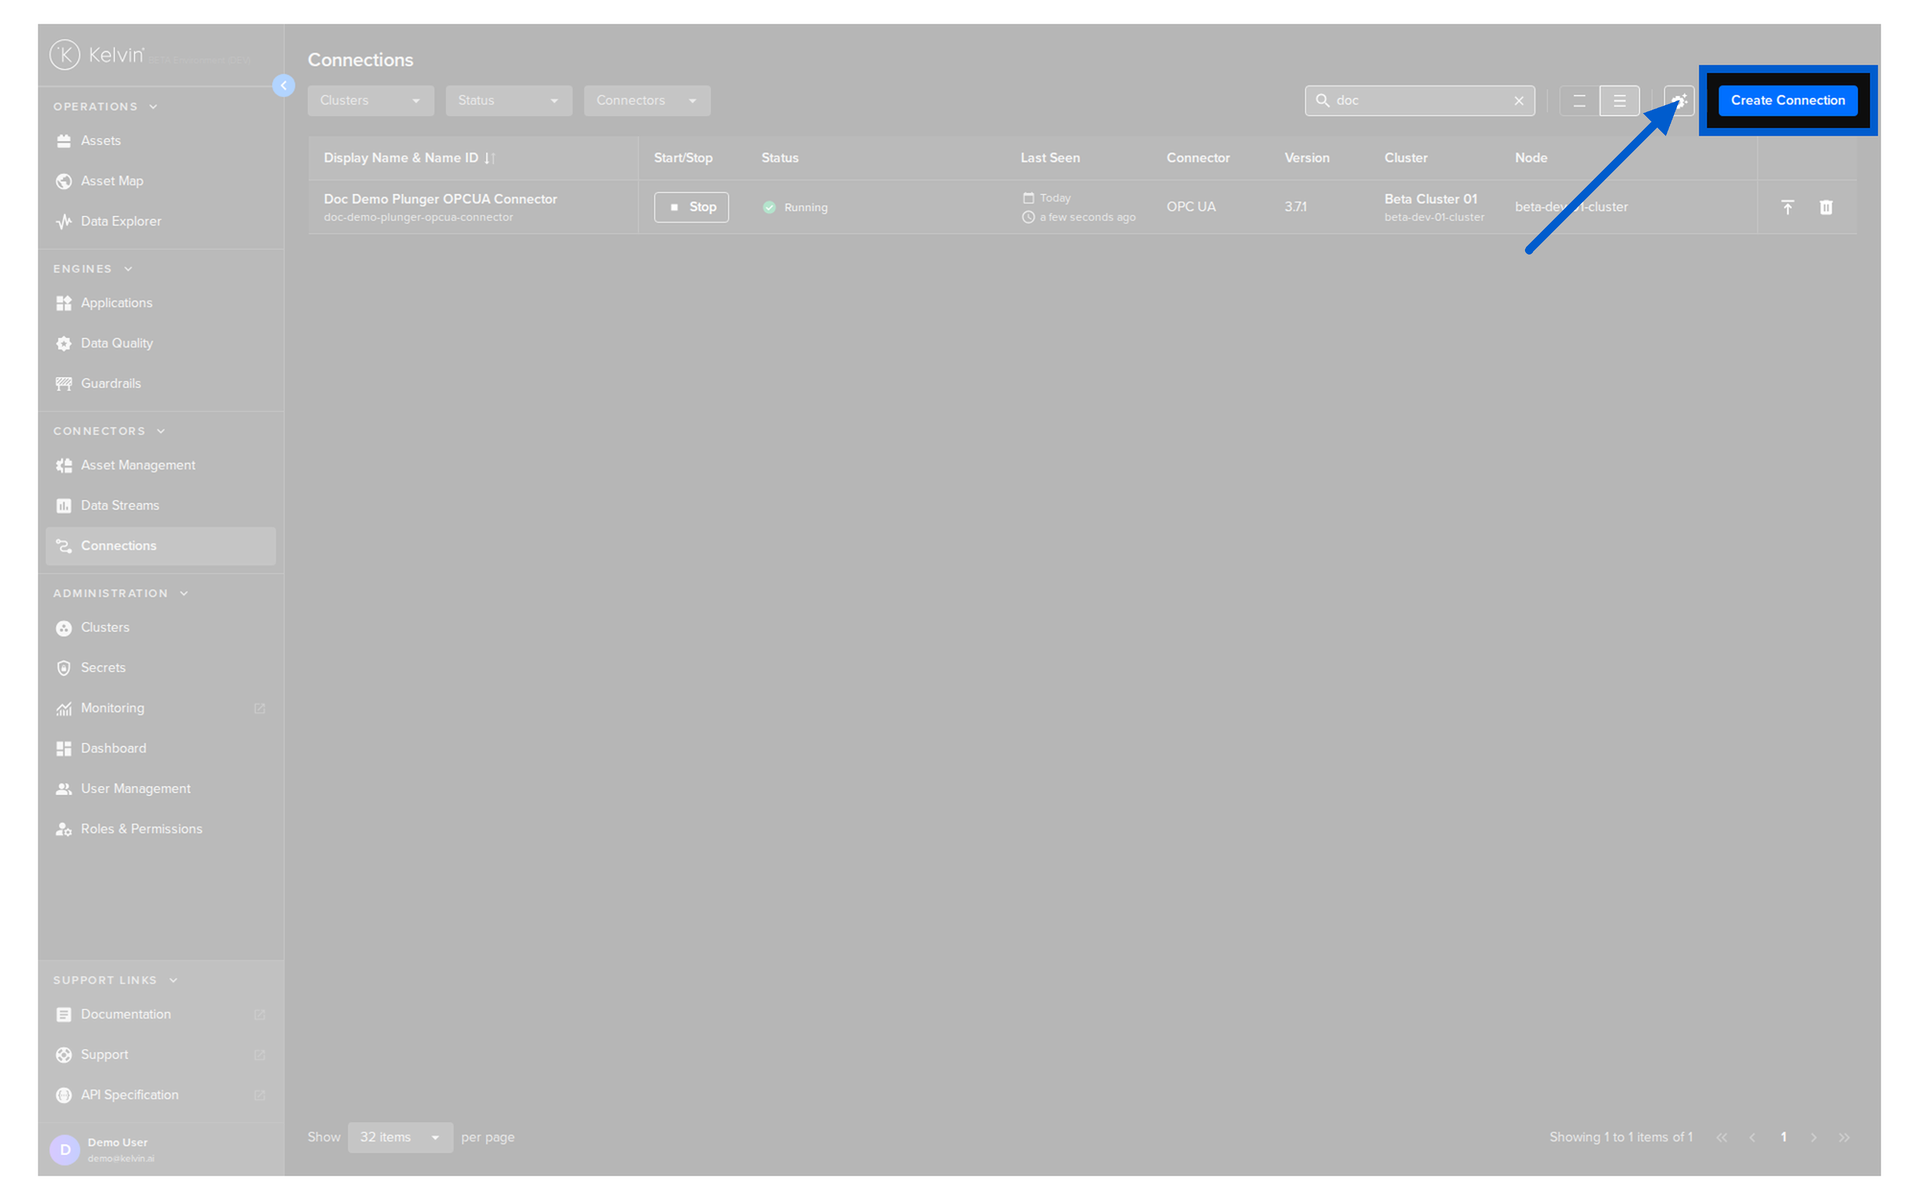
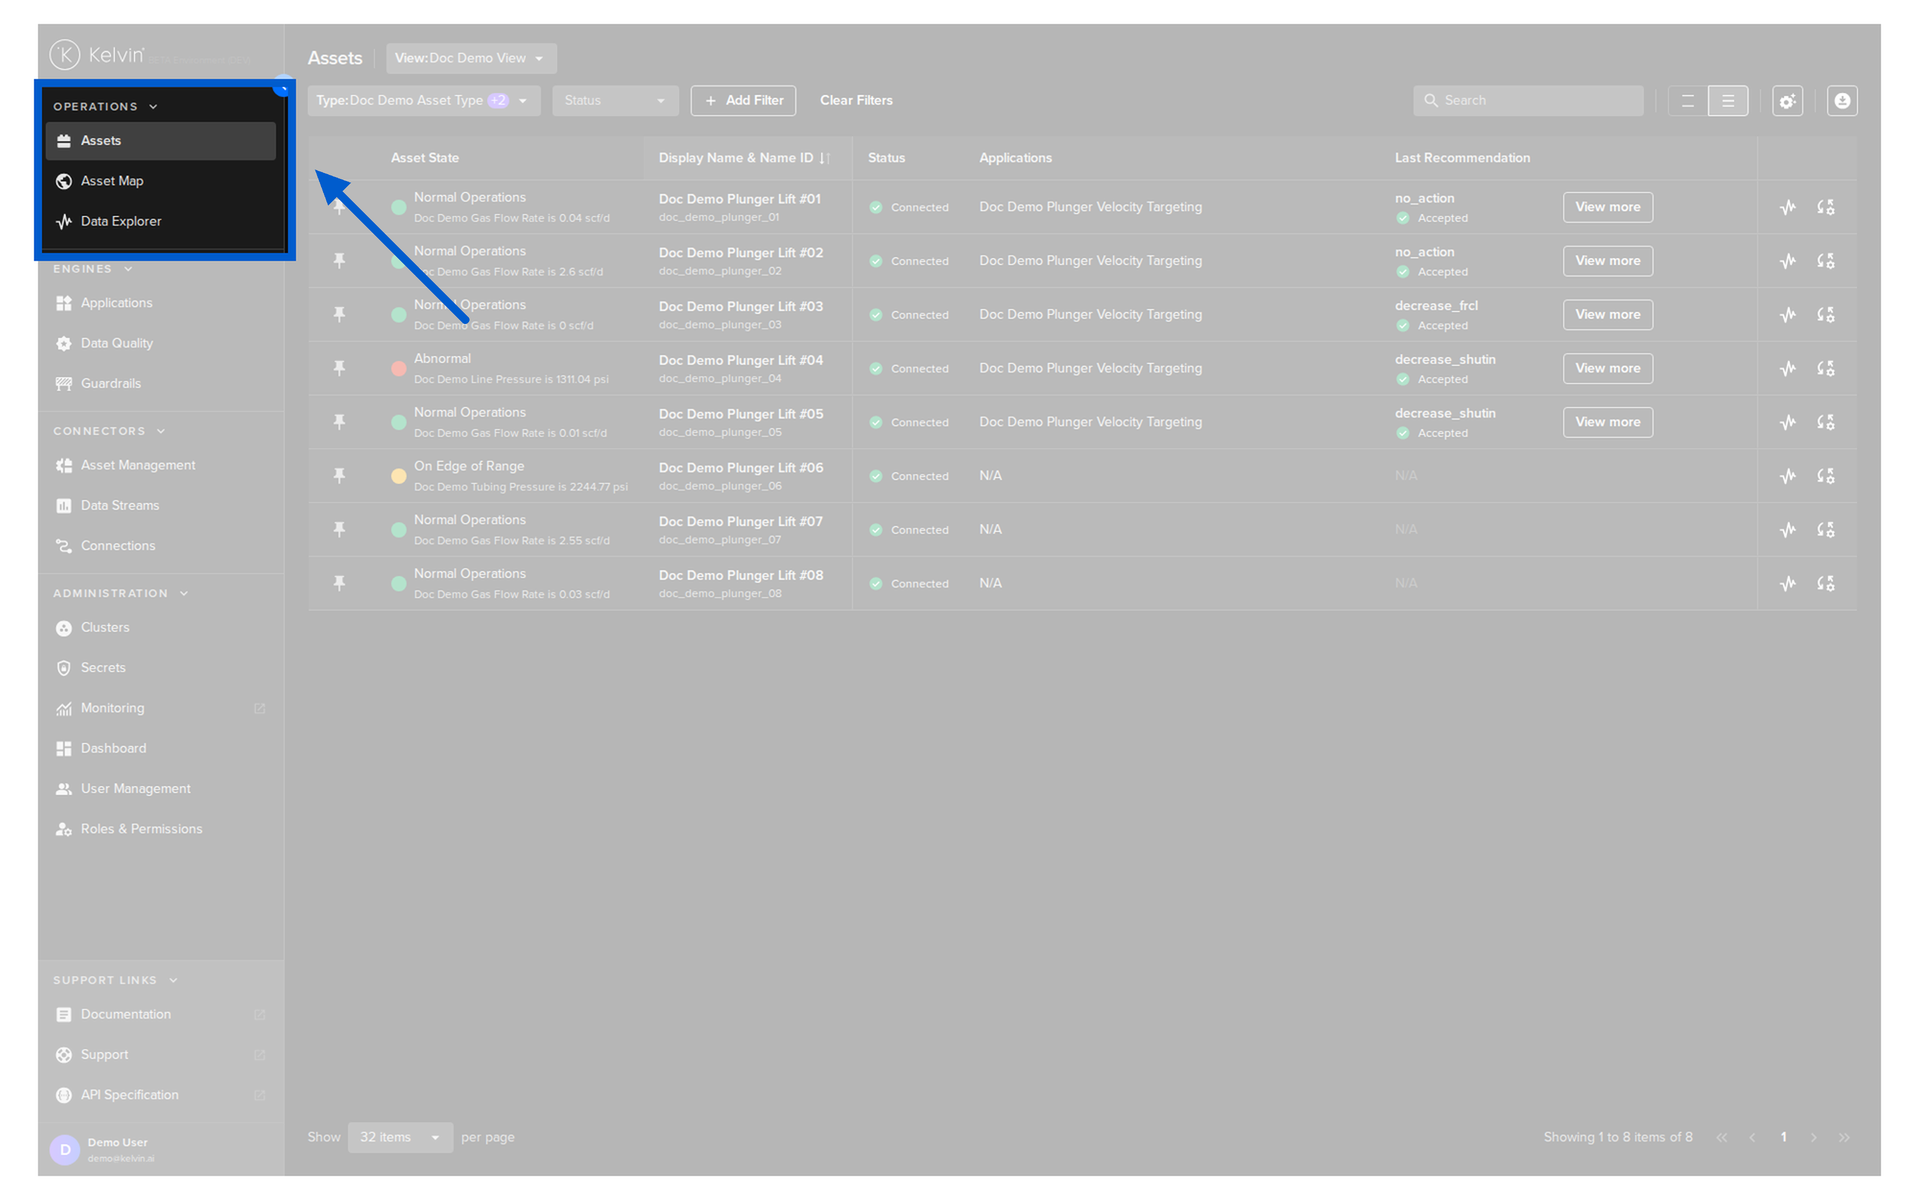
Step 1: Open the Connections page
Go to Connections in the left sidebar under the Connectors section.
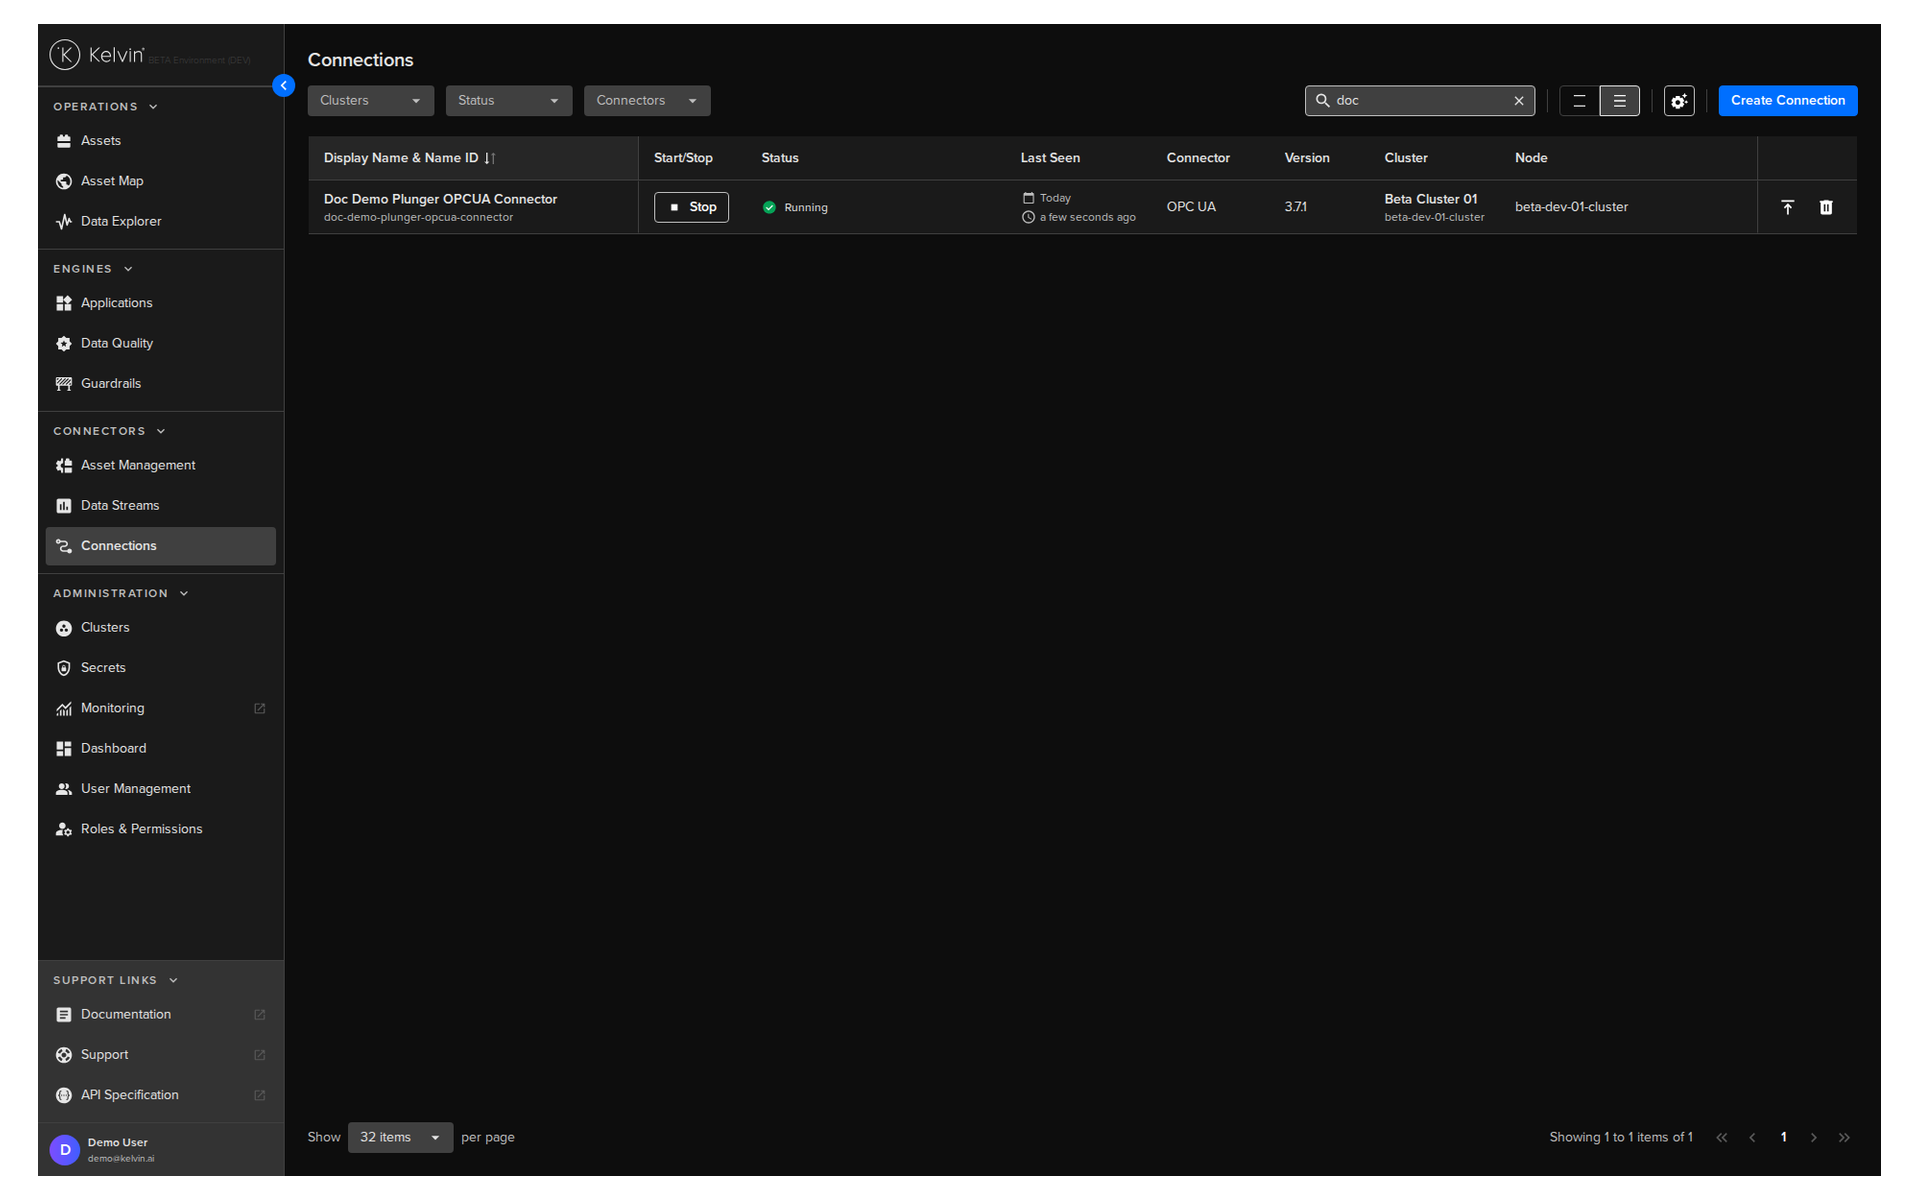
You will see a list of any existing connections. Click the Create Connection button.
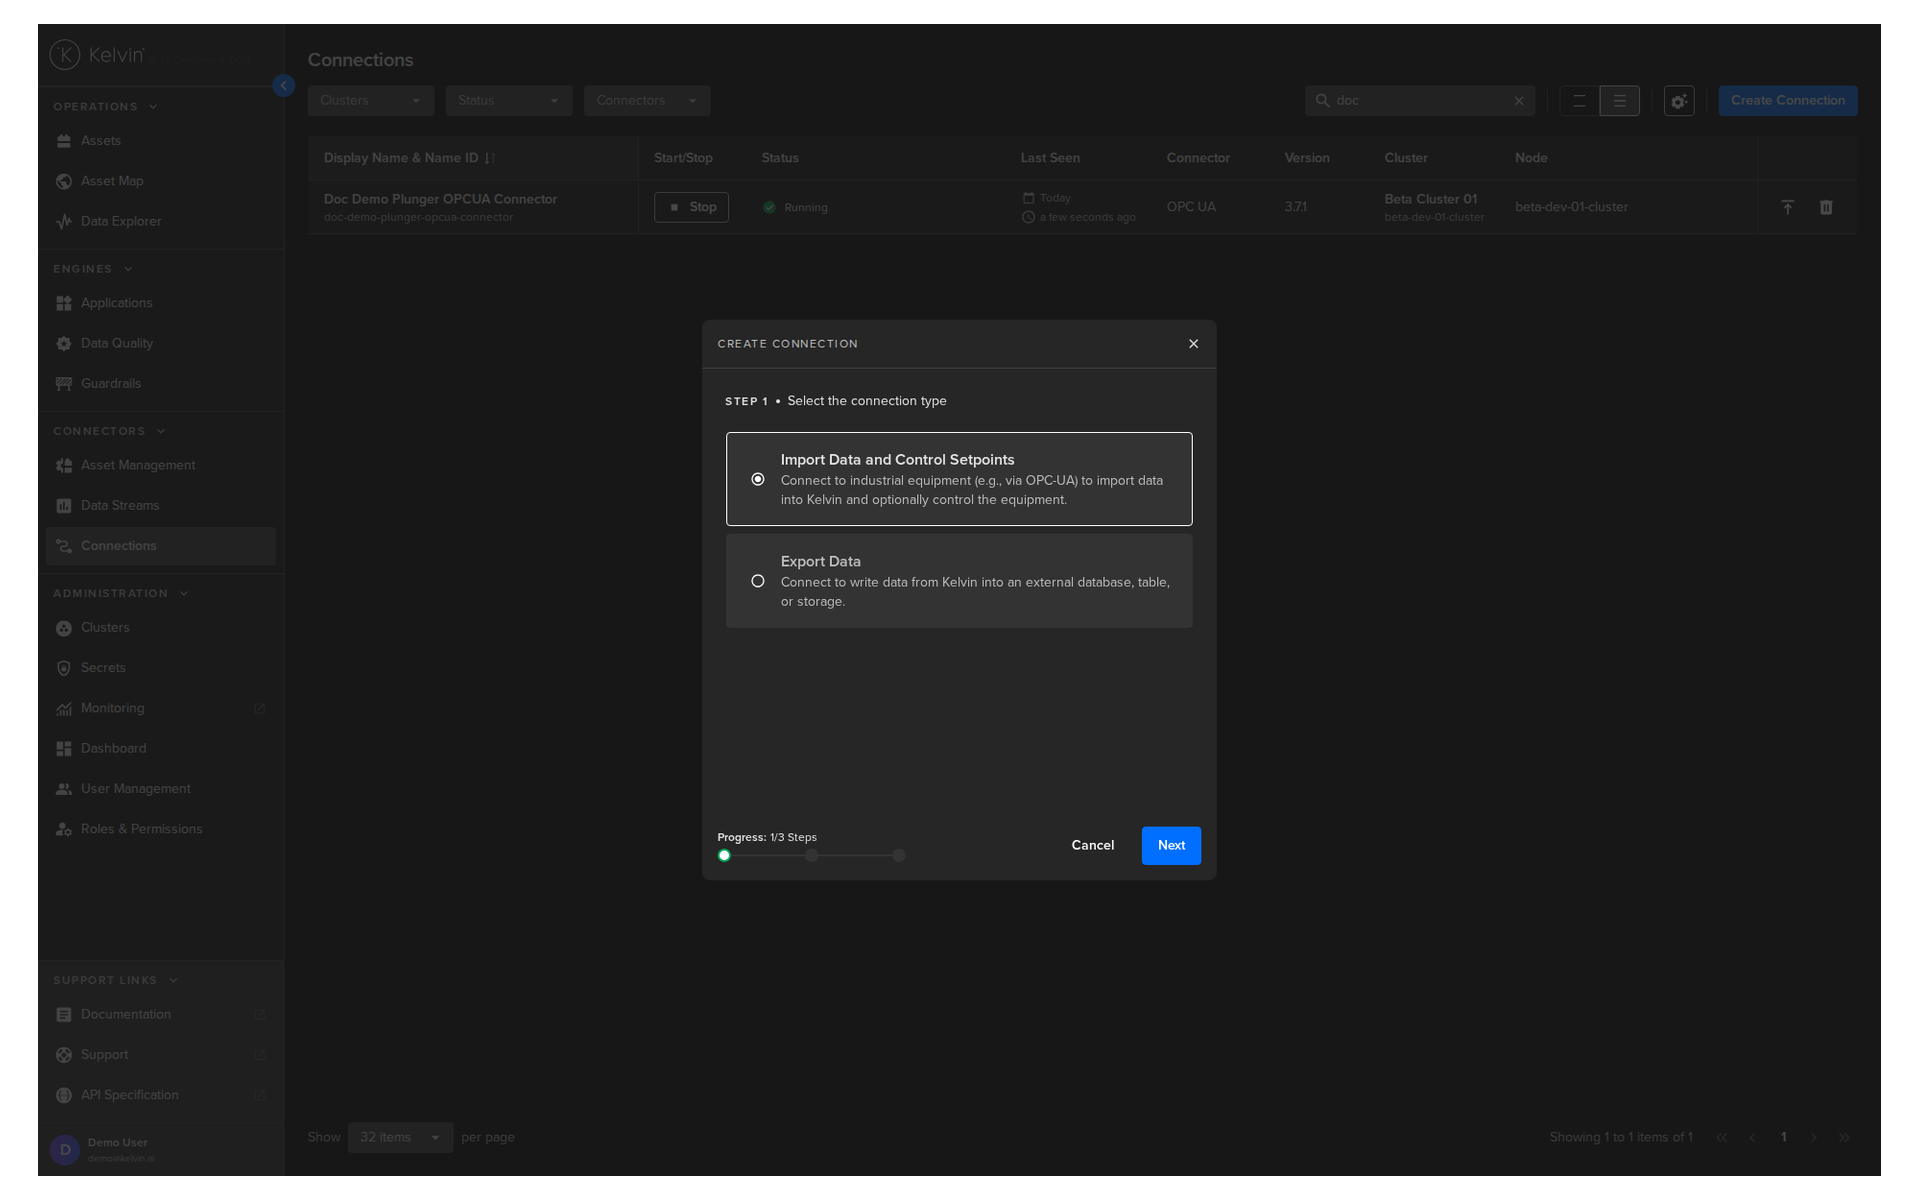
Step 2: Select connection type
You will see two options. Select Import Data and Control Setpoints and click Next.
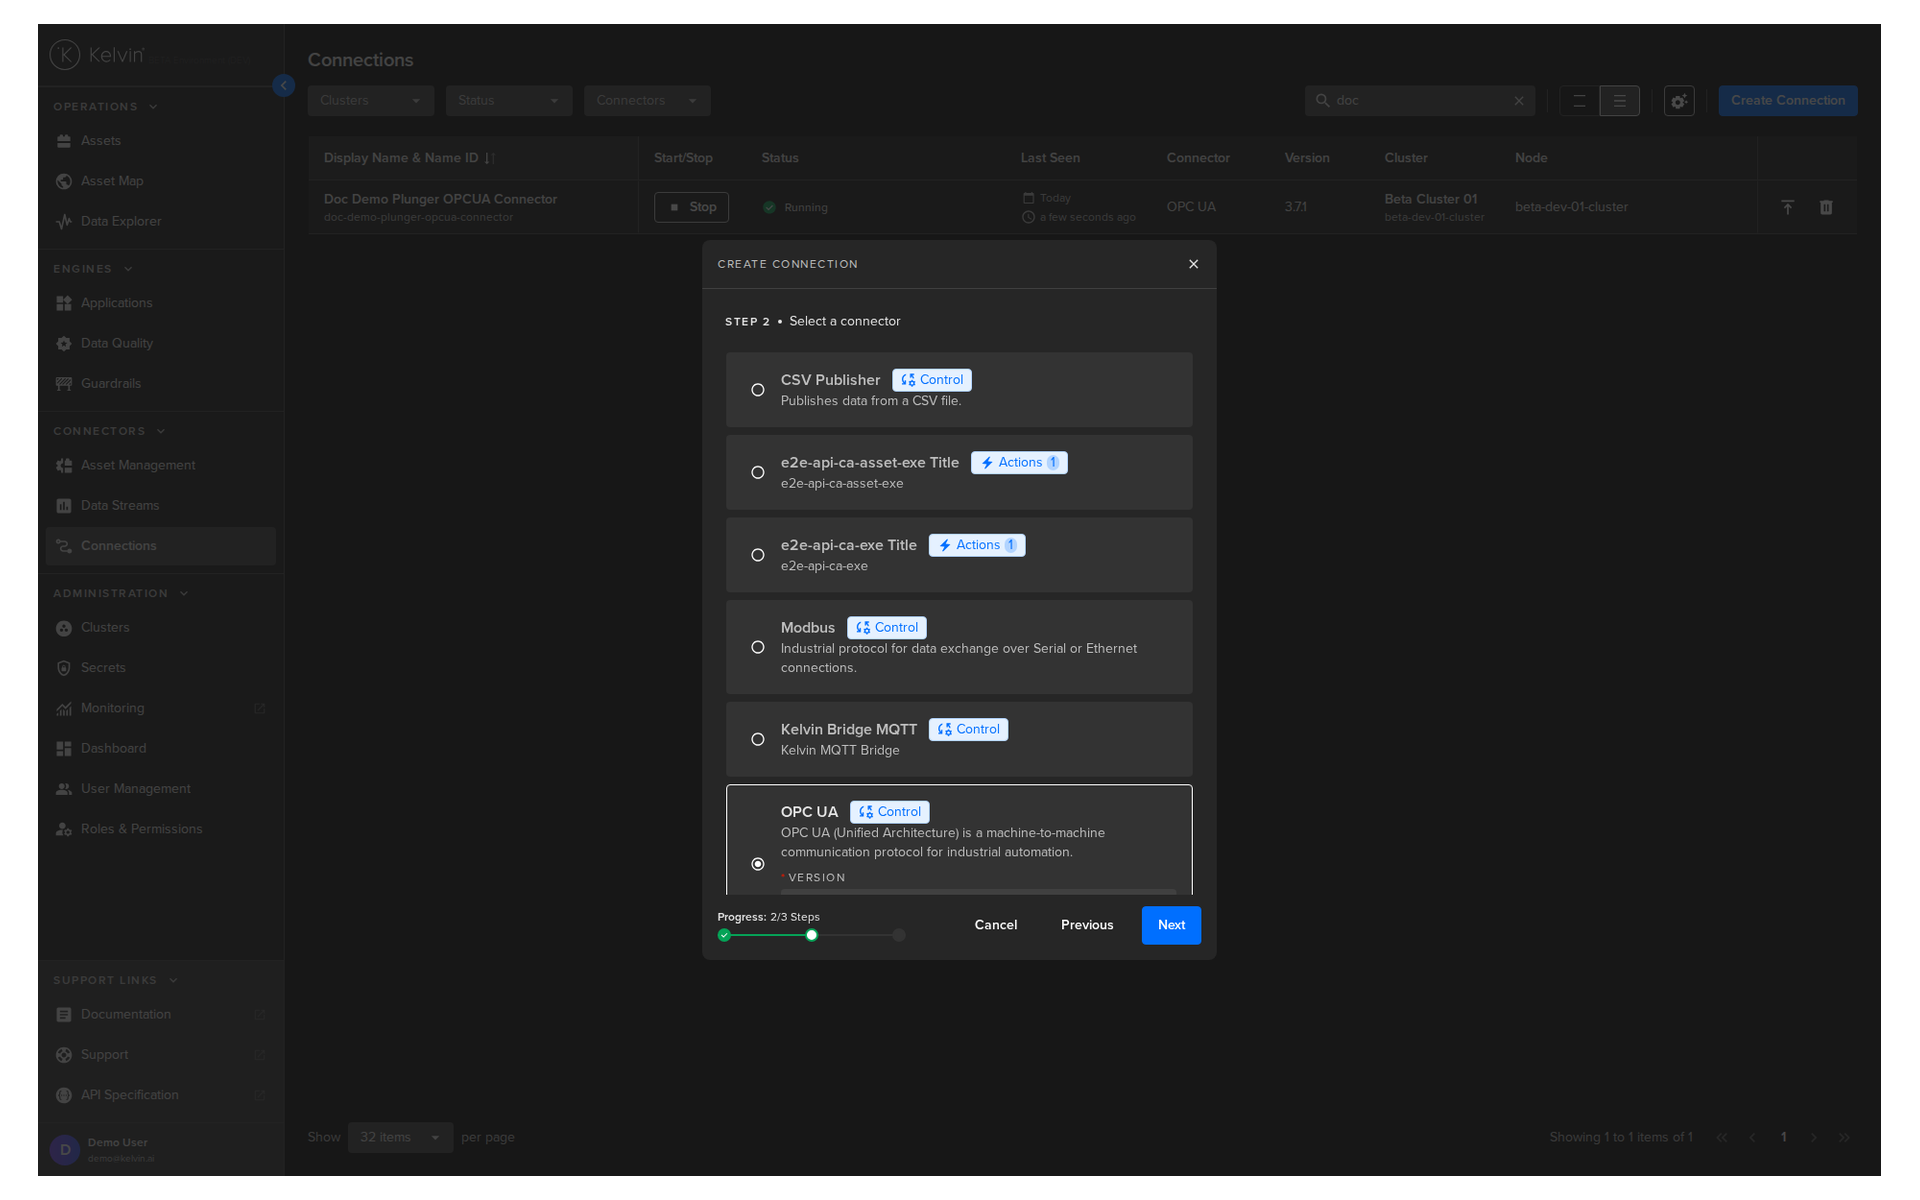
Step 3: Select the protocol
A list of available protocols appears. Select OPC UA, choose a version, and click Next.
Step 4: Configure the connection
This is where most of the setup happens. All sections must show a green check before the Create button becomes active.
Note
In this course we will only focus on the key elements that need to be configured. The rest can be left default.
Section A: Information
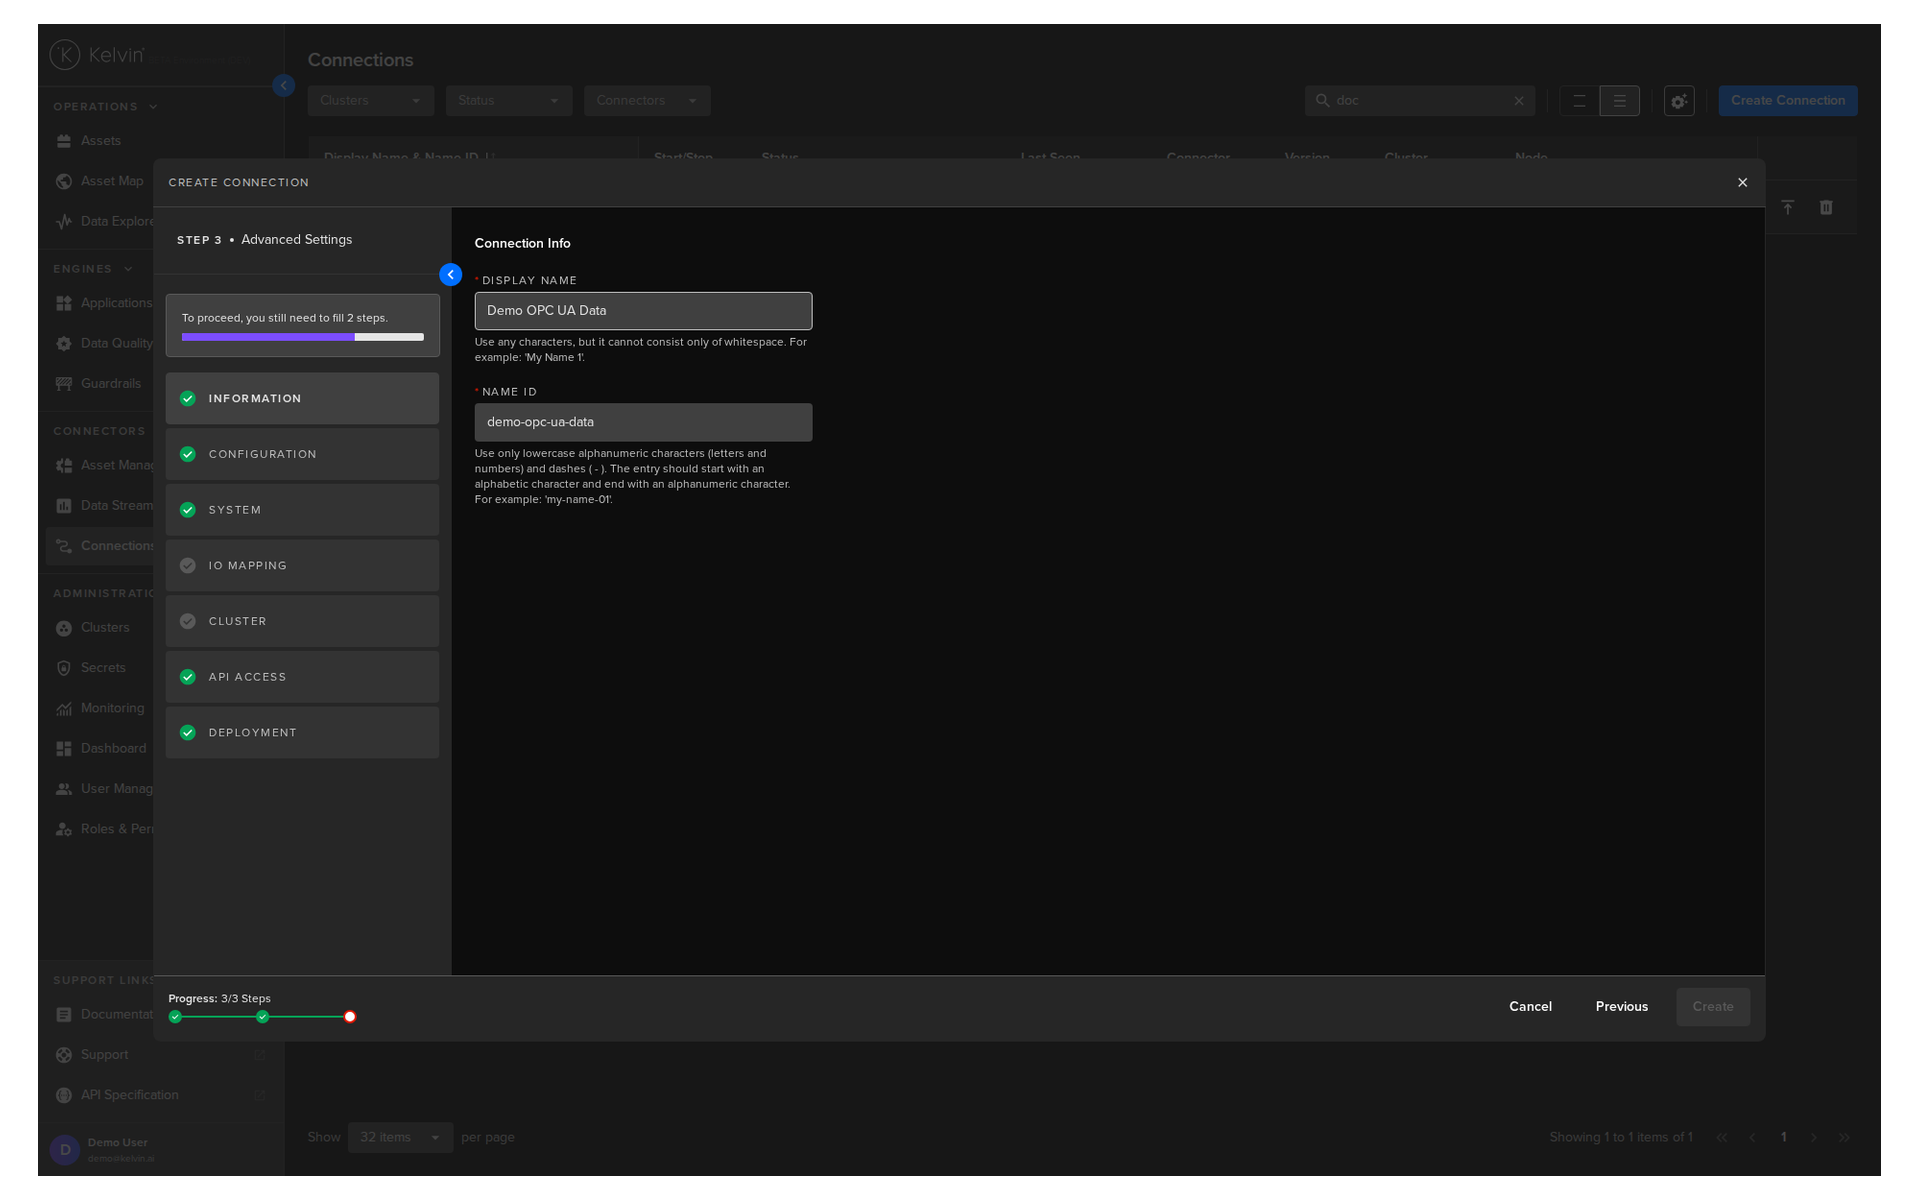
| Field | What to enter |
|---|---|
| Display Name | A human-readable name. Use any letters, numbers, and special characters |
| Connection Name | Auto-filled from your Display Name. Lowercase alphanumeric, dots, underscores, and hyphens only |
Section B: Configuration
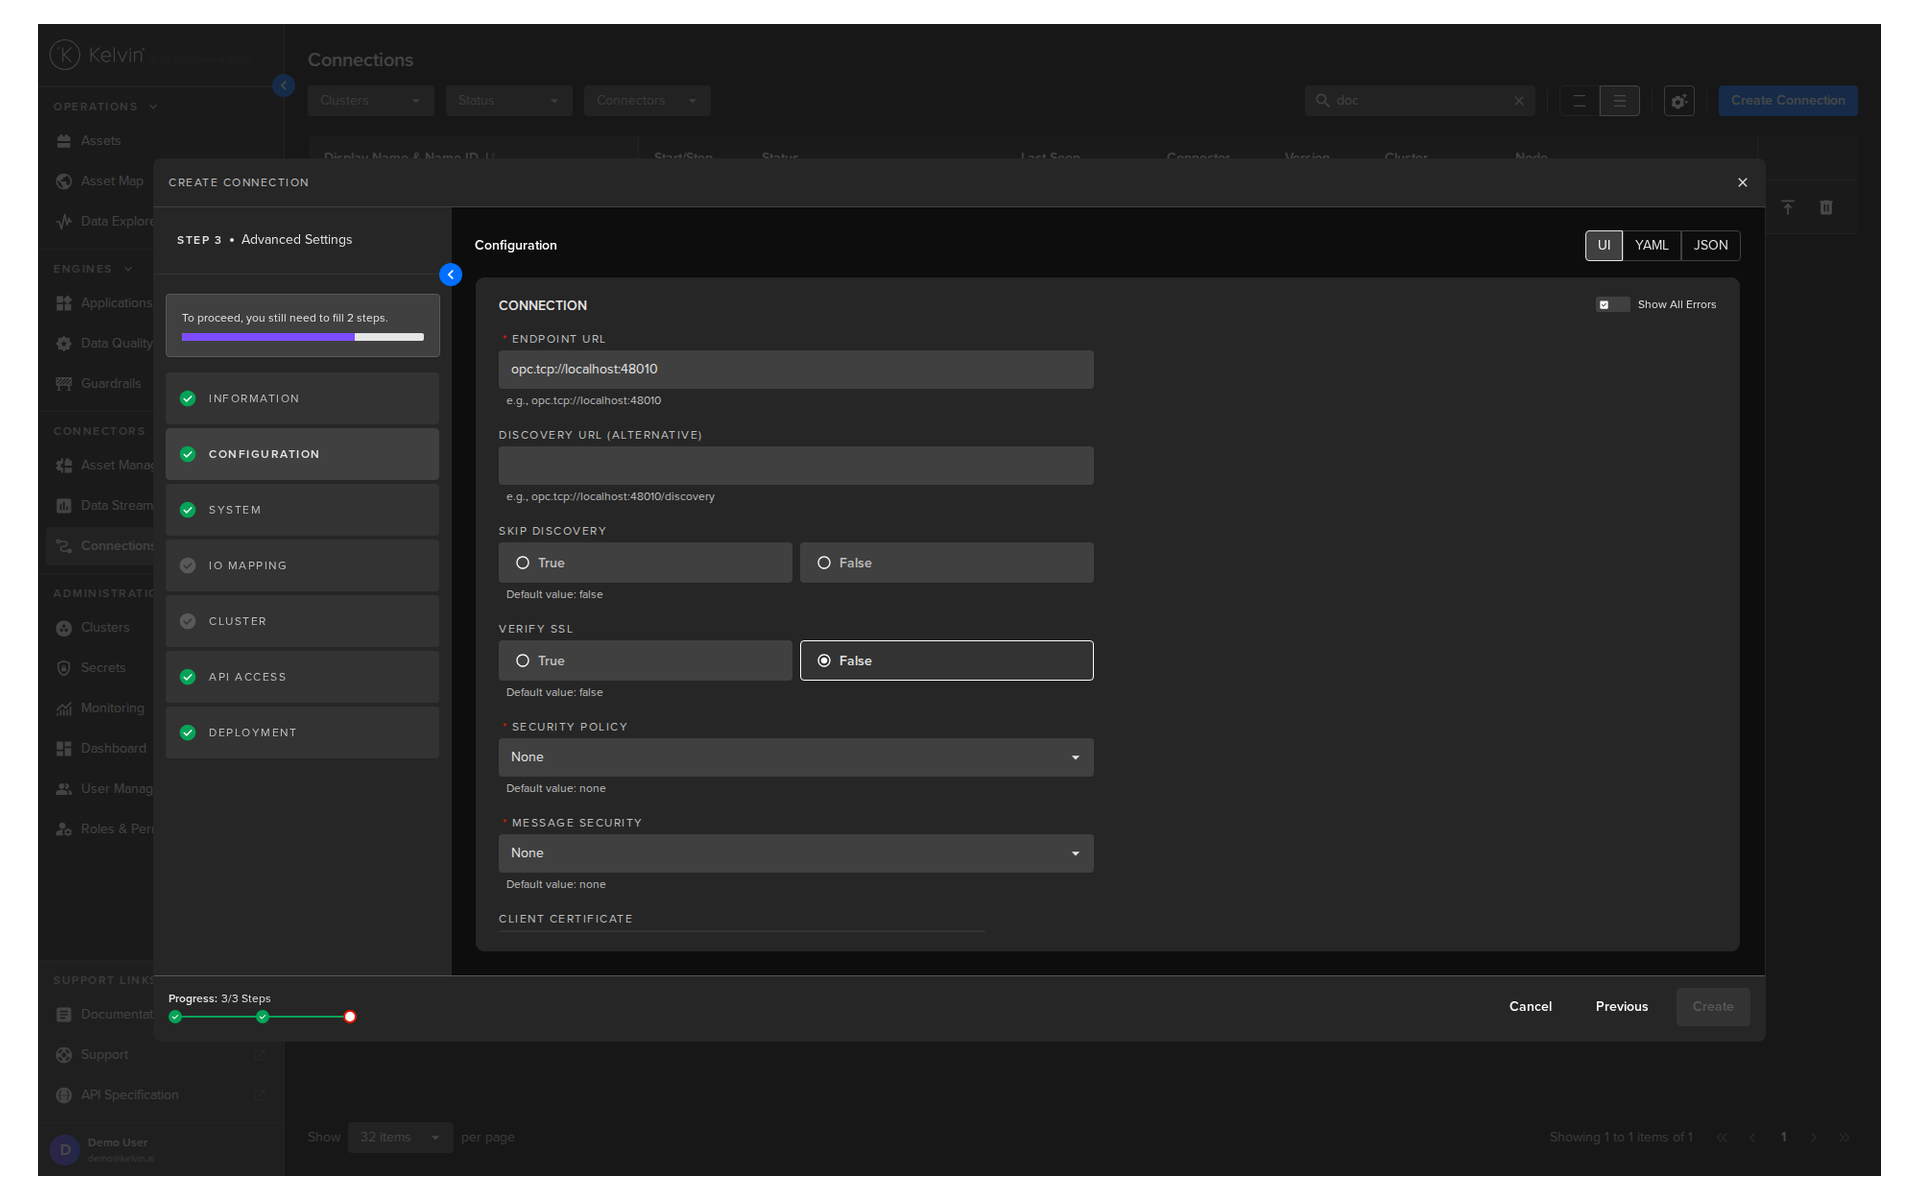
The key parameters for OPC UA:
| Parameter | Required | Description |
|---|---|---|
| Endpoint URL | Yes | The OPC UA server address. Format: opc.tcp://hostname:port |
| Verify SSL | Yes | Whether to verify SSL certificates. Default: False |
| Security Policy | Yes | Security type: None, Basic256Sha256, and others |
| Message Security | Yes | Message mode: None, Sign, or SignAndEncrypt. Default: None |
| Authentication Method | Yes | None, Credentials, or Certificate |
| Username / Password | If Credentials | Visible only when Credentials is selected |
| Certificates / Key Password | If Certificate | Visible only when Certificate is selected |
| Polling / Watchdog Timeouts | No | Read, Write, and Watchdog timeouts in milliseconds |
| Force Read After Write | Yes | Immediately confirms a write succeeded. Default: False |
| Subscription Monitoring Interval | Yes | Seconds between subscription checks |
| Logging Level | No | Info, Debug, Warning, or Error |
Pro Tip
You can edit the configuration in the default UI form, or switch to YAML or JSON format. YAML and JSON are useful if you are copying settings from another connection or from a script.
Section C: IO Mapping
This is the most important section. It maps each physical data point on your asset to a Kelvin Asset and Data Stream.
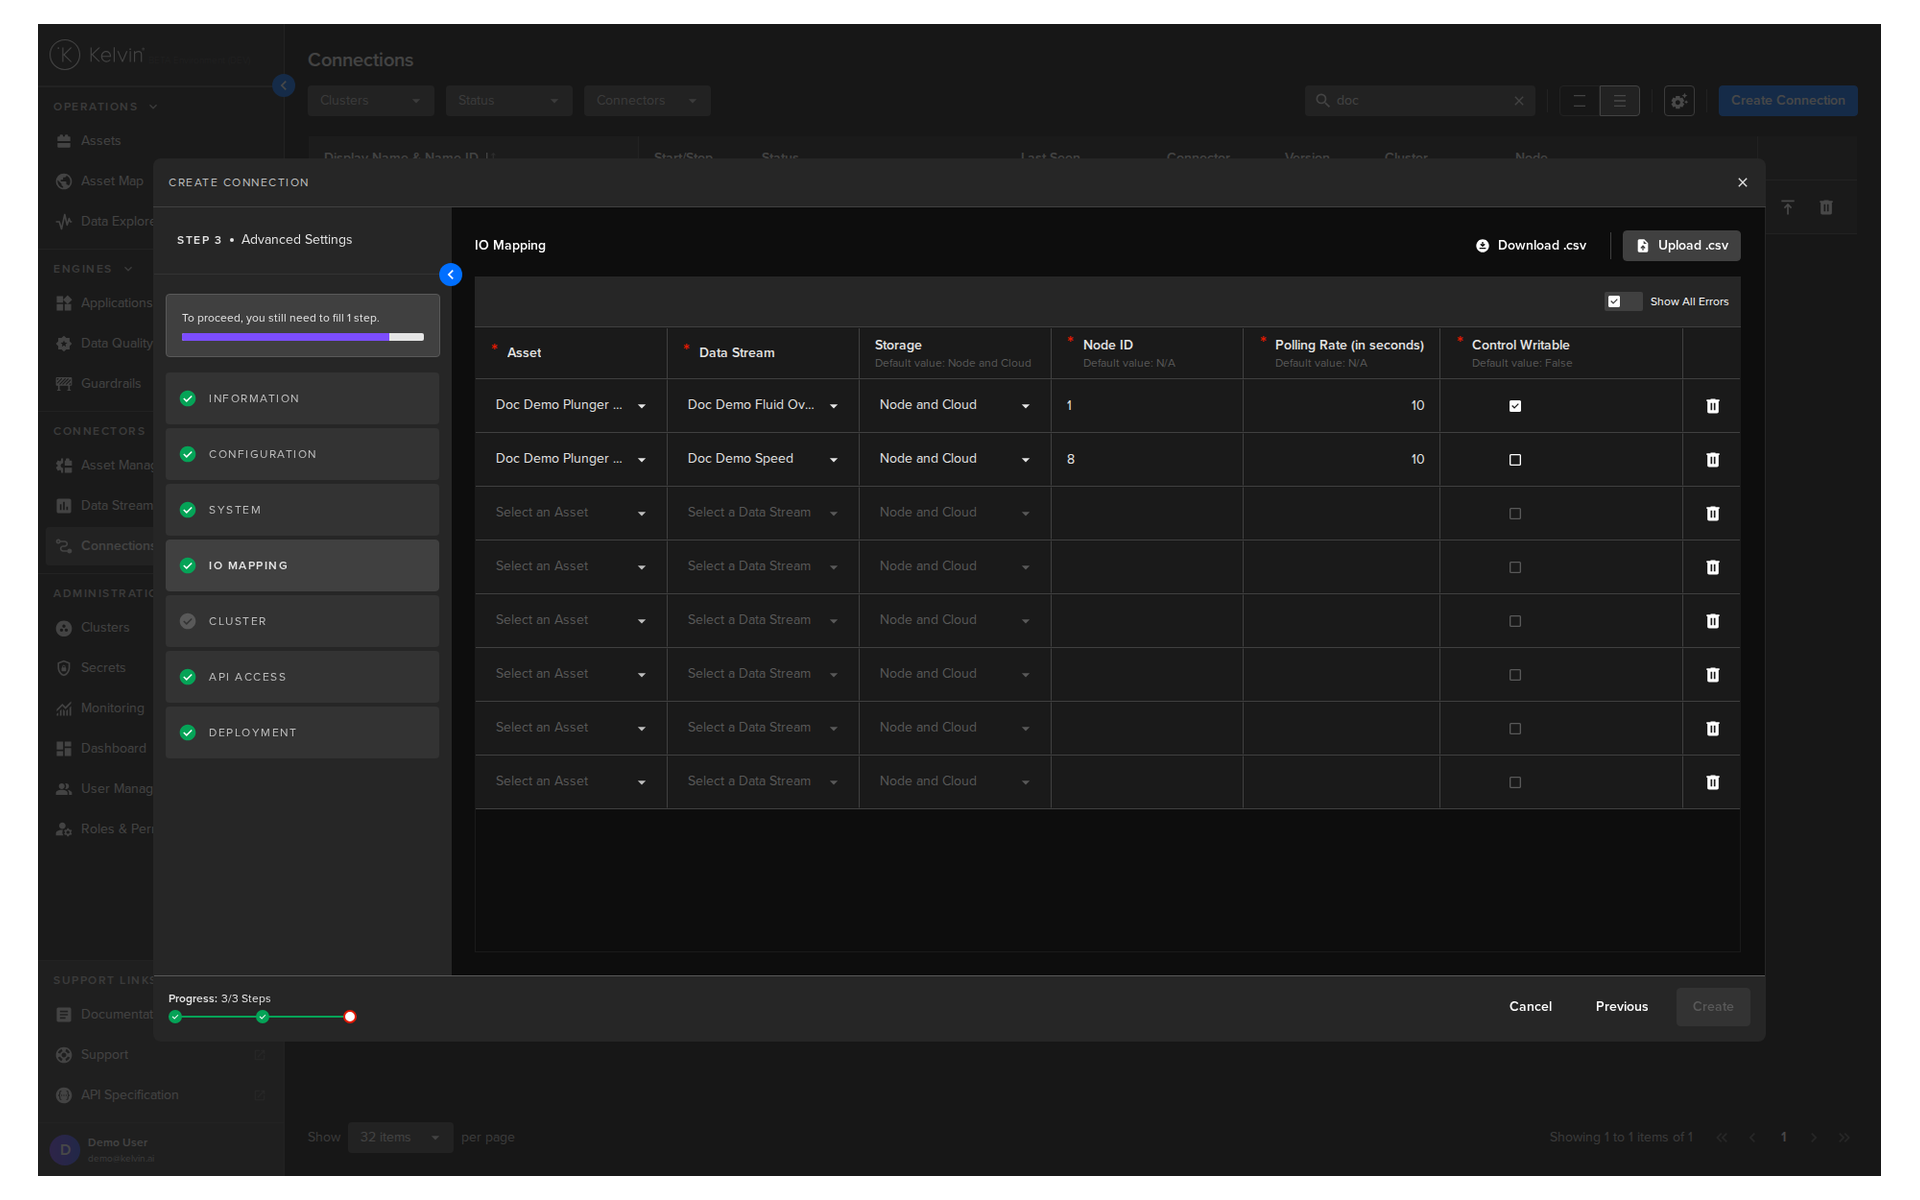
For each data point, you need:
| Column | Example | Required | Description |
|---|---|---|---|
| Asset | well-01 |
Yes | The Kelvin Asset name (lowercase, no spaces) |
| DataStream | water-flow |
Yes | The Kelvin Data Stream name (lowercase, no spaces) |
| Storage | node-and-cloud |
No | none, node, or node-and-cloud |
| Node ID | ns=4;i=1002 |
Yes | The OPC UA address of this data point on your asset |
| Polling Rate | 30 |
Yes | How often to read this data point, in seconds |
| Control Writable | RO |
Yes | RO for read only, RW for read/write |
Pro Tip
If you have many data points to map, use the Download CSV option in the top right corner of this section. Fill in all rows in Microsoft Excel or Google Sheets, then upload the completed file. This saves significant time for large asset configurations.
You can only upload one file. If you upload a second file, only the latest upload will be used.
Section D: Cluster
Select which cluster to deploy the connection to. The cluster must have direct network access to your OPC UA server.
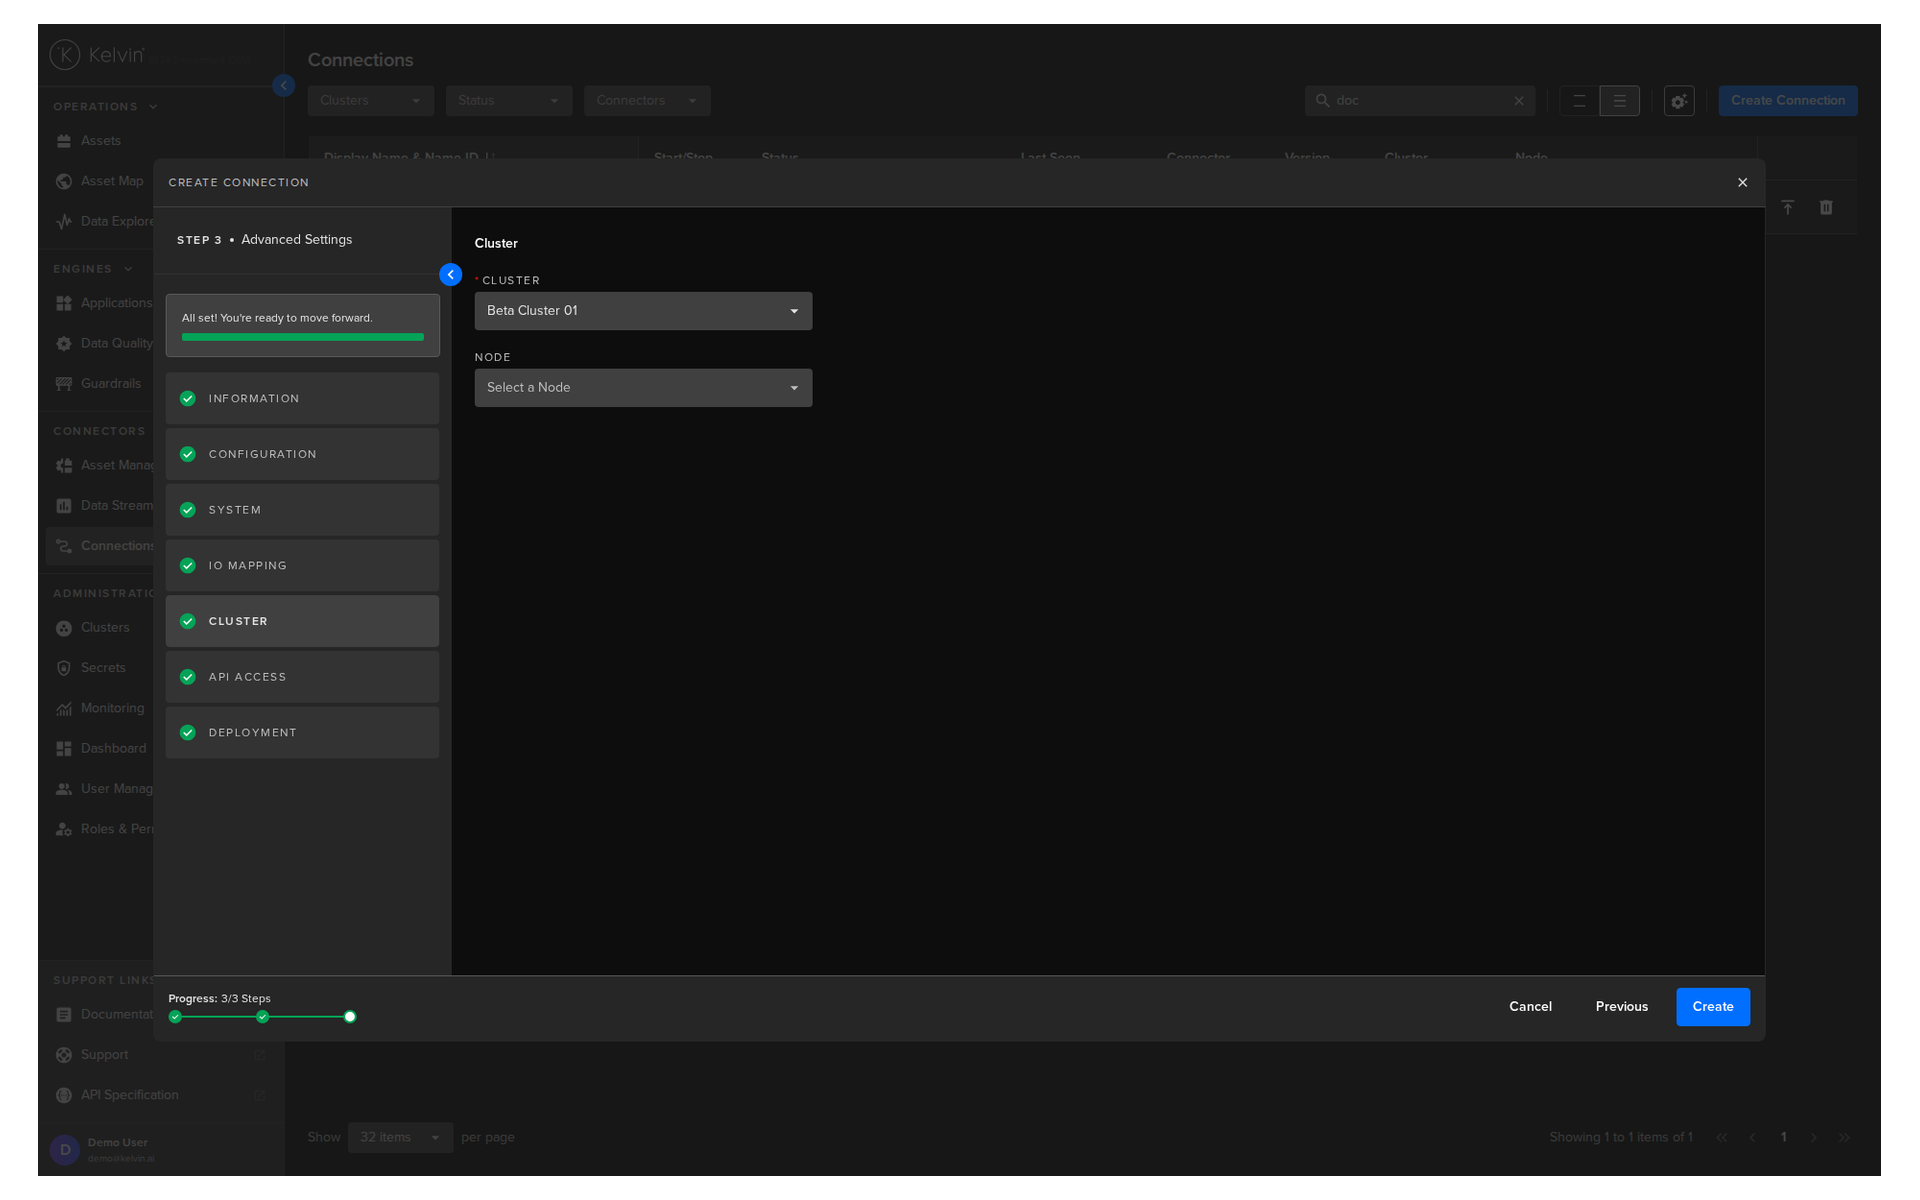
You can optionally select a specific node. If you do not, the platform assigns one automatically.
For Operations
If your asset uses a serial connection (for example, Modbus RTU), you must select a single-node cluster and specify the exact node that has the serial hardware connected. Serial connections require direct hardware access and cannot be assigned automatically.
Step 5: Create the connection
When all sections show a green check, the Create button turns blue. Click it.
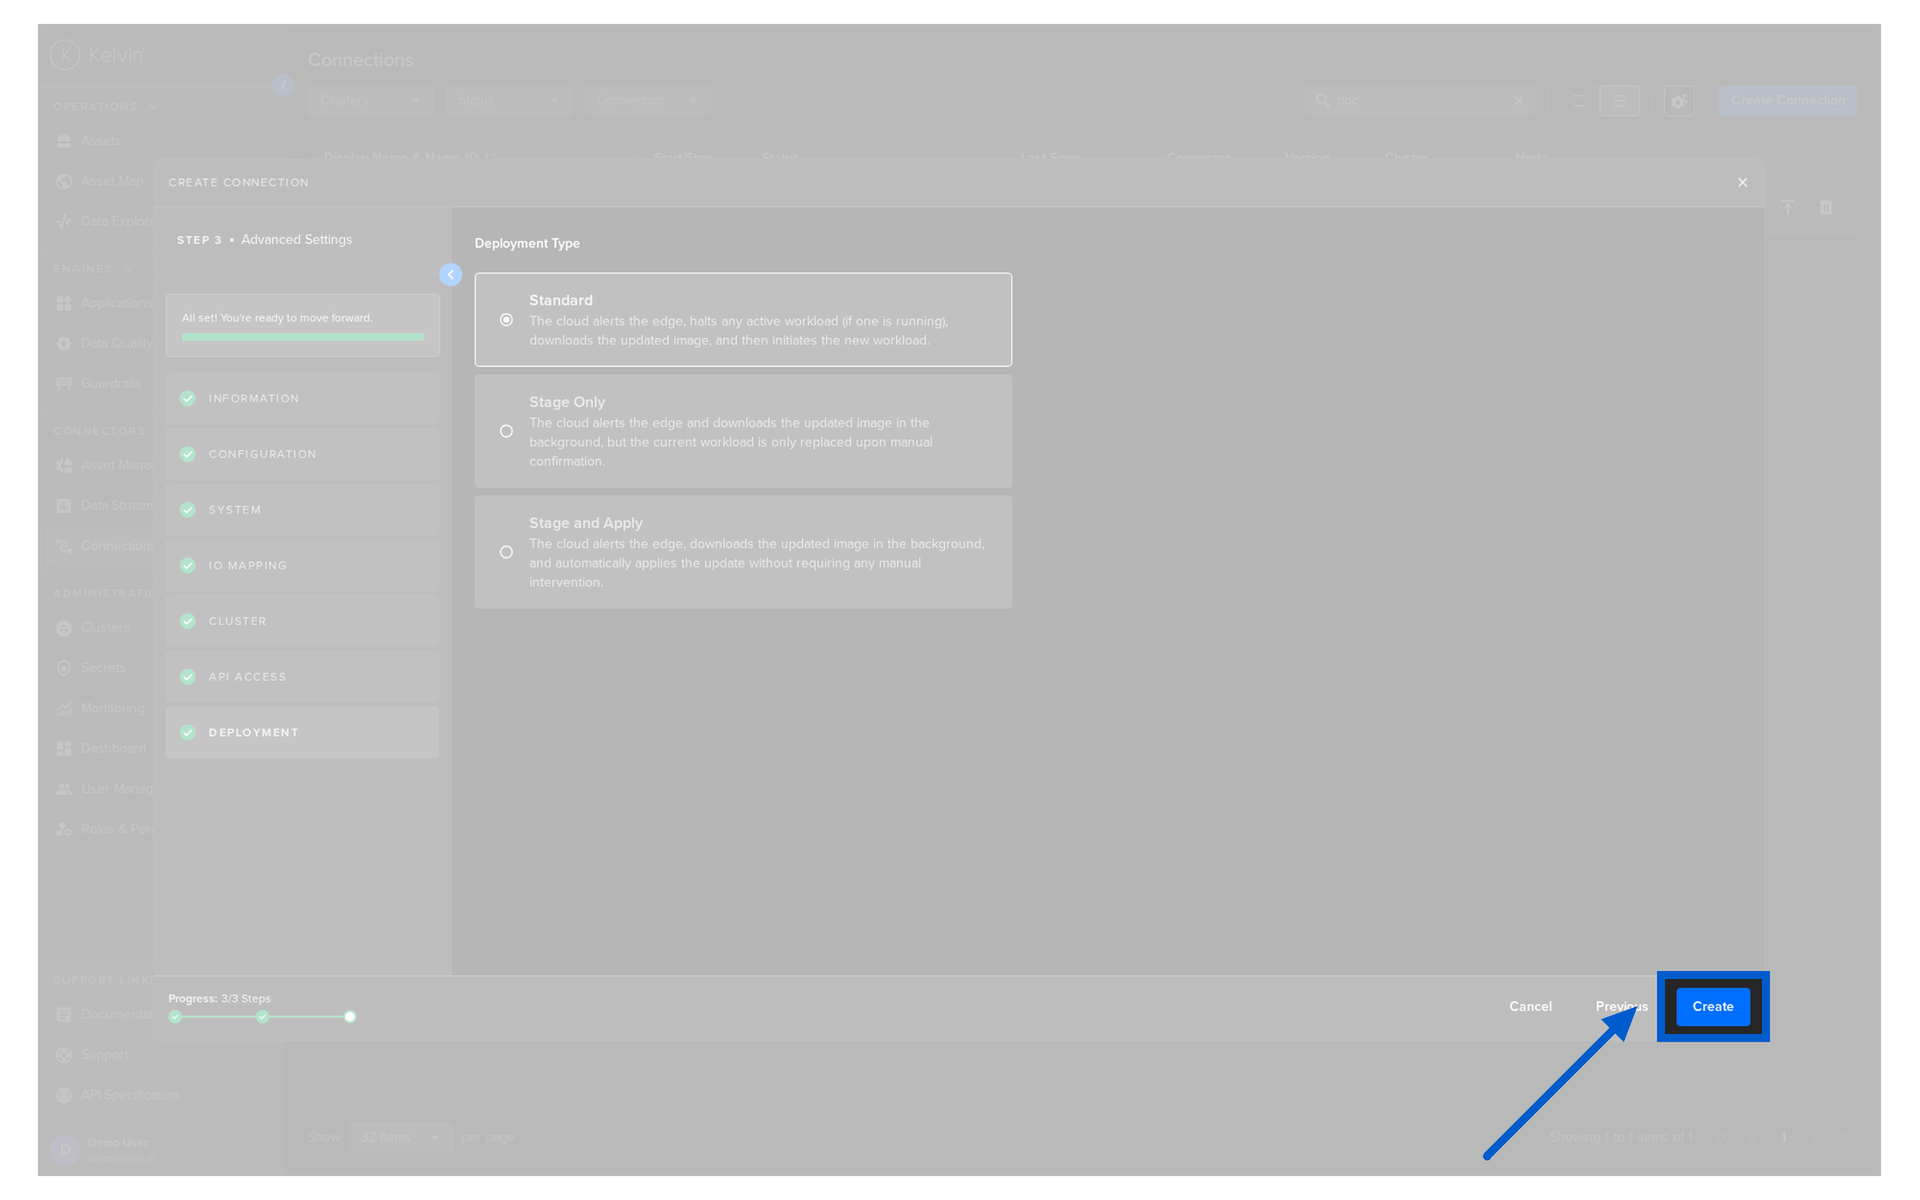
The connection will appear in your Connections list. Its status will move through:
- Pending — created, waiting to deploy
- Deploying — being installed on the edge node
- Running — active and collecting data
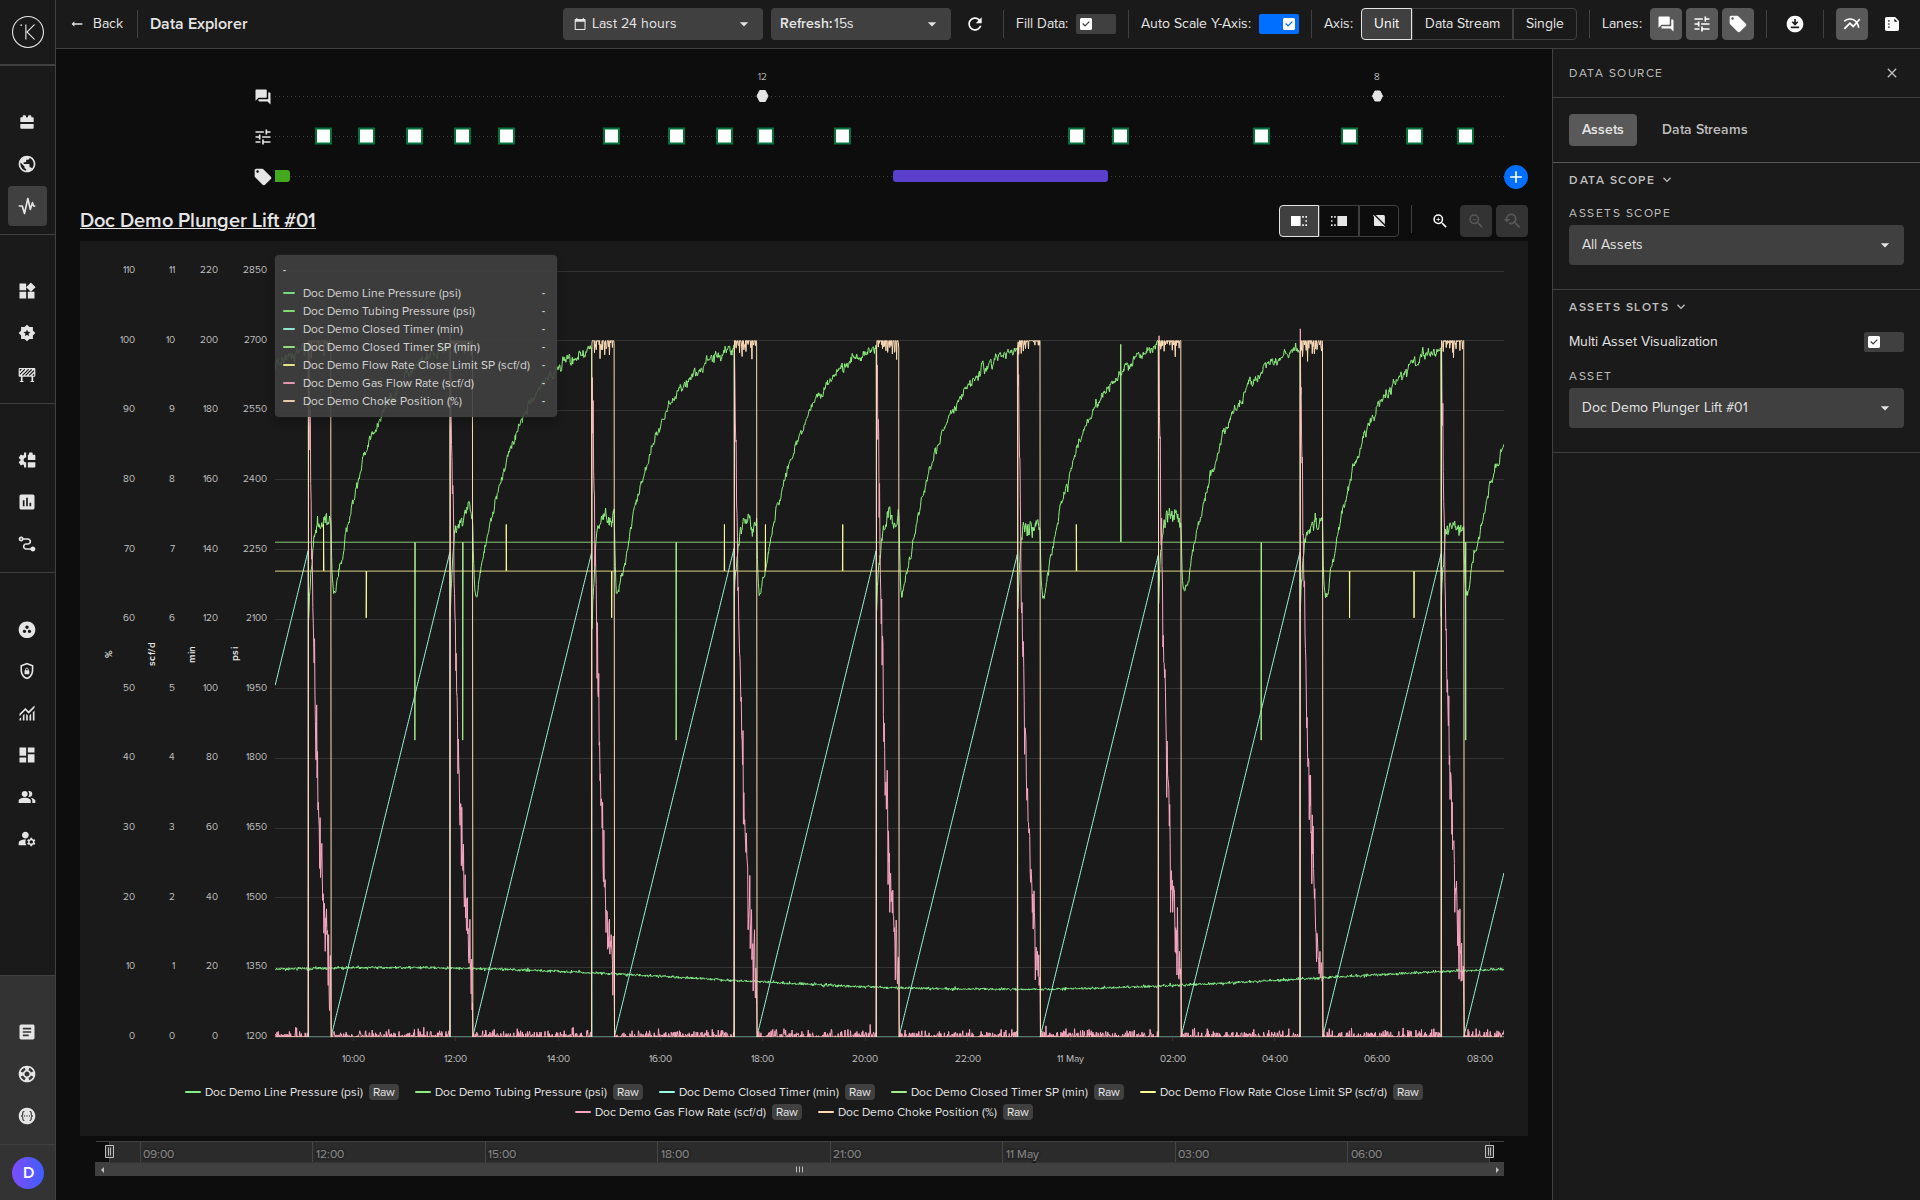
After a few minutes, your connection is live. You can verify it is working by navigating to the Data Explorer and selecting your assets and data streams to view the live data.
Managing Your Connections
Once a connection is running, you have four management actions available.
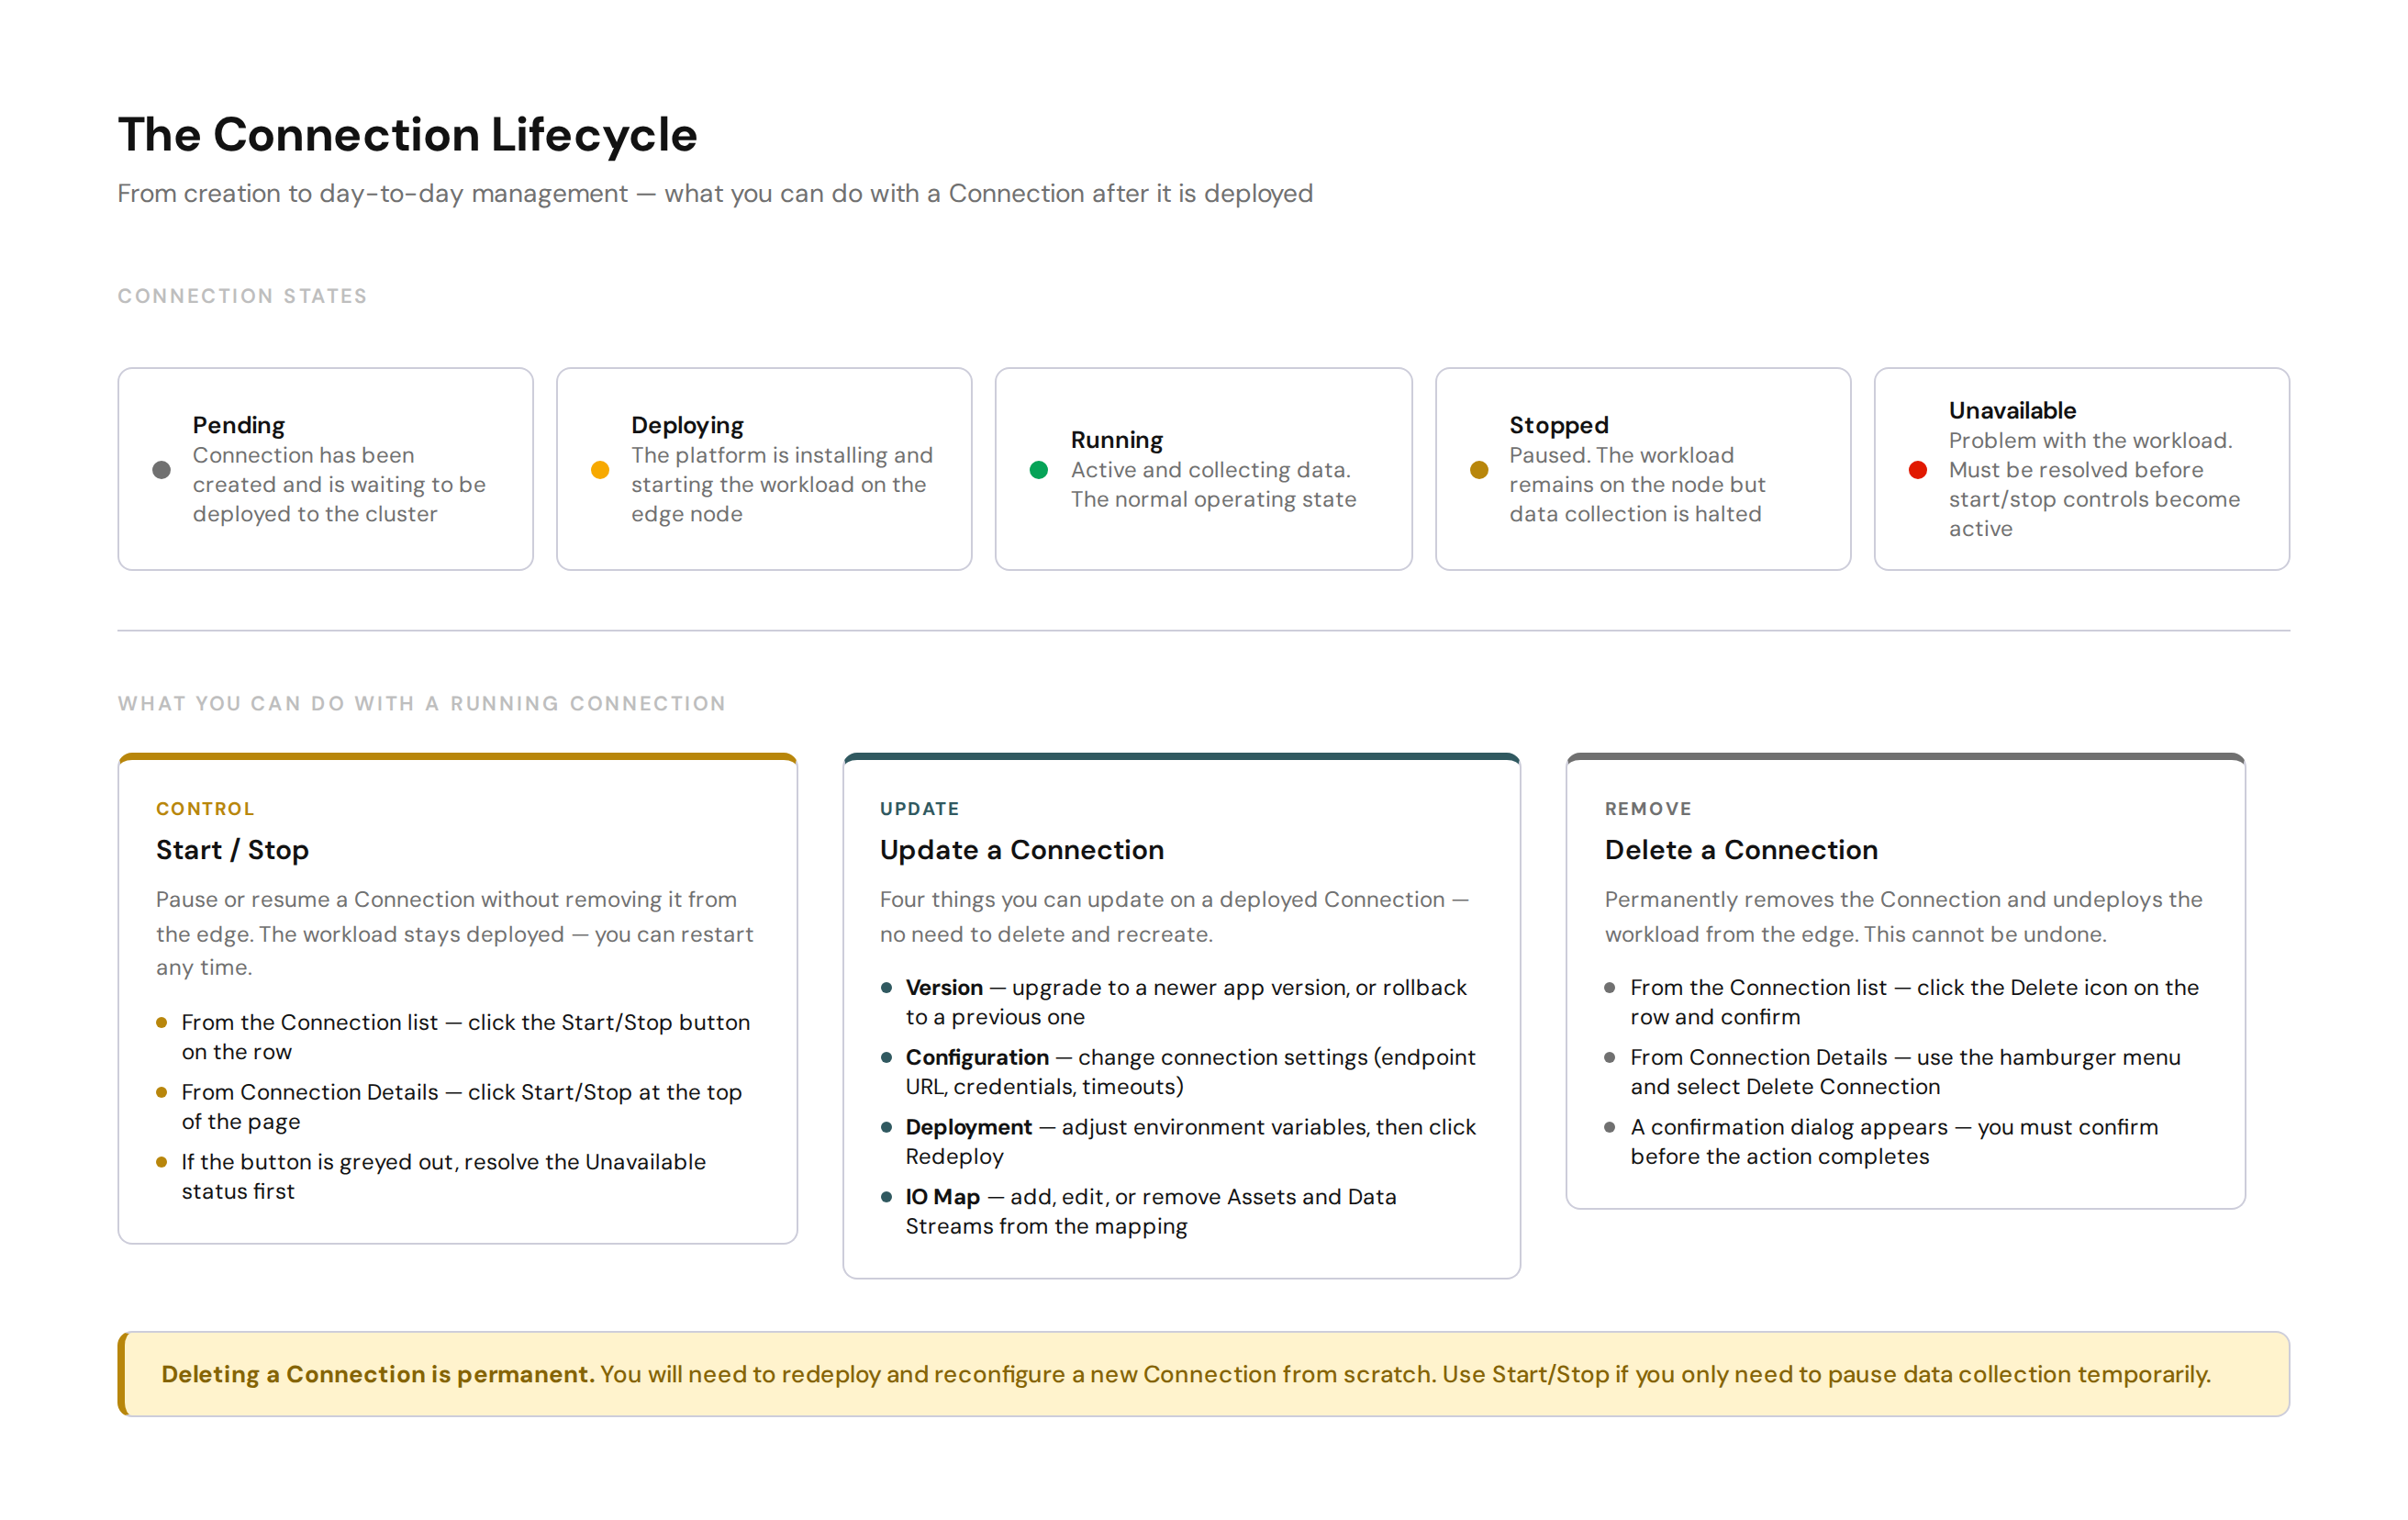
Starting and Stopping
You can pause a connection without removing it from the edge. The workload stays deployed on the node — you can restart it at any time without redeploying.
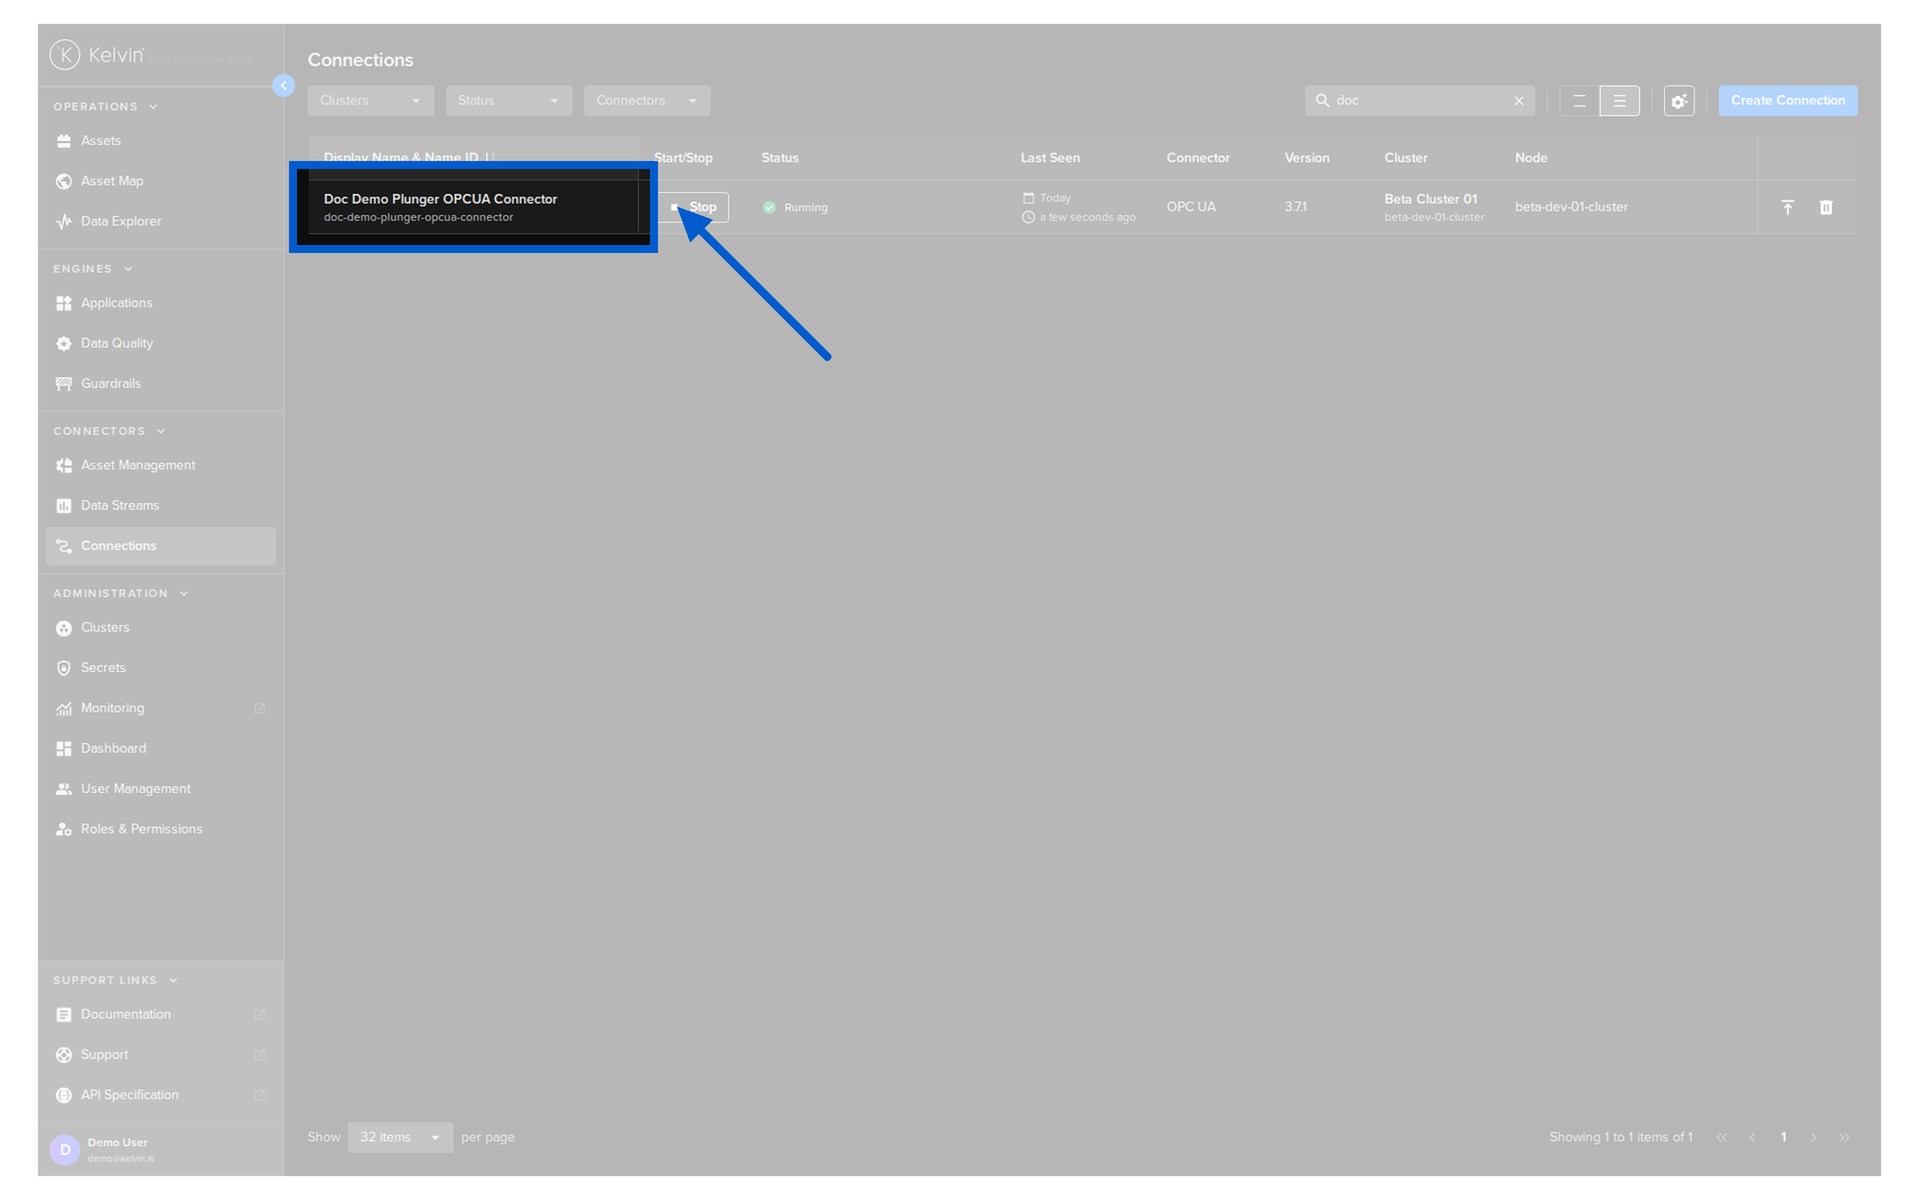
From the Connection list:
Go to Connections. Click the Start/Stop button on the relevant row.
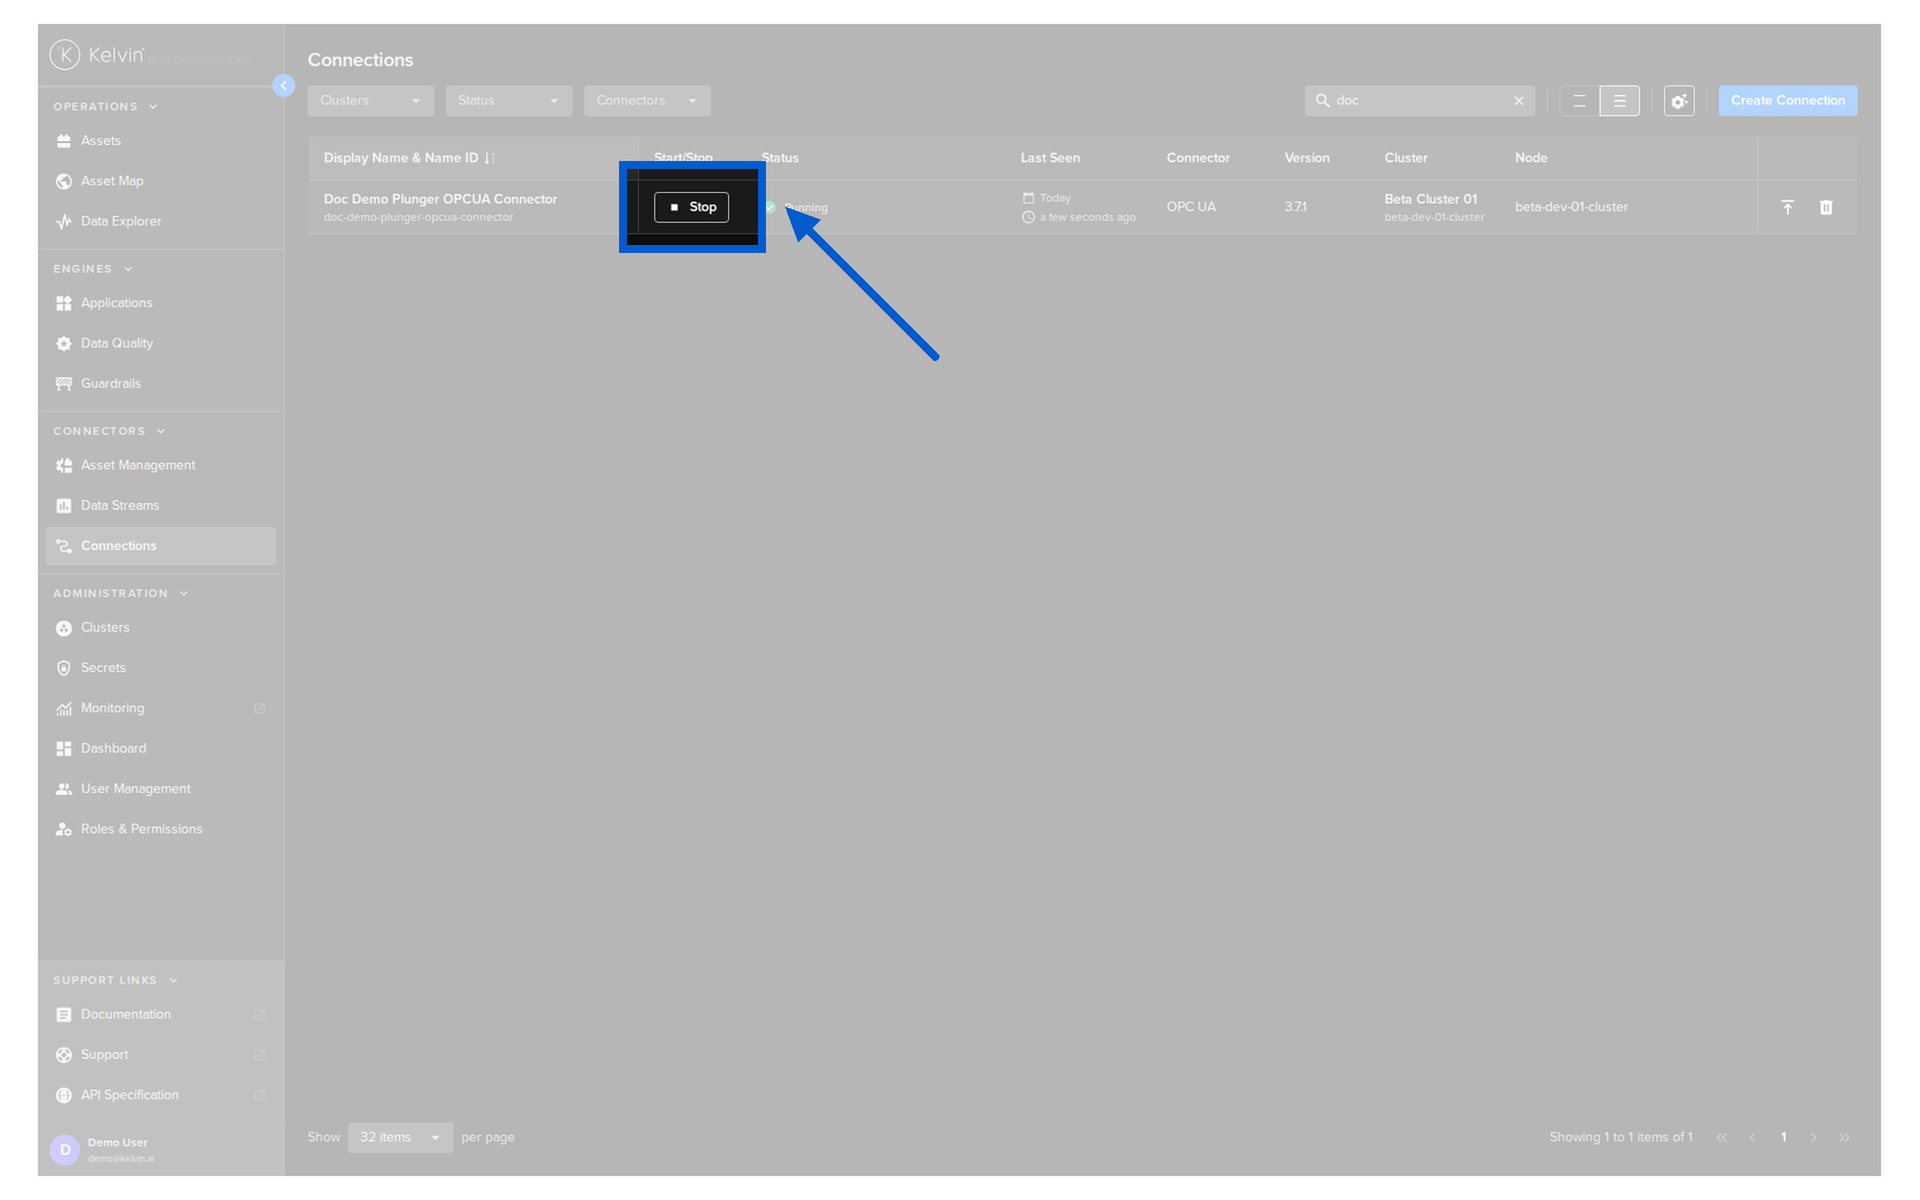
From Connection Details:
Click on the connection name to open its detail page. Click the Start/Stop button at the top.
For Operations
If the Start/Stop button is greyed out, the connection status is Unavailable. You need to resolve the underlying workload issue before you can control it.
Updating a Connection
You do not need to delete and recreate a connection to make changes. Four things can be updated on a deployed connection:
Update the version:
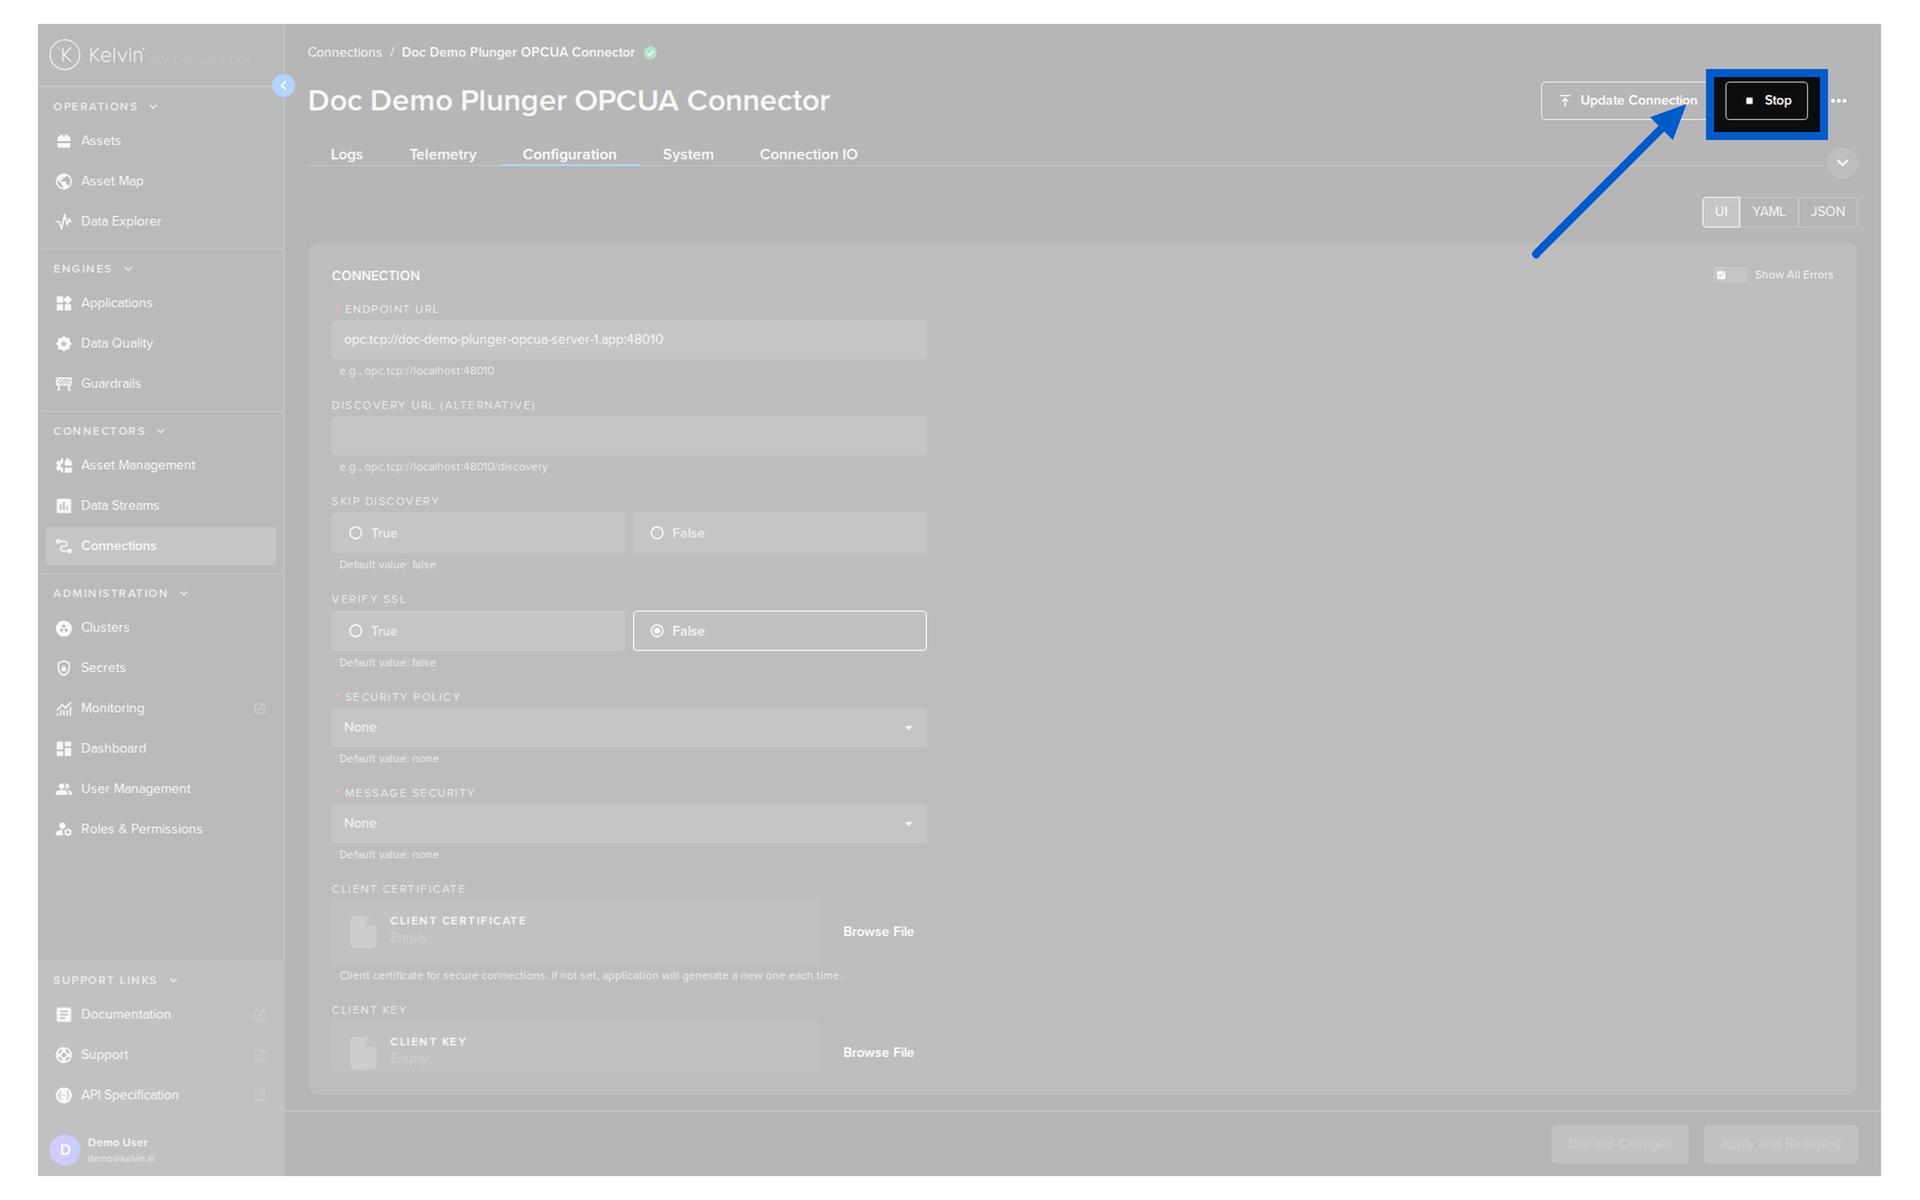
Go to Connections. Click the upgrade icon on the row, or click the connection name and use the Update Connection button. Select the new version from the list.
![]()
Pro Tip
You can also roll back to a previous version if the current version has problems. Version history is kept in the platform.
Update the configuration:
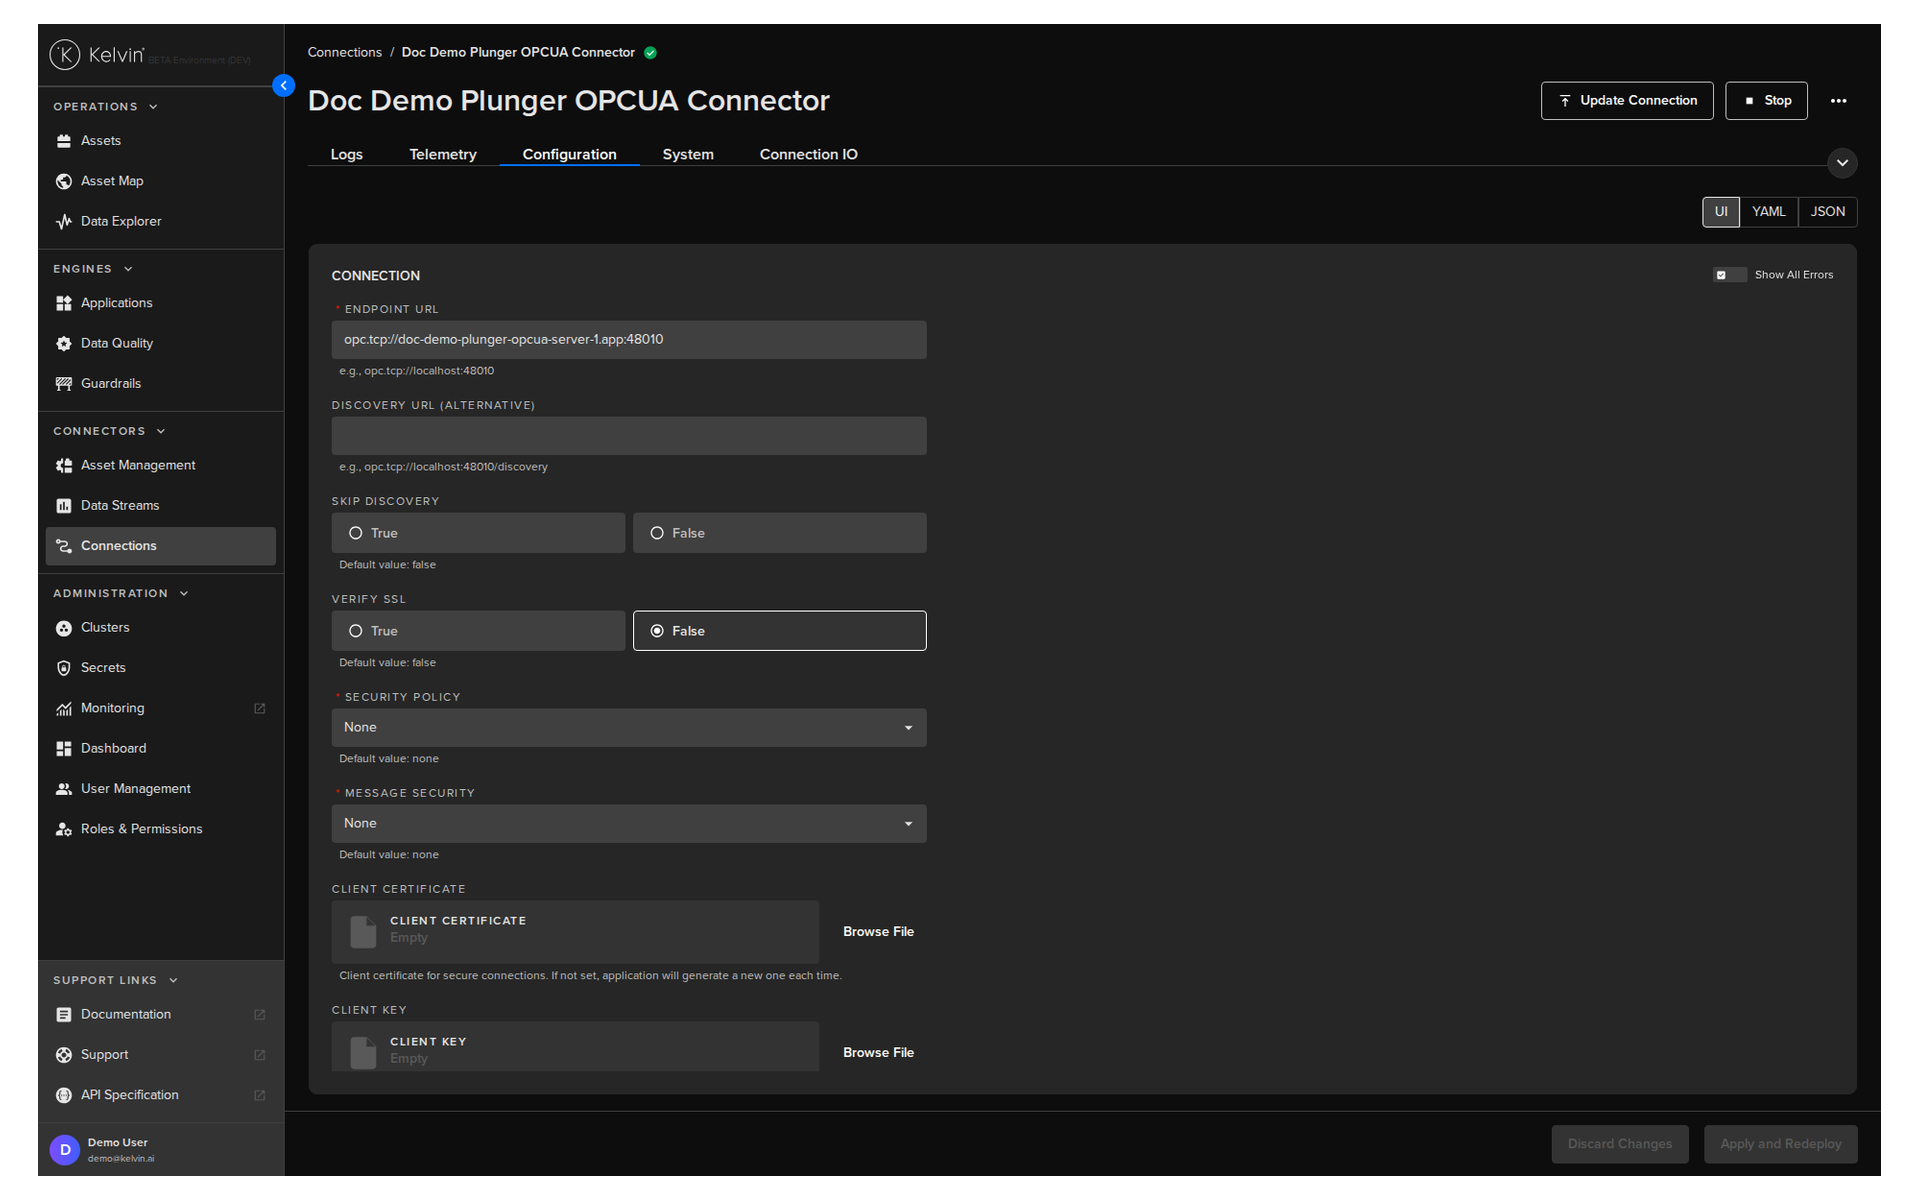
Click the connection name. Go to the Configuration tab. Edit the settings in the UI, YAML, or JSON view. Click Apply and Redeploy when ready.

Update the deployment:
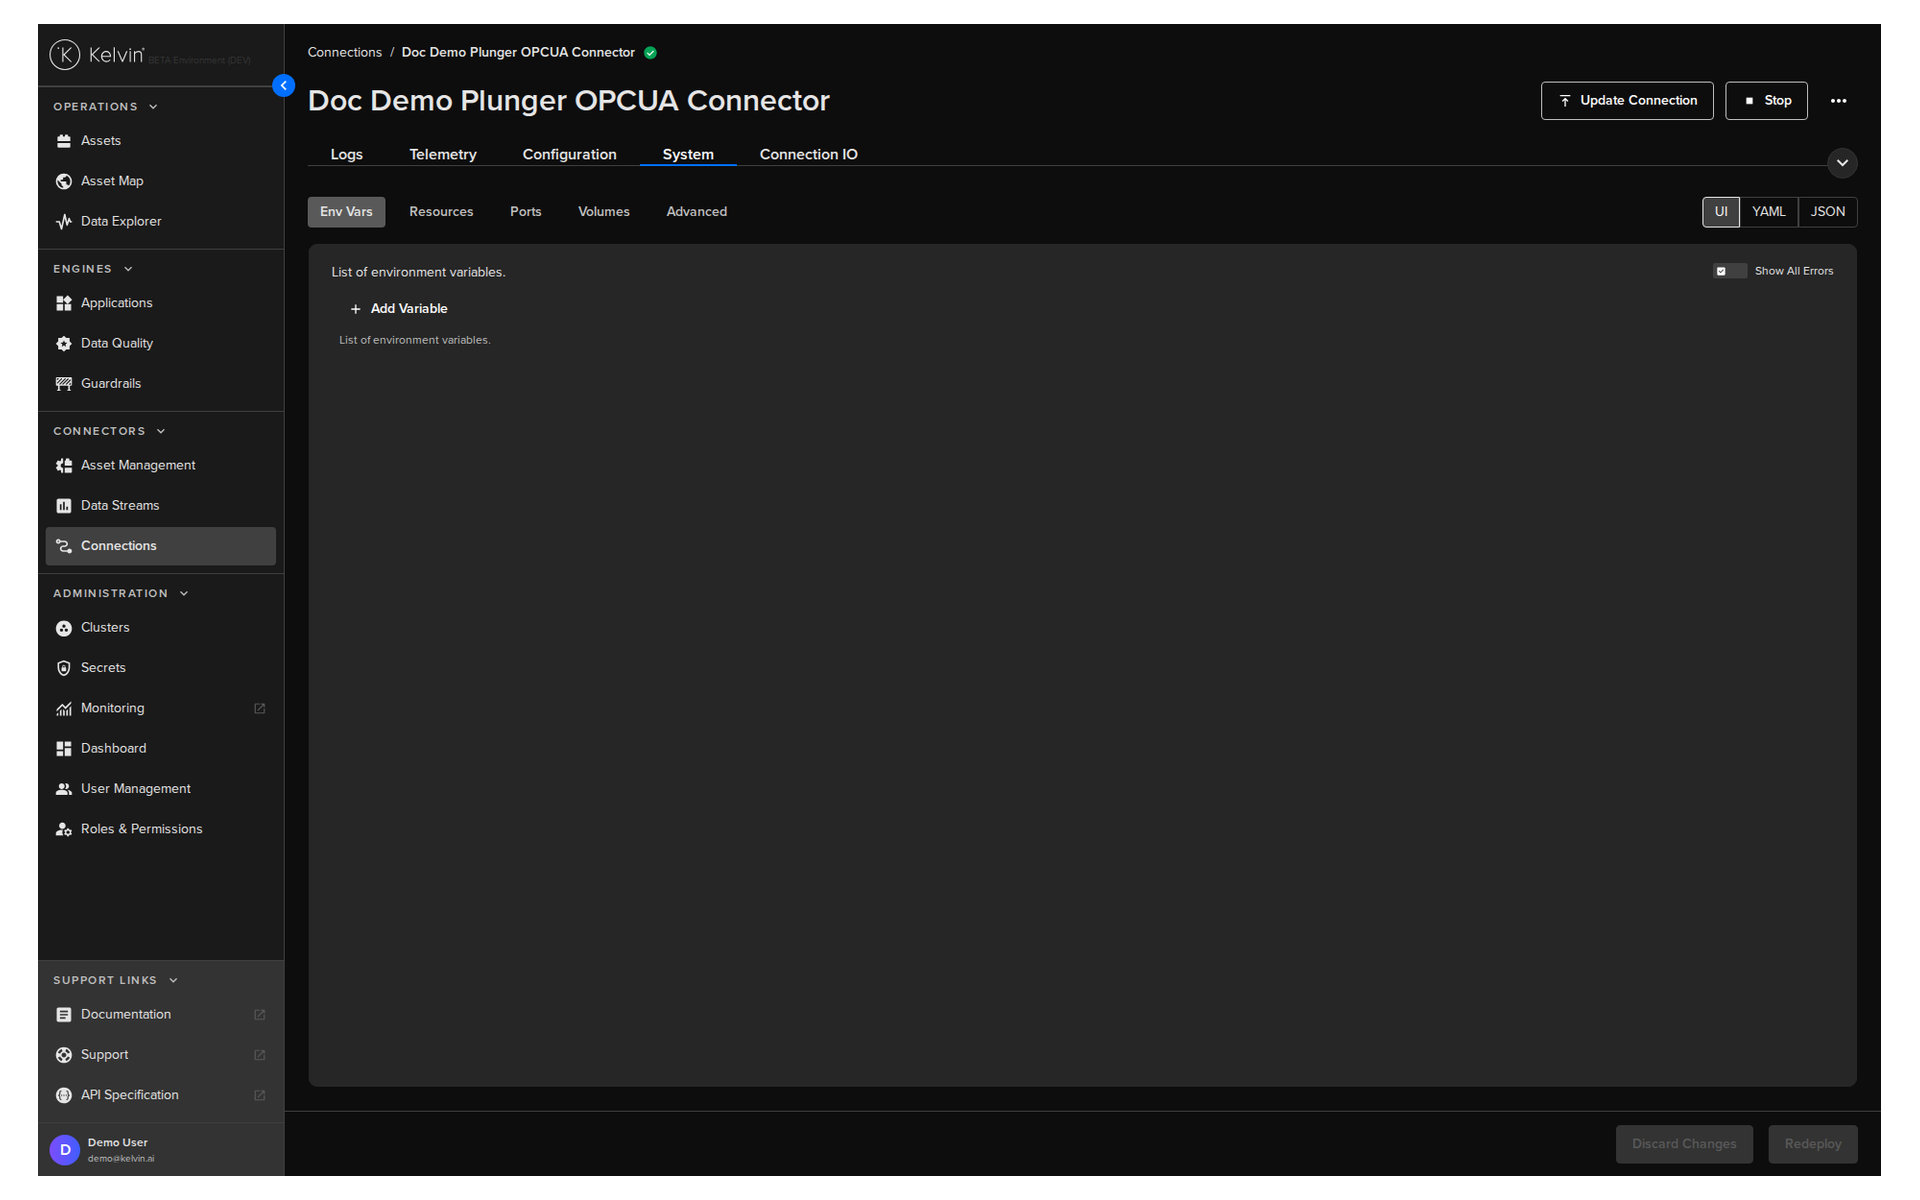
Click the connection name. Go to the System tab. Adjust environment variables as needed. Click Redeploy.
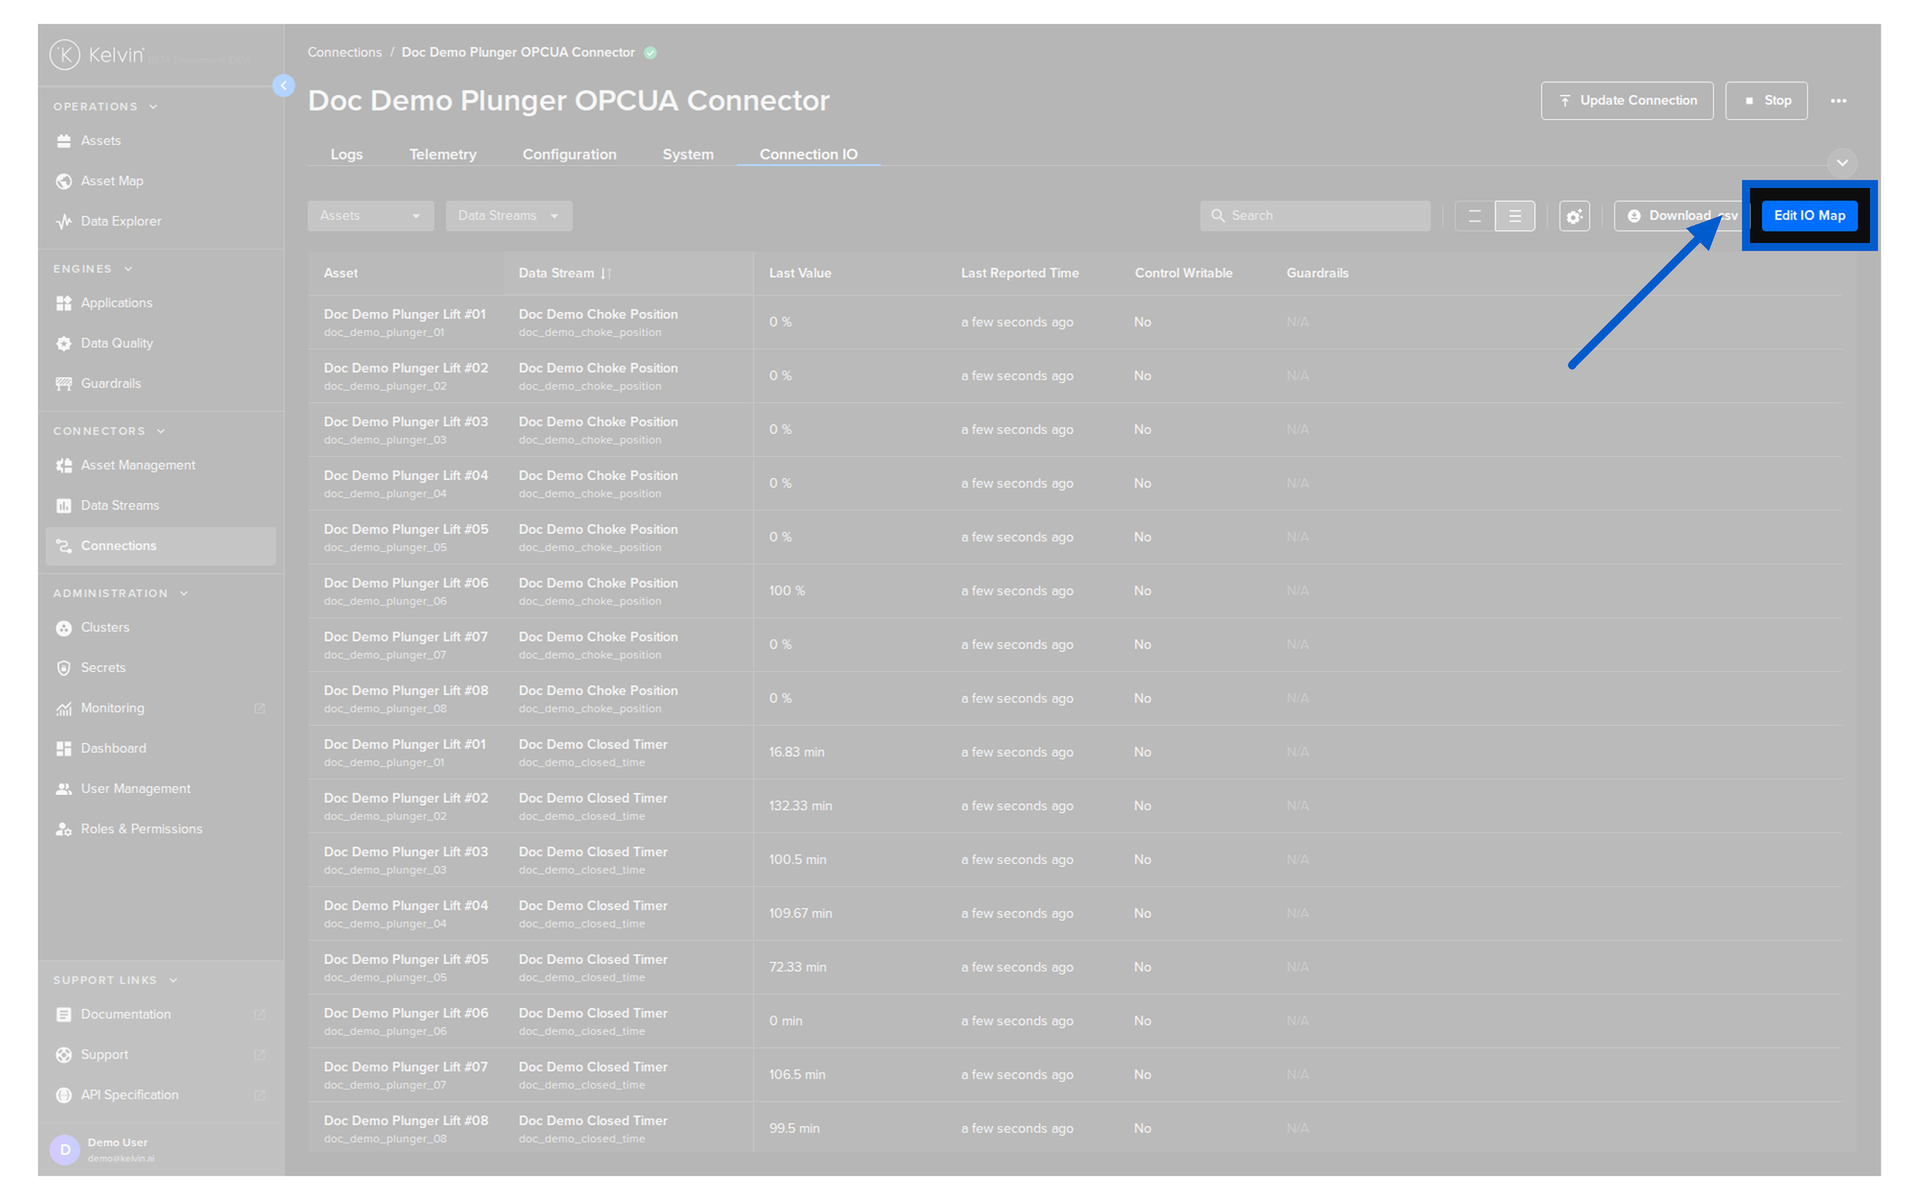
Update the IO Map:
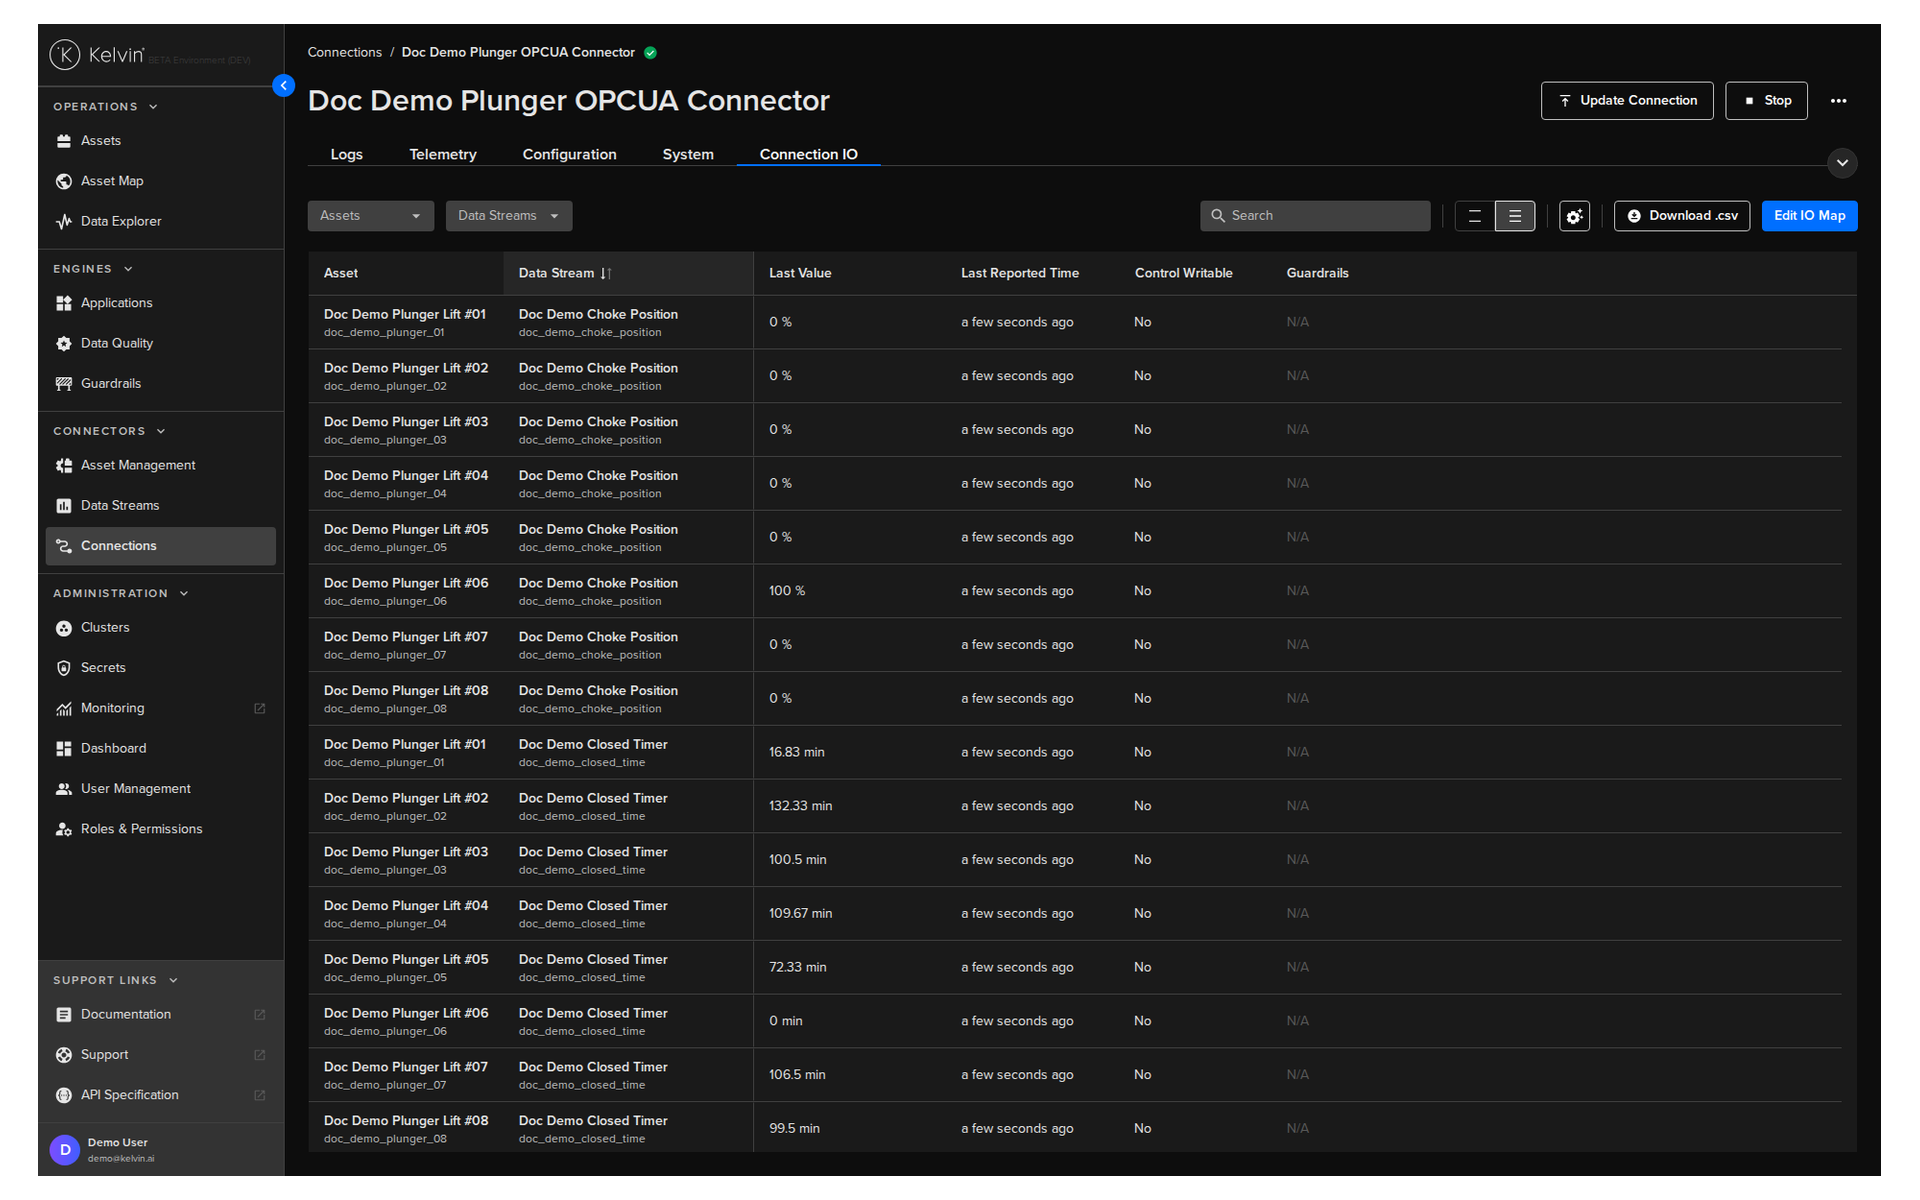
Click the connection name. Go to the Connection IO tab. Click Edit IO Map. Add, edit, or remove assets and data stream mappings. Click Save.
Deleting a Connection
Deleting a connection is permanent. It removes the workload from the edge entirely. You cannot undo this.
From the Connection list:
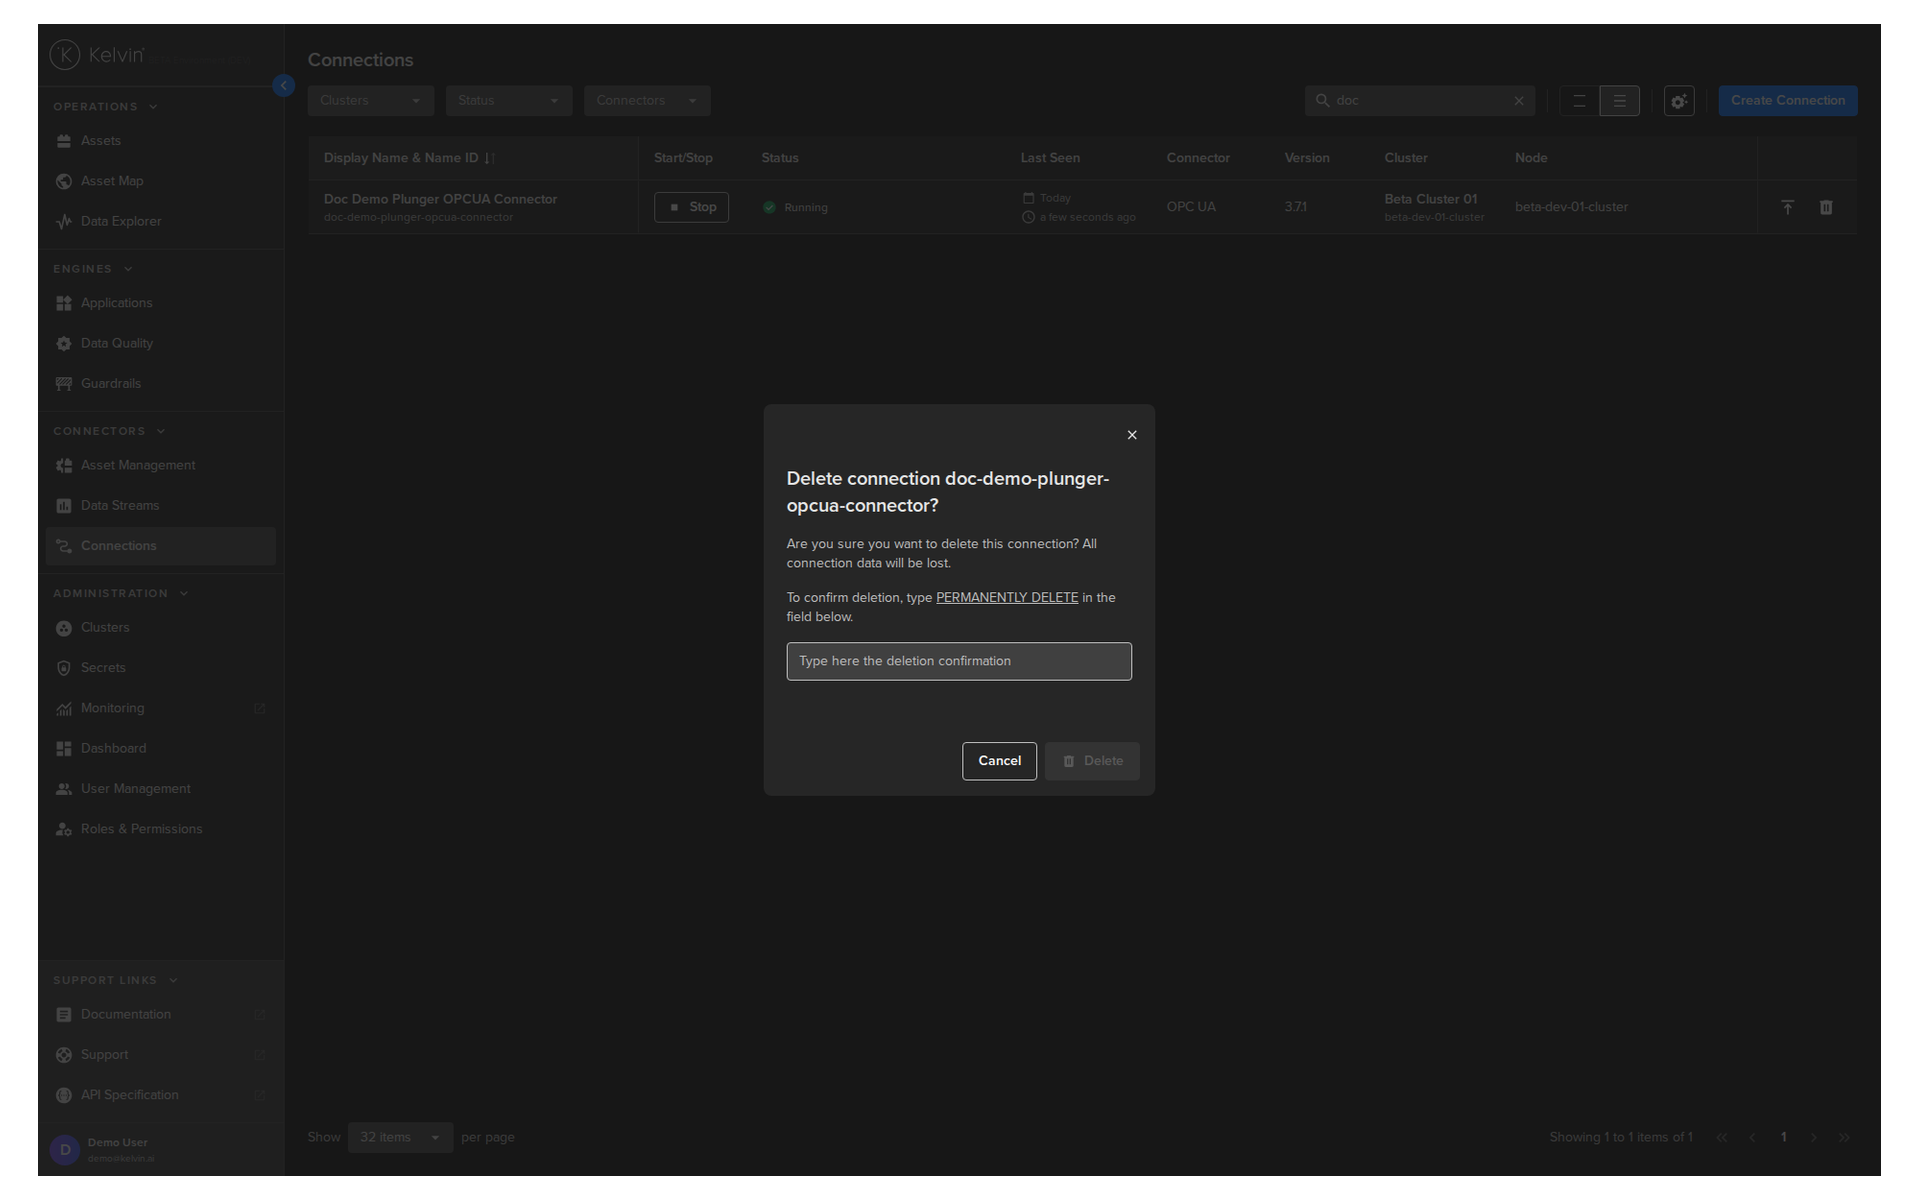
Go to Connections. Click the Delete icon on the relevant row. Follow the confirmation prompt.
![]()
From Connection Details:
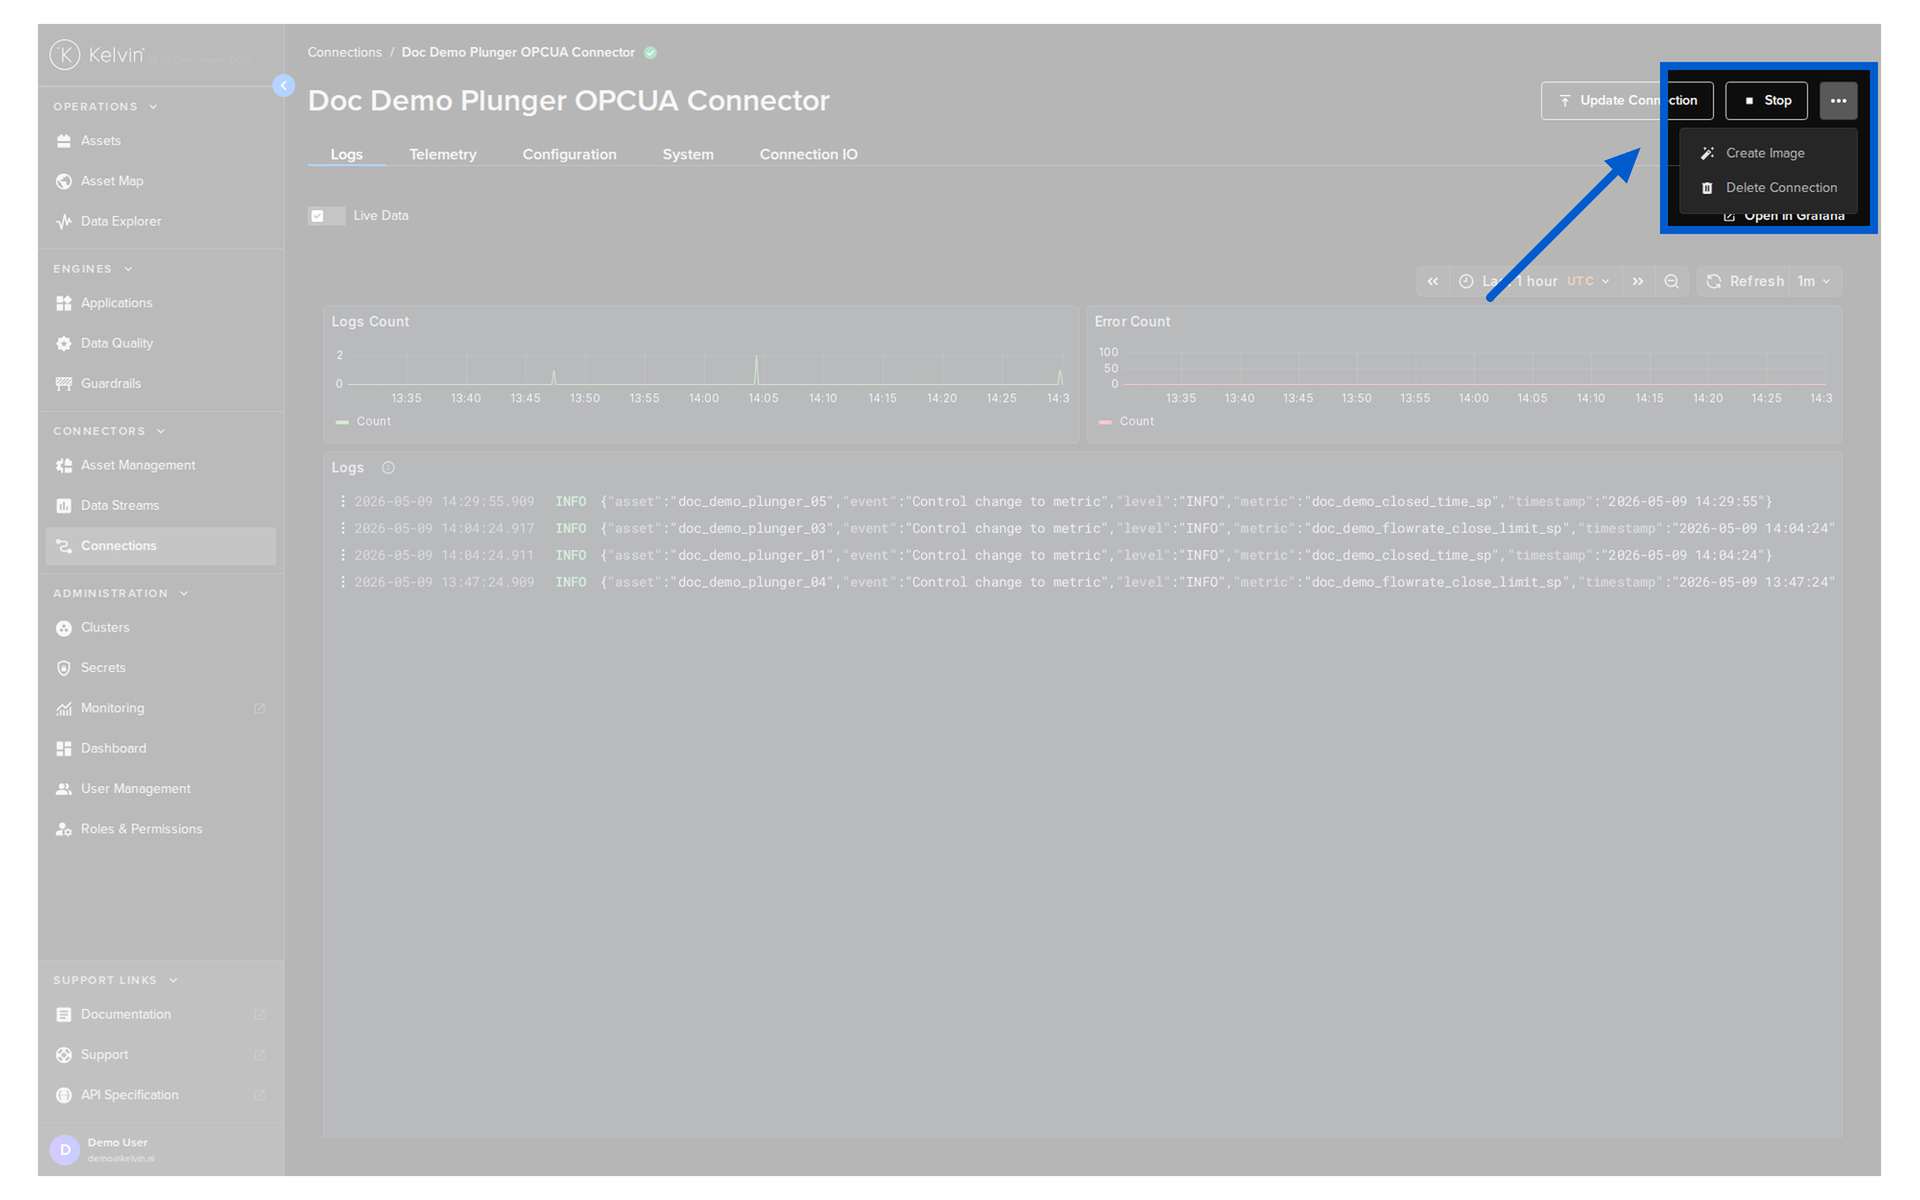
Click the connection name. Click the hamburger menu at the top right. Select Delete Connection. Confirm.
Warning
Only delete a connection if you no longer need it. If you need to pause data collection temporarily, use Stop instead. Stopping preserves the full configuration — deleting loses it permanently.
Building a Custom Connection
The built-in OPC UA, Modbus, and Emerson ROC connectors cover most industrial use cases. But if your asset uses a different protocol — or you need to pull data from an API, database, or other custom source — you can build a custom connection using the Kelvin SDK.
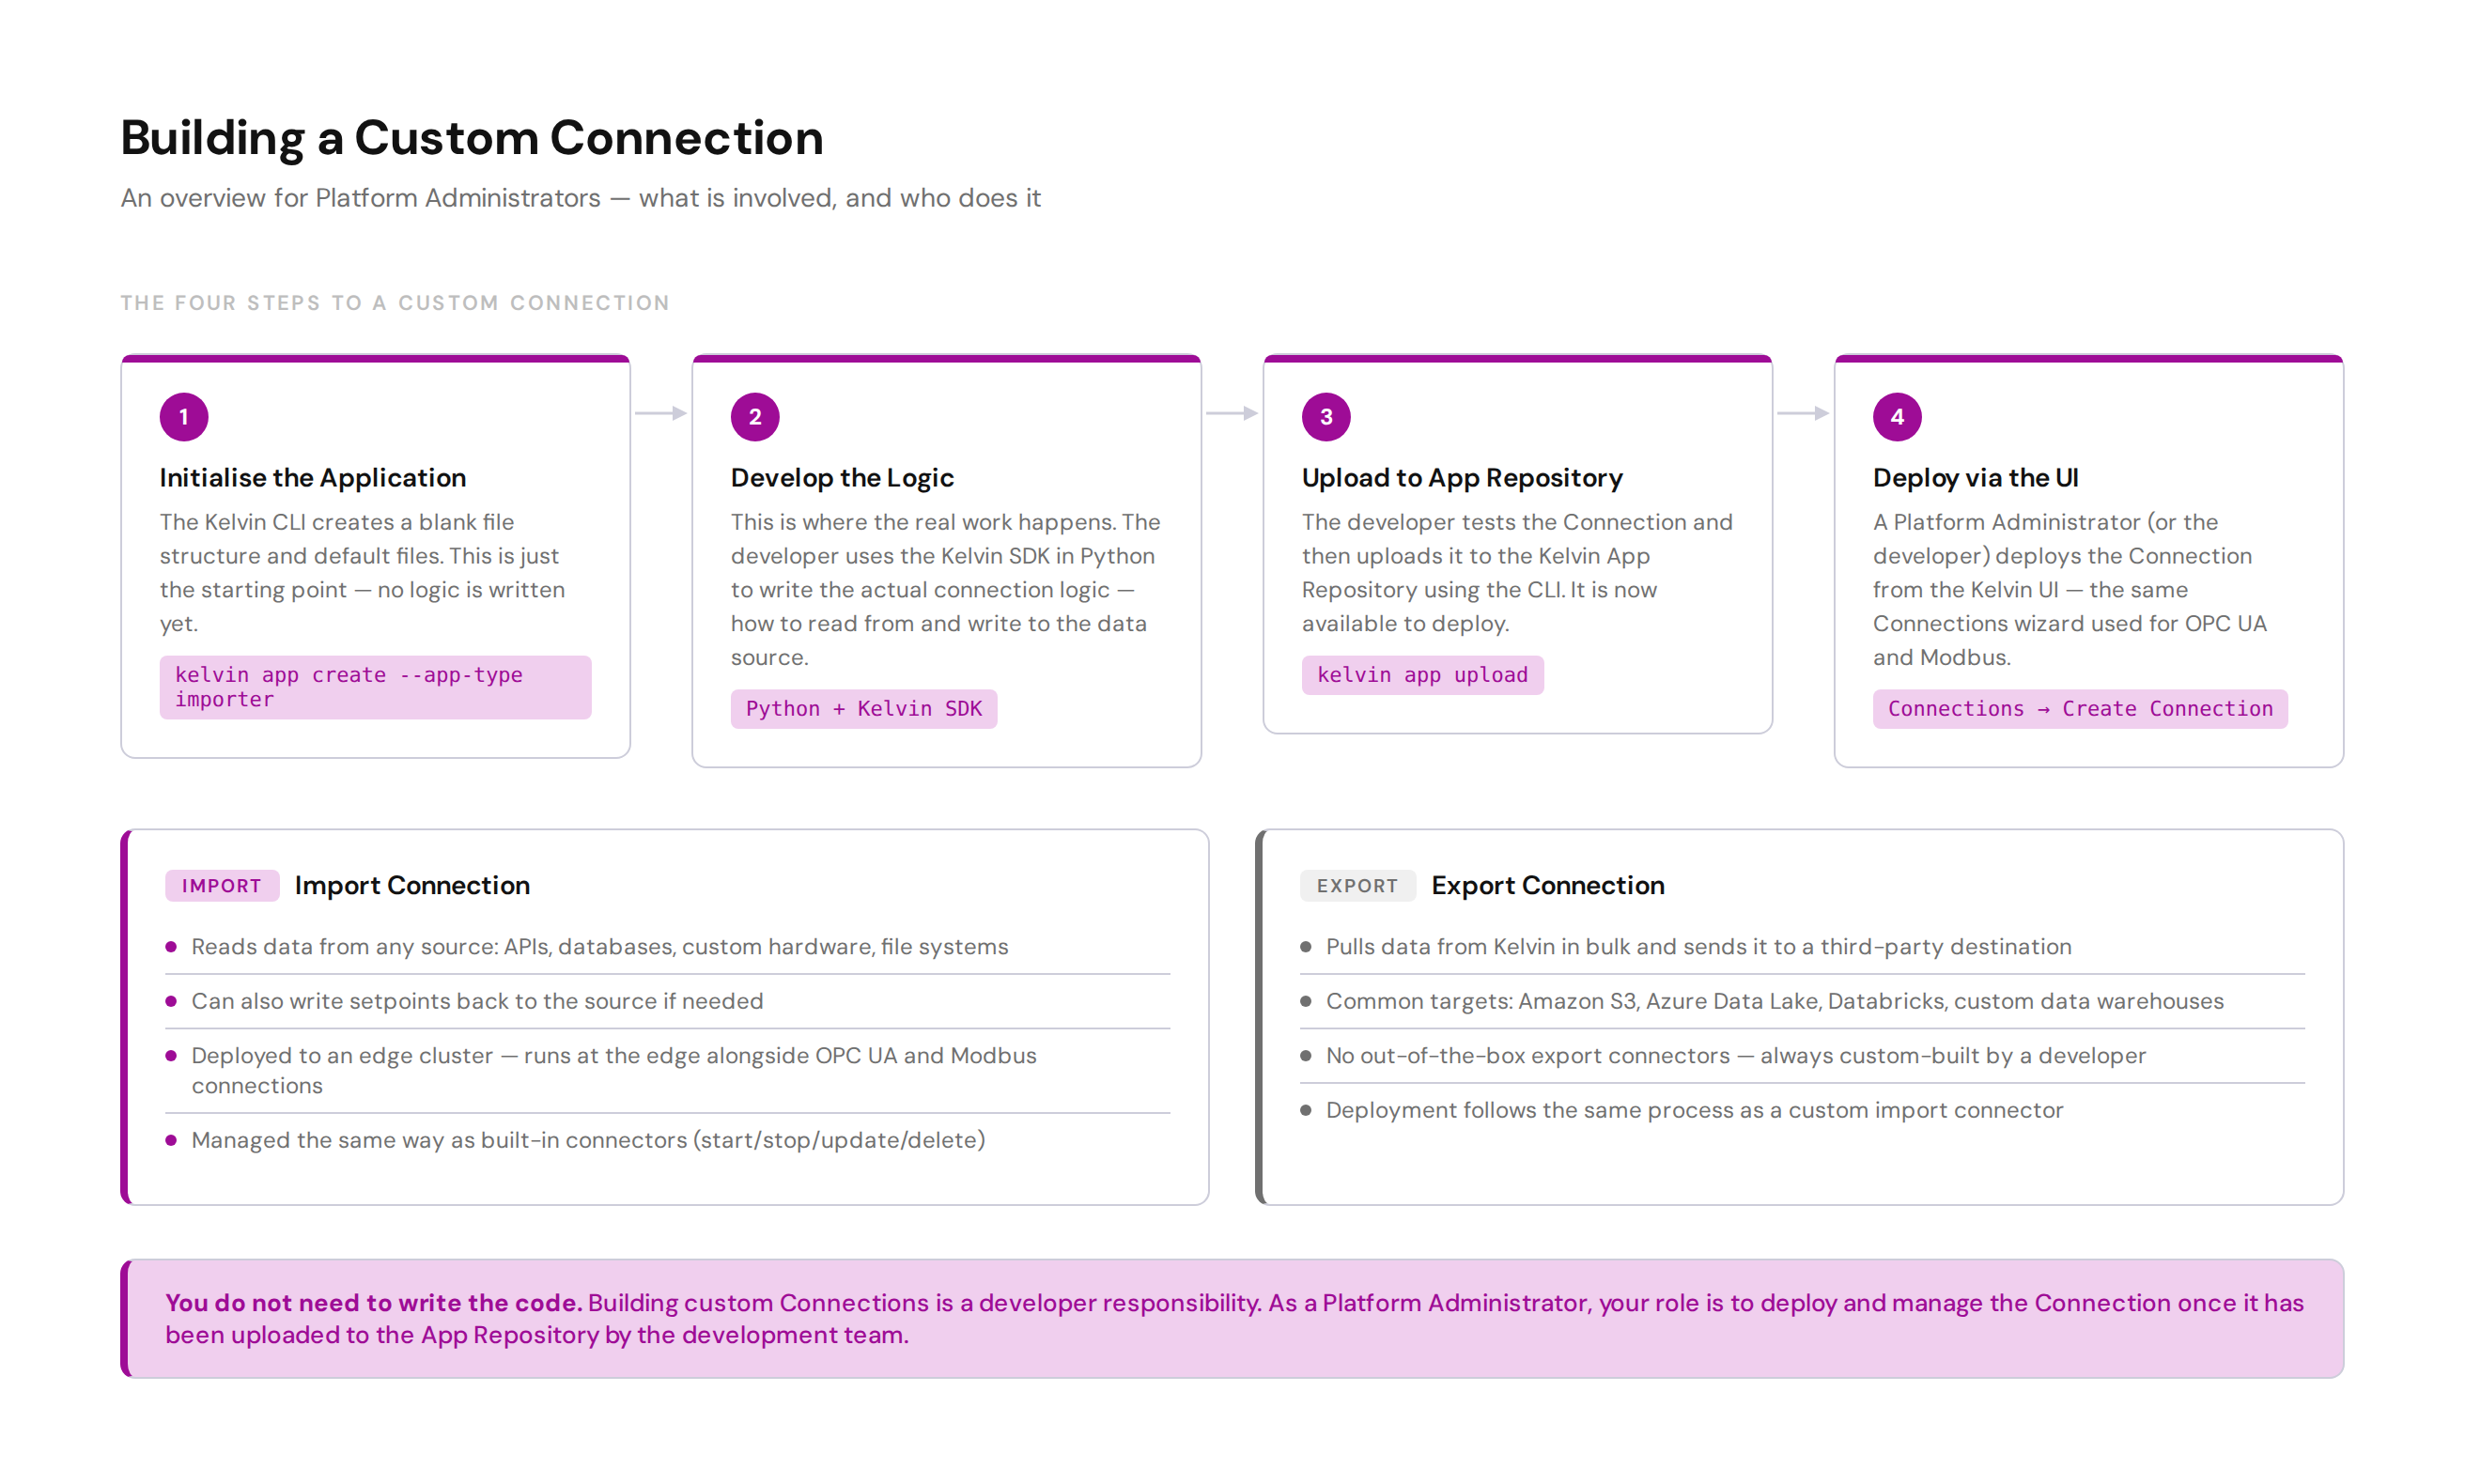
Building a custom connection is a developer task. As a Platform Administrator, you do not need to write the code. Your responsibility starts once the developer has uploaded the connection to the App Repository.
The four stages for a developer building a custom connection:
| Stage | Tool | What happens |
|---|---|---|
| 1. Initialise | Kelvin CLI | Creates the blank app file structure and default files: kelvin app create --app-type importer |
| 2. Develop | Python + Kelvin SDK | The real work. Developer writes the connection logic using the Kelvin SDK — how to read/write data from the source |
| 3. Upload | Kelvin CLI | Test the app, then upload to the App Repository: kelvin app upload |
| 4. Deploy | Kelvin UI | Deploy from Connections → Create Connection, same as a built-in connector |
Once a custom connection is deployed, you manage it exactly the same way as any other connection — start, stop, update, and delete all work identically.
For full developer documentation:
- Create an Import Connection
- Create an Export Connection
- Deploy an Import Connection
- Deploy an Export Connection
A Brief Note on Export Connections
Export Connections take data that is already stored in Kelvin and push it to a third-party system for further processing. They are always custom-built by a developer — there are no out-of-the-box export connectors.
The most common use is sending data to platforms like Databricks for ML model training and advanced analytics, or to cloud storage like Amazon S3 or Azure Data Lake for long-term archiving.
Export Connections are a developer responsibility. Once built and uploaded to the App Repository, you deploy and manage them the same way as import connections.
What Comes Next: Data Quality and Guardrails
Getting data into Kelvin is only the first step. The next question is: can you trust the data?
Course 274 covers Asset Data Assurance — how to configure data quality rules and guardrails that protect your platform from bad data and runaway control changes.
A few things to look forward to in Course 274:
- Setting data quality metrics per data stream
- Defining guardrail rules to catch out-of-range values
- Using static value thresholds and dynamic data stream thresholds
- Understanding what happens when a guardrail rule is breached
Quick Reference
| I want to... | How |
|---|---|
| Create a new OPC UA connection | Connections → Create Connection → Import Data and Control Setpoints → OPC UA |
| Pause a connection temporarily | Connections list → Start/Stop button |
| Change a connection's endpoint URL | Click connection name → Configuration tab → Edit → Apply and Redeploy |
| Add more assets to an existing connection | Click connection name → Connection IO tab → Edit IO Map → Add → Save |
| Upgrade to a new connector version | Connections list → Upgrade icon, or click name → Update Connection |
| Temporarily roll back to an older version | Click connection name → Update Connection → select older version |
| Delete a connection | Connections list → Delete icon, or click name → hamburger menu → Delete Connection |
| View live data from a connection | Data Explorer → select Asset → select Data Stream |
| Deploy a custom connection built by a developer | Connections → Create Connection (same as built-in, after upload to App Repository) |
Quick Quiz
Quiz 1: What is the primary job of an Import Connection?
Answer: An Import Connection is the live communication link between Kelvin and your physical assets — like a SCADA system talking to a PLC. It continuously reads data from the asset and feeds it into Kelvin as Asset and Data Stream values. It can also write data back to the asset — for example, sending a setpoint change approved through a SmartApp recommendation.
Quiz 2: You need to pause data collection on a connection for planned maintenance. What should you use: Stop or Delete?
Answer: Use Stop. Stopping a connection pauses data collection without removing the workload from the edge. You can restart at any time without reconfiguring anything. Deleting is permanent and cannot be undone.
Quiz 3: What are the four things you configure in the IO Mapping section when setting up an OPC UA connection?
Answer: For each data point you map, you configure: the Asset name, the Data Stream name, the Node ID (the OPC UA address on the physical asset), the Polling Rate (in seconds), the Storage location (node, or node and cloud), and the Control Writable setting (RO or RW).
Quiz 4: You have added 200 new data streams to an existing connection. What is the fastest way to update the IO Mapping?
Answer: Use the Download CSV option in the IO Mapping section. Export the existing mappings, add the new rows in Excel or Google Sheets, and upload the completed file. This avoids having to add each row individually through the UI.
Quiz 5: What does Read/Write (RW) mean on a data stream, and why would you set it?
Answer: Read/Write means Kelvin can both read the value from the asset and send a new value back to the asset through the Connection. You set a data stream to RW on any data point where a SmartApp needs to be able to control a value on the physical asset — for example, changing a target pressure or a flow setpoint. Data streams that are for monitoring only should be set to Read Only (RO) to prevent accidental writes.
Quiz 6: Which of the following protocols is NOT available as a built-in connector in Kelvin: OPC UA, Modbus, MQTT, or Emerson ROC?
Answer: MQTT does not have a built-in out-of-the-box connector in Kelvin. OPC UA, Modbus TCP/RTU, and Emerson ROC are all available as built-in connectors. An MQTT connection would need to be built as a custom connector by a developer using the Kelvin SDK.
Quiz 7: A developer on your team has built a custom connection and uploaded it to the App Repository. What is your next step as Platform Administrator?
Answer: Deploy the custom connection from the Kelvin UI using the same Connections → Create Connection wizard used for built-in connectors. Once deployed, you manage it — start, stop, update, delete — exactly the same way as any other connection.
Summary
A Connection is the bridge between your physical assets and the Kelvin Platform. Import Connections communicate with your assets — reading live data from them and writing commands or setpoints back, just like SCADA talks to a PLC. Export Connections push data from Kelvin outward to third-party systems like Databricks or data lakes for further processing.
The key things to remember:
- Kelvin ships with built-in connectors for OPC UA, Modbus TCP/RTU, and Emerson ROC. Use these for standard industrial assets.
- When creating a connection, the four key things to configure are: Information (name), Configuration (protocol settings), IO Mapping (which data points map to which Kelvin assets and data streams), and Cluster (where to deploy).
- For large IO Maps, use the CSV download/upload feature to save time.
- Once deployed, you can start/stop, update, or delete a connection. Stop is temporary — delete is permanent.
- You can update a connection's version, configuration, deployment settings, and IO map without deleting and recreating it.
- Custom connections are built by developers using the Kelvin SDK, but deployed and managed by Platform Administrators in the same way as built-in connectors.
- Course 274 covers the next step: data quality rules and guardrails to ensure the data coming in from your connections is trustworthy.
For full documentation, visit:
- Connectors Concept
- Connect to Data Quick Start
- Update a Connection
- Start/Stop a Connection
- Delete a Connection
- Develop Custom Connections
Good luck and Happy Learning !