Testing with generator
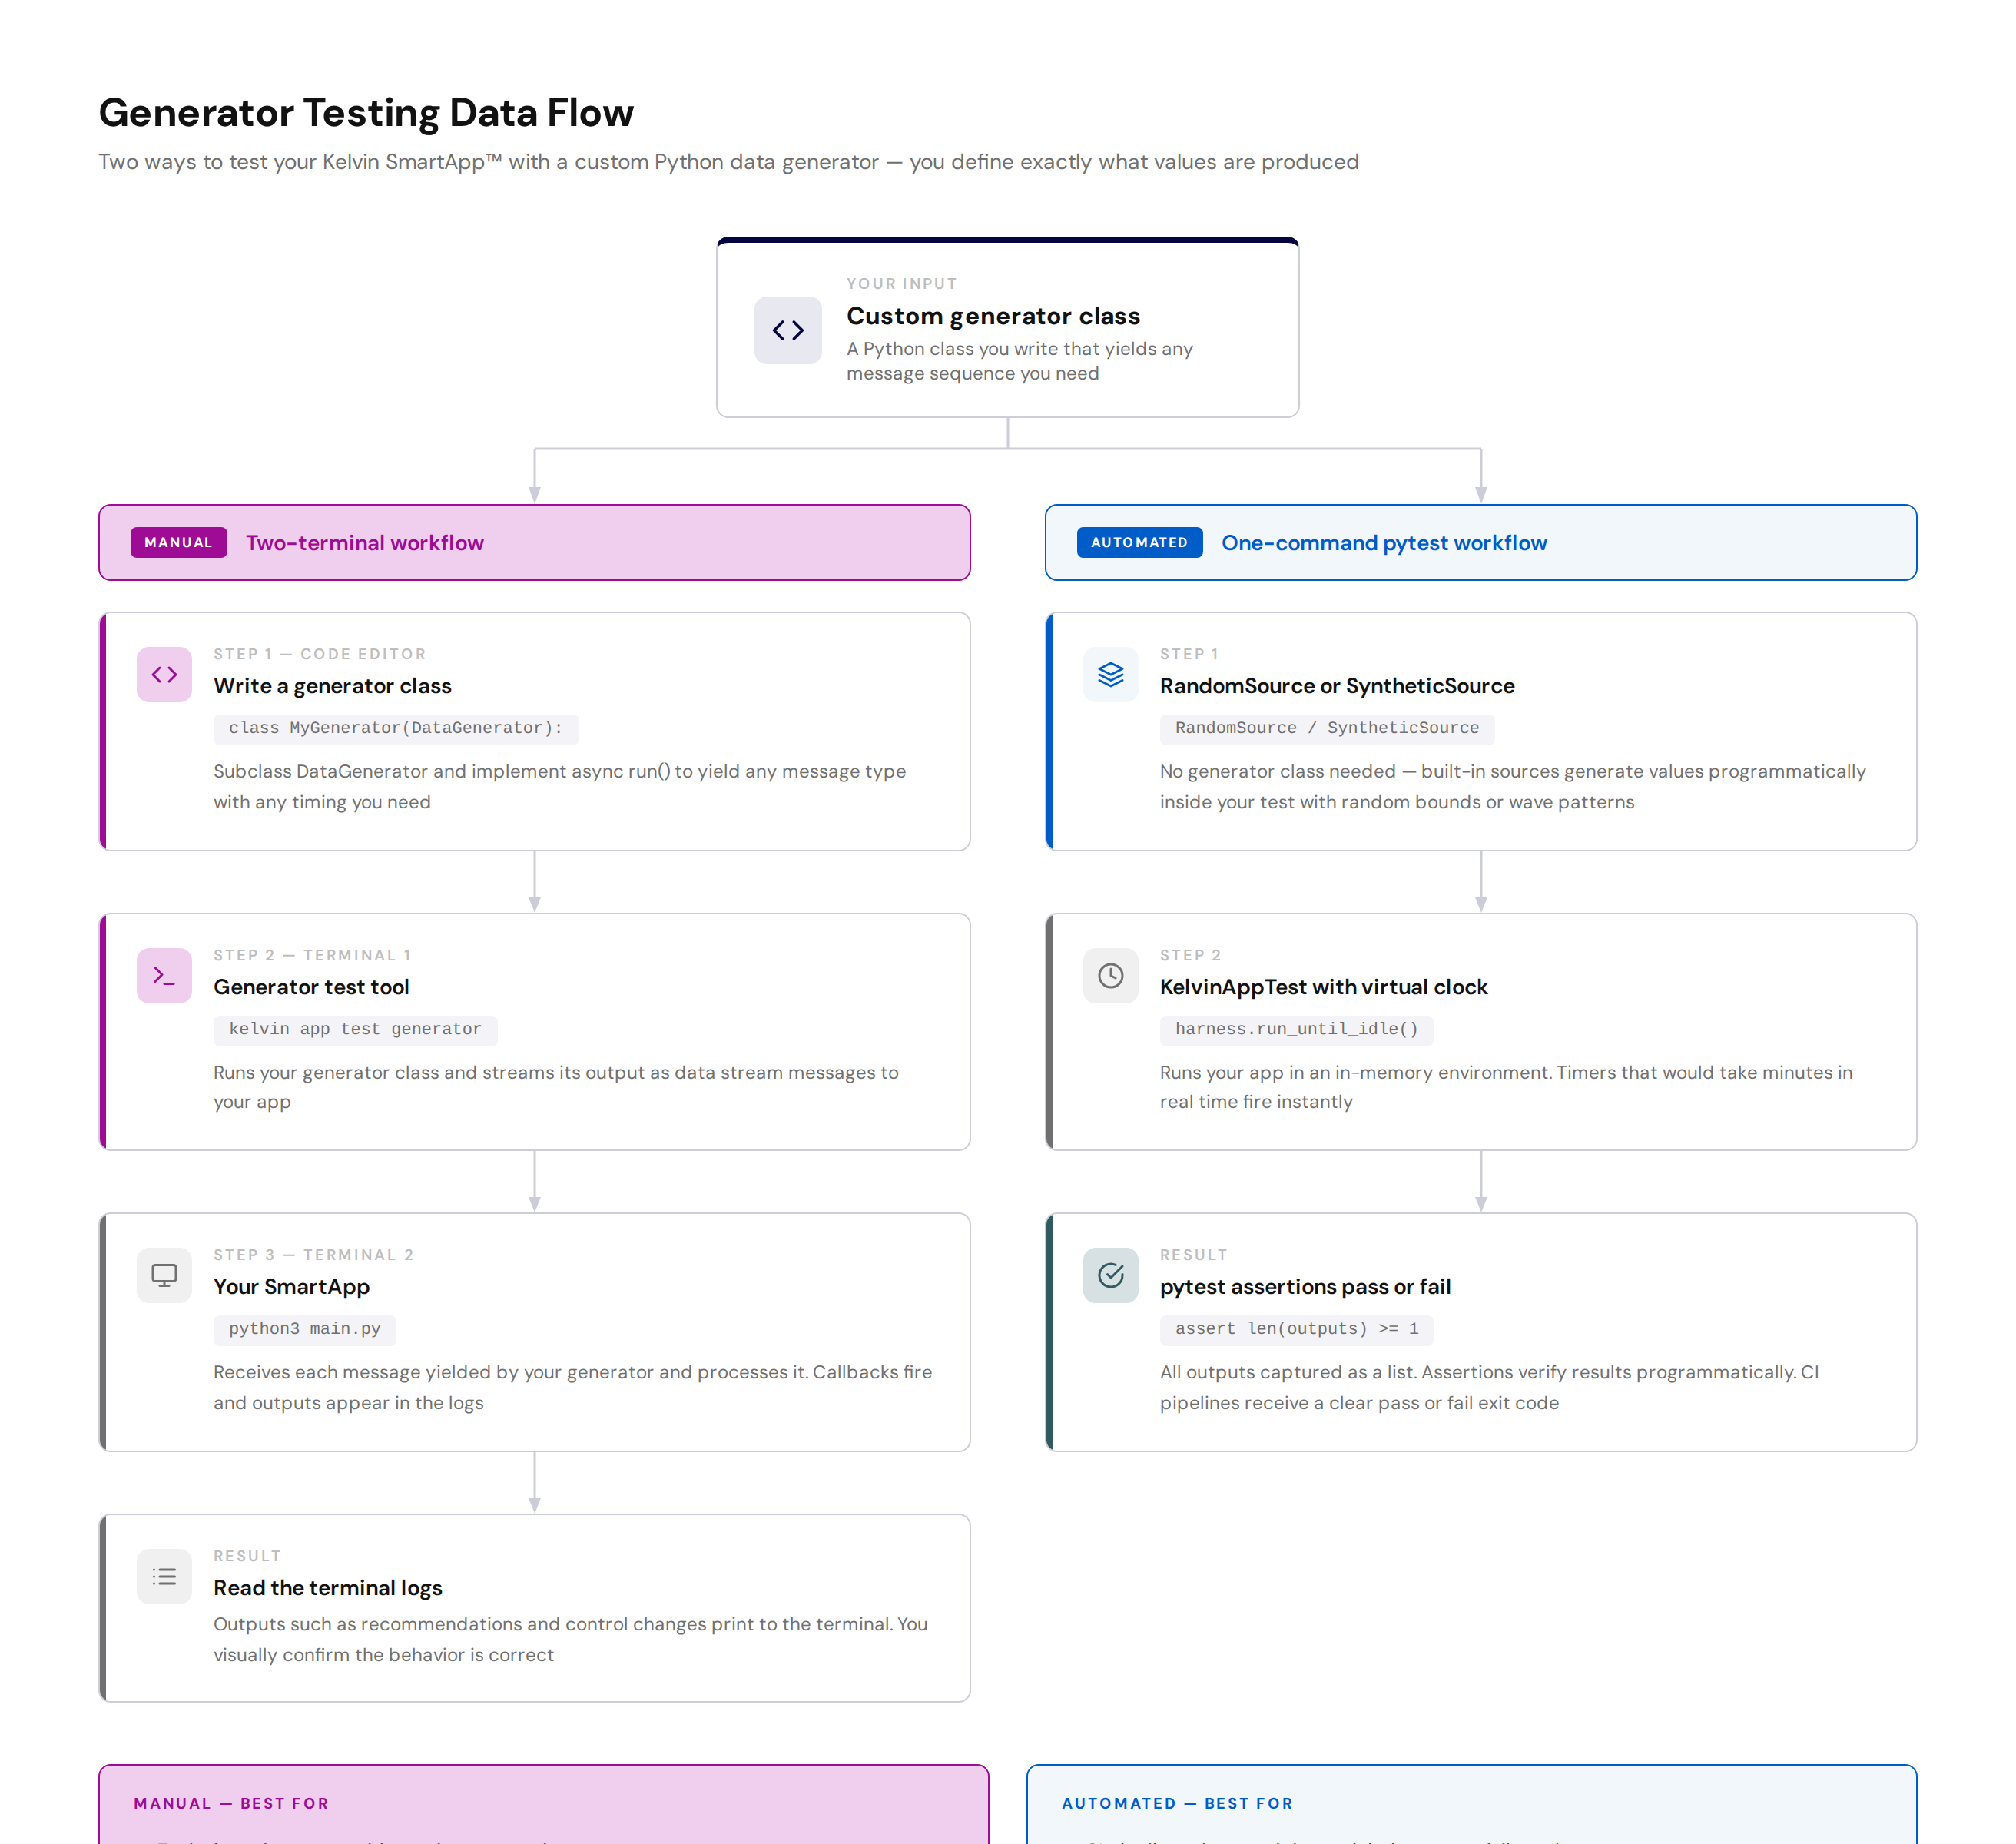
Generator testing lets you write a Python class that produces exactly the input values your app needs, in exactly the order and timing you need them. Unlike the simulator, which generates random numbers within a range, the generator gives you full control: you choose what types of messages are sent, what values they carry, and when they arrive.
This is the most flexible local testing method. Use it when you want to simulate a specific sequence of events, exercise an edge case, or test how your app responds to a pattern that cannot be expressed with a simple range or wave.
Manual testing
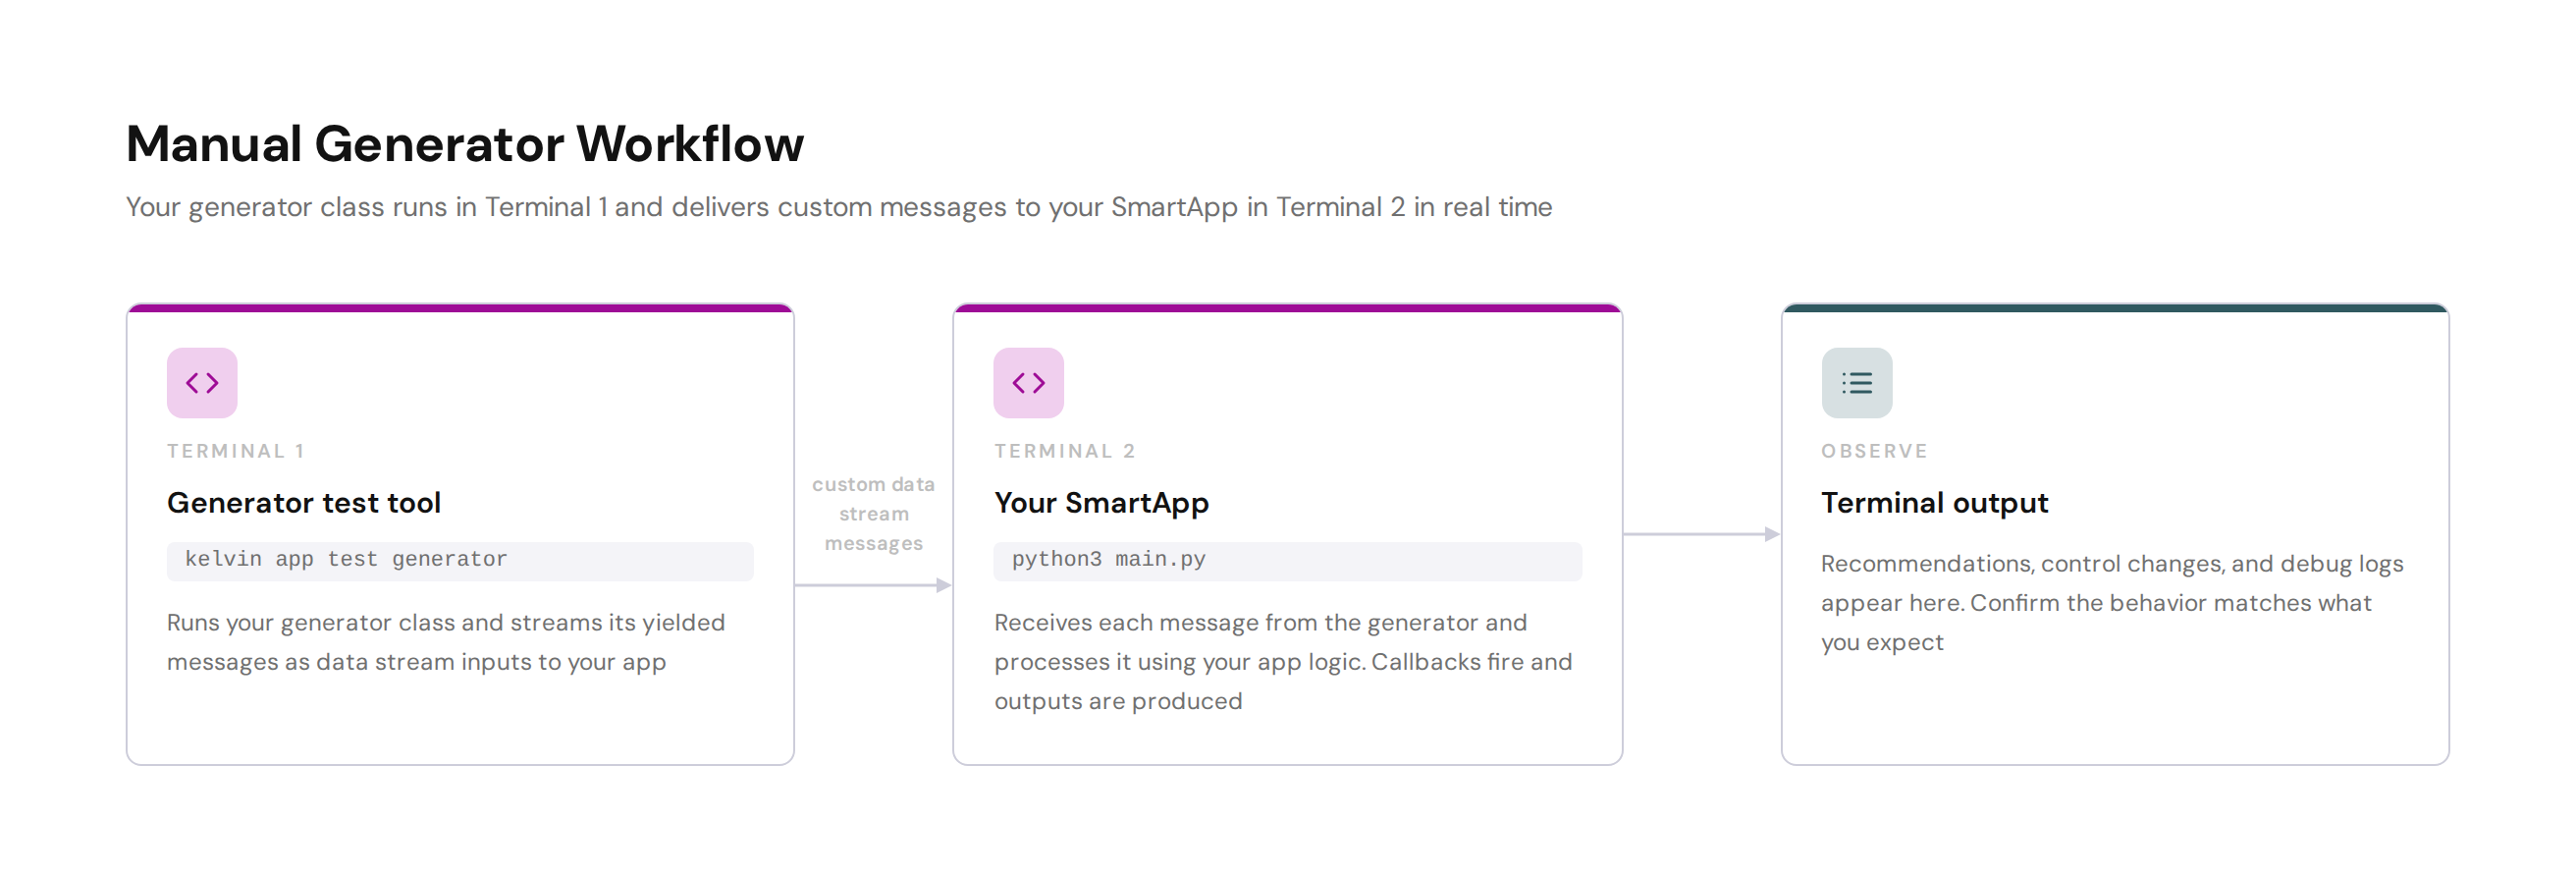
The manual generator flow runs your custom generator class in one terminal and your Application in another. The generator class produces messages that are delivered to your app in real time, exactly as you defined them.
This lets you watch your app respond to a hand-crafted sequence of inputs without writing any test assertions. It is useful during active development when you are iterating quickly and want to see what happens with specific input patterns.
Requirements
The kelvin CLI must be installed and you must have a valid app.yaml in your project folder. If you created your app with kelvin app create, both are already in place.
You can use config.yaml to override values from app.yaml without changing your committed files. Read more in Create an Application.
Step 1: Write a generator class
Create a Python file — for example mygen.py — and define a class that subclasses DataGenerator from the Kelvin SDK. Implement an async def run() method that yields message objects, one at a time.
import asyncio
from typing import AsyncGenerator

from kelvin.message import Number
from kelvin.krn import KRNAssetDataStream
from kelvin.publisher import DataGenerator


class MyGenerator(DataGenerator):

    async def run(self) -> AsyncGenerator[Number, None]:
        # Yield a sequence of temperature values for doc_demo_plunger_01
        for value in [60.0, 65.0, 70.0, 78.0, 82.0, 90.0, 95.0]:
            yield Number(
                resource=KRNAssetDataStream("doc_demo_plunger_01", "temperature"),
                payload=value,
            )
            await asyncio.sleep(1)   # pause 1 second between each value
Each yield delivers one message to your app. The resource tells the system which asset and data stream the value belongs to. The payload is the actual numeric value.
You can yield as many messages as you want, to as many assets and streams as you need. You can add asyncio.sleep() calls between yields to control timing, or yield messages in rapid succession to simulate a burst of data.
Step 2: Start the generator
Open a terminal in your app folder and run:
This loads your generator class from mygen.py and starts calling run(). Each message your generator yields is published to your app as a data stream message.
Available options:
| Parameter | Required | Description |
|---|---|---|
--config |
Optional | Path to app.yaml (defaults to current directory) |
--entrypoint |
Required | Path to your Python file and class name, in filename.py:ClassName format |
Step 3: Run your Application
Open a second terminal in the same folder and run:
Your app starts and connects to the generator. As your generator yields each message, the app receives it and processes it. You will see log output in this terminal showing callbacks firing and outputs being produced.
Step 4: What to look for
You now have two terminals running side by side:
- Terminal 1 (generator): Shows each message as it is yielded and published.
- Terminal 2 (Application): Shows your app receiving and processing each message.
Watch the Application terminal to confirm:
- Callbacks fire for each value received
- The values arrive in the order you defined in
run() - Logic that depends on a specific sequence or threshold fires at the right point
- Outputs such as recommendations or control changes appear when expected
When the generator finishes yielding messages, both processes will wind down naturally. You can also stop them at any time with Ctrl+C.
Automated testing
For automated tests, you do not need to write a generator class at all. KelvinAppTest includes built-in data sources — RandomSource and SyntheticSource — that cover most patterns you would otherwise implement manually in a generator. They run inside the test function, so there are no terminals to manage and no timing to wait for.
The other major advantage is virtual time. If your Application has a timer that fires after 60 seconds, the test harness advances the virtual clock past that point instantly. Tests that cover time-based logic complete in milliseconds.
What you need
Make sure pytest and pytest-asyncio are installed:
Your main.py must expose your KelvinApp instance as a module-level variable:
Step 1: Imports
Create a test file, for example test_generator.py, and add these imports:
import pytest

from main import app                              # your KelvinApp instance

from kelvin.testing import KelvinAppTest, ManifestBuilder
from kelvin.testing.sources import RandomSource, SyntheticSource
from kelvin.testing.sources.synthetic import SineWave, SquareWave
from kelvin.message import RecommendationMsg      # import whichever message types your app produces
KelvinAppTestis the test harness. It wraps your app with an in-memory environment and a virtual clock.ManifestBuilderdefines the test environment — which inputs, outputs, and assets exist.RandomSourceandSyntheticSourcereplace the manual generator class entirely for automated tests.
Step 2: Define the test environment with ManifestBuilder
The manifest describes what your test environment looks like. It must match the input and output names in your app.yaml.
manifest = (
    ManifestBuilder()
    .add_input("temperature")                                     # must match an input in app.yaml
    .add_output("alert")                                          # any output your app produces
    .add_asset("doc_demo_plunger_01", parameters={"limit": 75})
    .add_asset("doc_demo_plunger_02", parameters={"limit": 75})
    .build()
)
You can also load the manifest directly from app.yaml if you prefer:
from pathlib import Path

manifest = (
    ManifestBuilder.from_app_yaml(Path("app.yaml"))
    .add_asset("doc_demo_plunger_01", parameters={"limit": 75})
    .add_asset("doc_demo_plunger_02", parameters={"limit": 75})
    .build()
)
Step 3: Choose your data source
The built-in sources are documented fully in Random & Synthetic Sources, but here is a quick overview of each:
RandomSource generates random values within bounds you set. Add a seed to make the sequence reproducible across test runs:
source = RandomSource(
    columns={"temperature": (60.0, 95.0)},
    interval=1.0,
    duration=30.0,
    seed=42,
).with_asset("doc_demo_plunger_01")
SyntheticSource generates values that follow a wave pattern. This lets you test logic at precise points — for example, verifying an alert fires when a sine wave crosses your threshold:
source = SyntheticSource(
    columns={
        "temperature": SineWave(amplitude=20, offset=70, period=60),
        # oscillates between 50 and 90, crossing 75 twice per period
    },
    interval=1.0,
    duration=120.0,
).with_asset("doc_demo_plunger_01")
For the full list of wave types and their parameters, see Random & Synthetic Sources.
Step 4: Write the test
Wire everything together. The harness delivers all generated messages to your app and collects everything your app publishes into harness.outputs.
@pytest.mark.asyncio
async def test_high_temperature_alert():
    harness = KelvinAppTest(app, manifest=manifest).add_source(source)

    async with harness:
        await harness.run_until_idle(timeout=130.0)
        outputs = harness.outputs

    recommendations = [o for o in outputs if isinstance(o, RecommendationMsg)]
    assert len(recommendations) >= 1
harness.outputs is a plain Python list. Filter it by message type and assert on the content however you need.
Step 5: Run the tests
From your app folder:
pytest exits with code 0 if all assertions pass, or non-zero if any fail. CI pipelines use this exit code to gate deployments.
For custom action testing, see Testing custom actions.