Quick Start Guide
Jump to a Section
If you want to skip straight to a particular step, use the links below. Otherwise, read through from the start for the full guided experience.
Introduction
Overview
You've come to the right place to start ! Follow this quick start guide and build your first Application during the next hour.
By the end of this quick start guide you will have achieved the following steps;
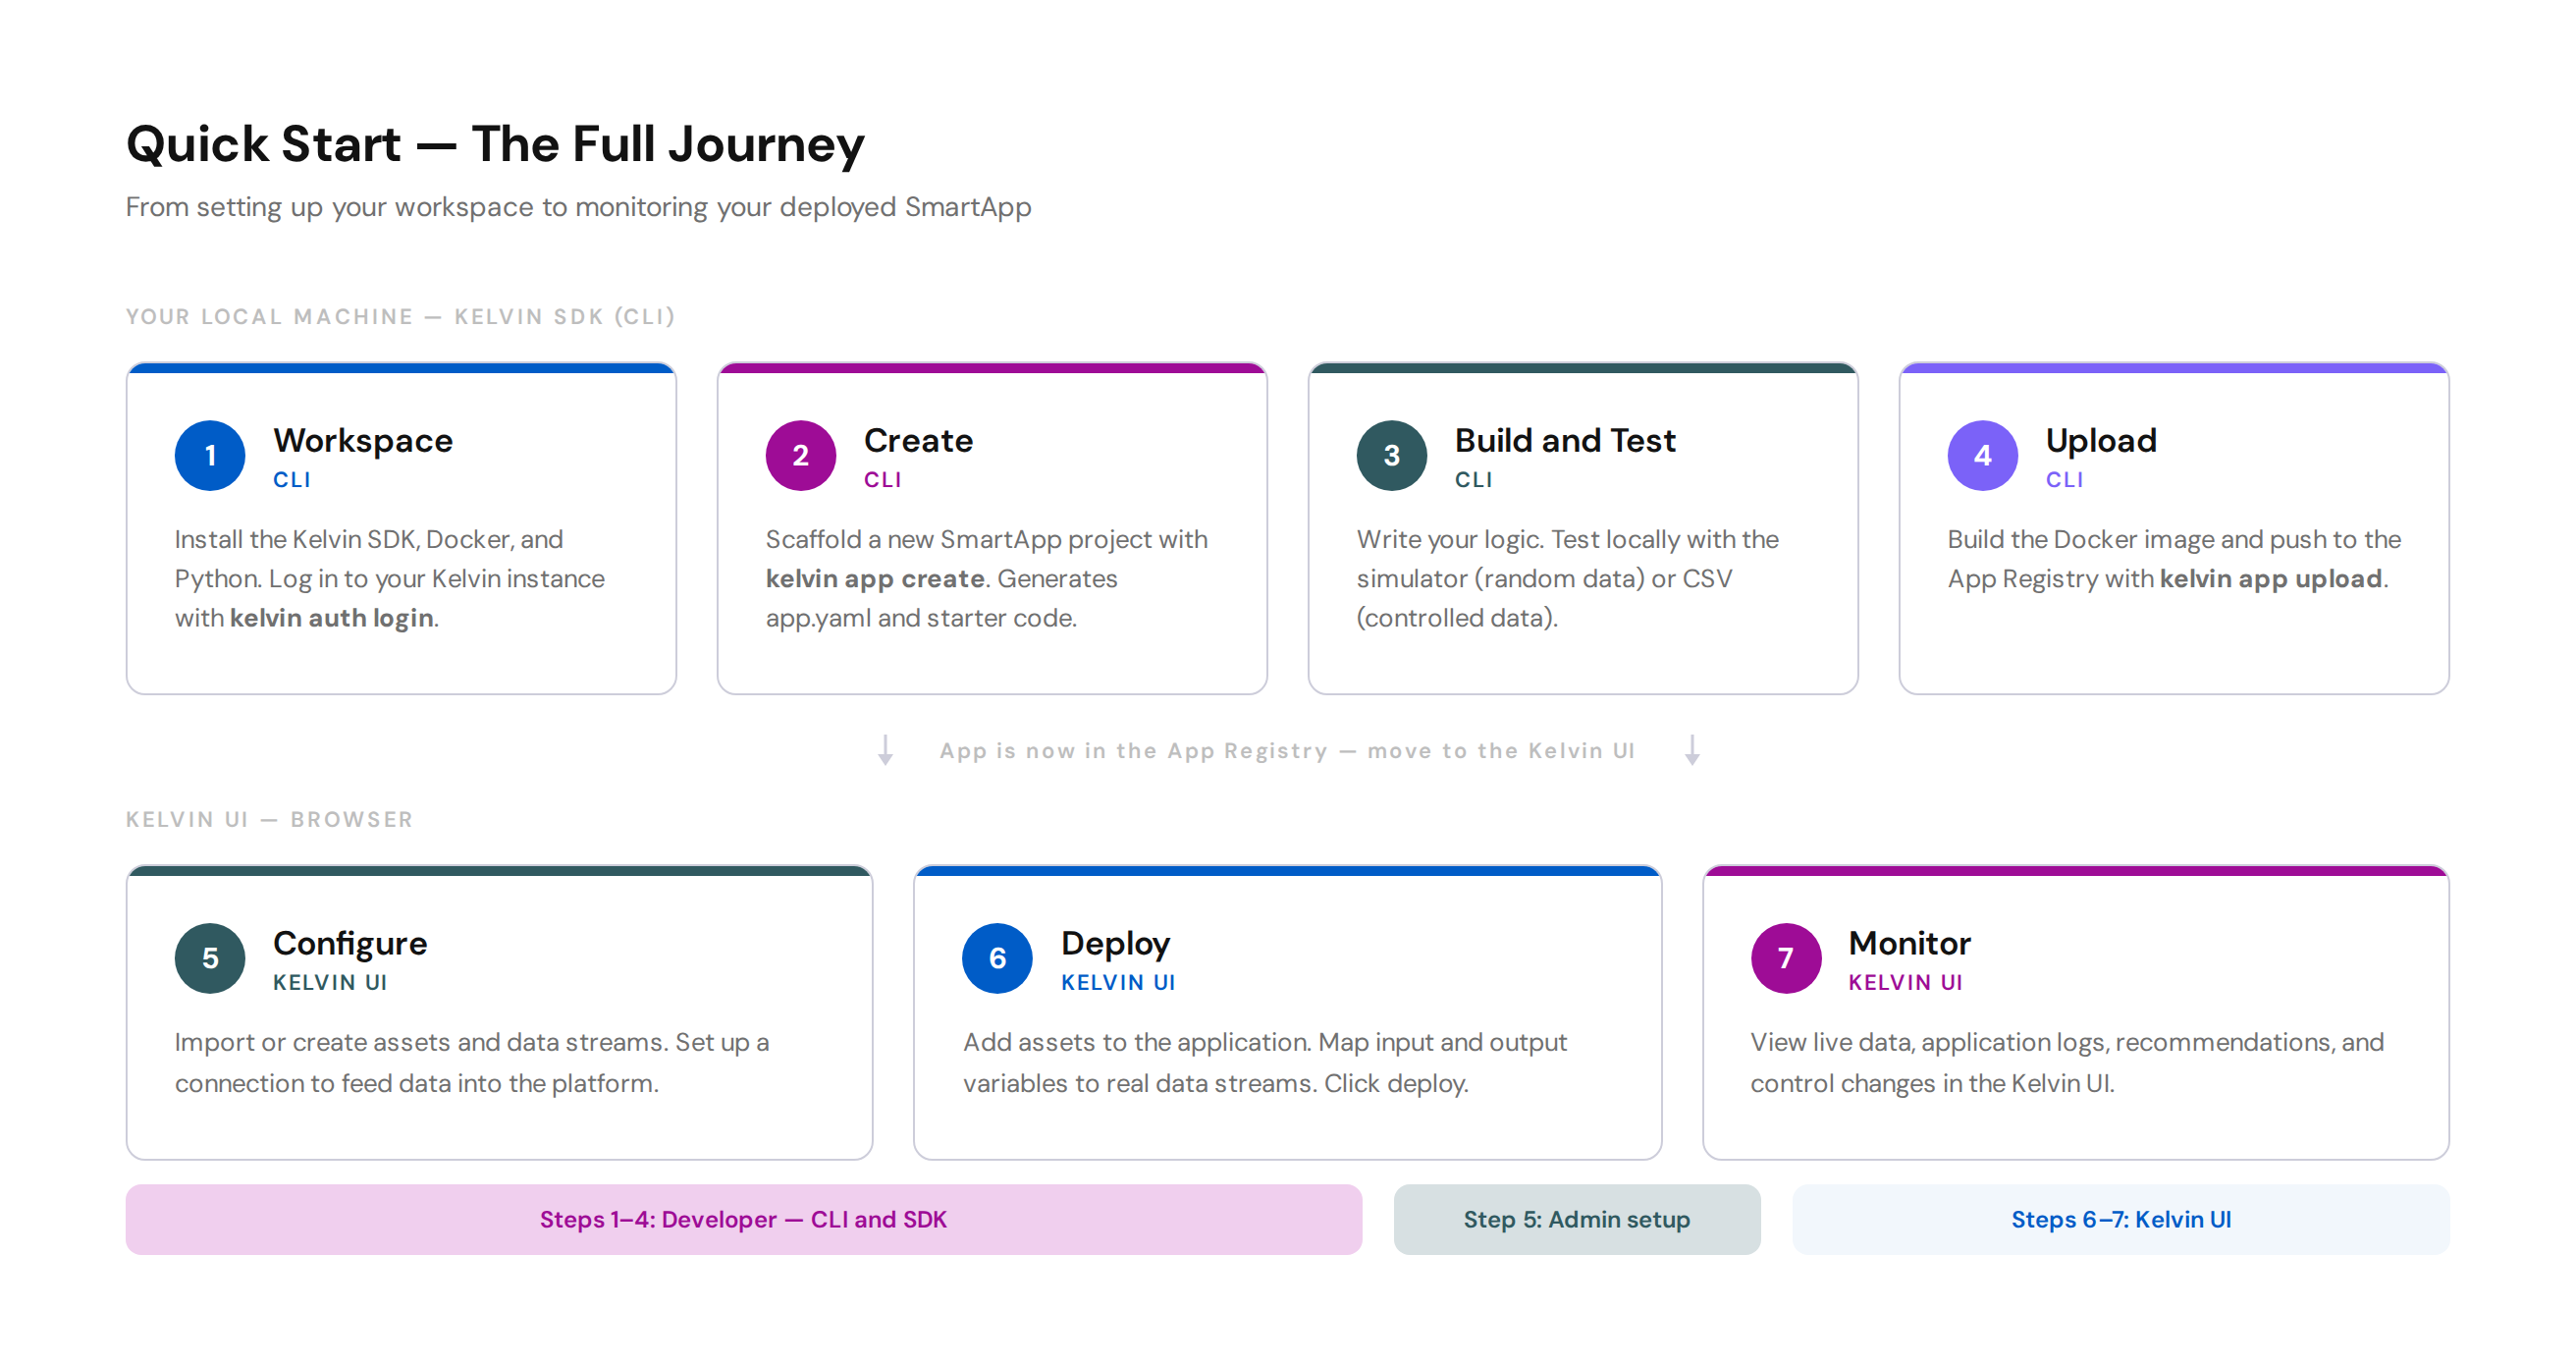
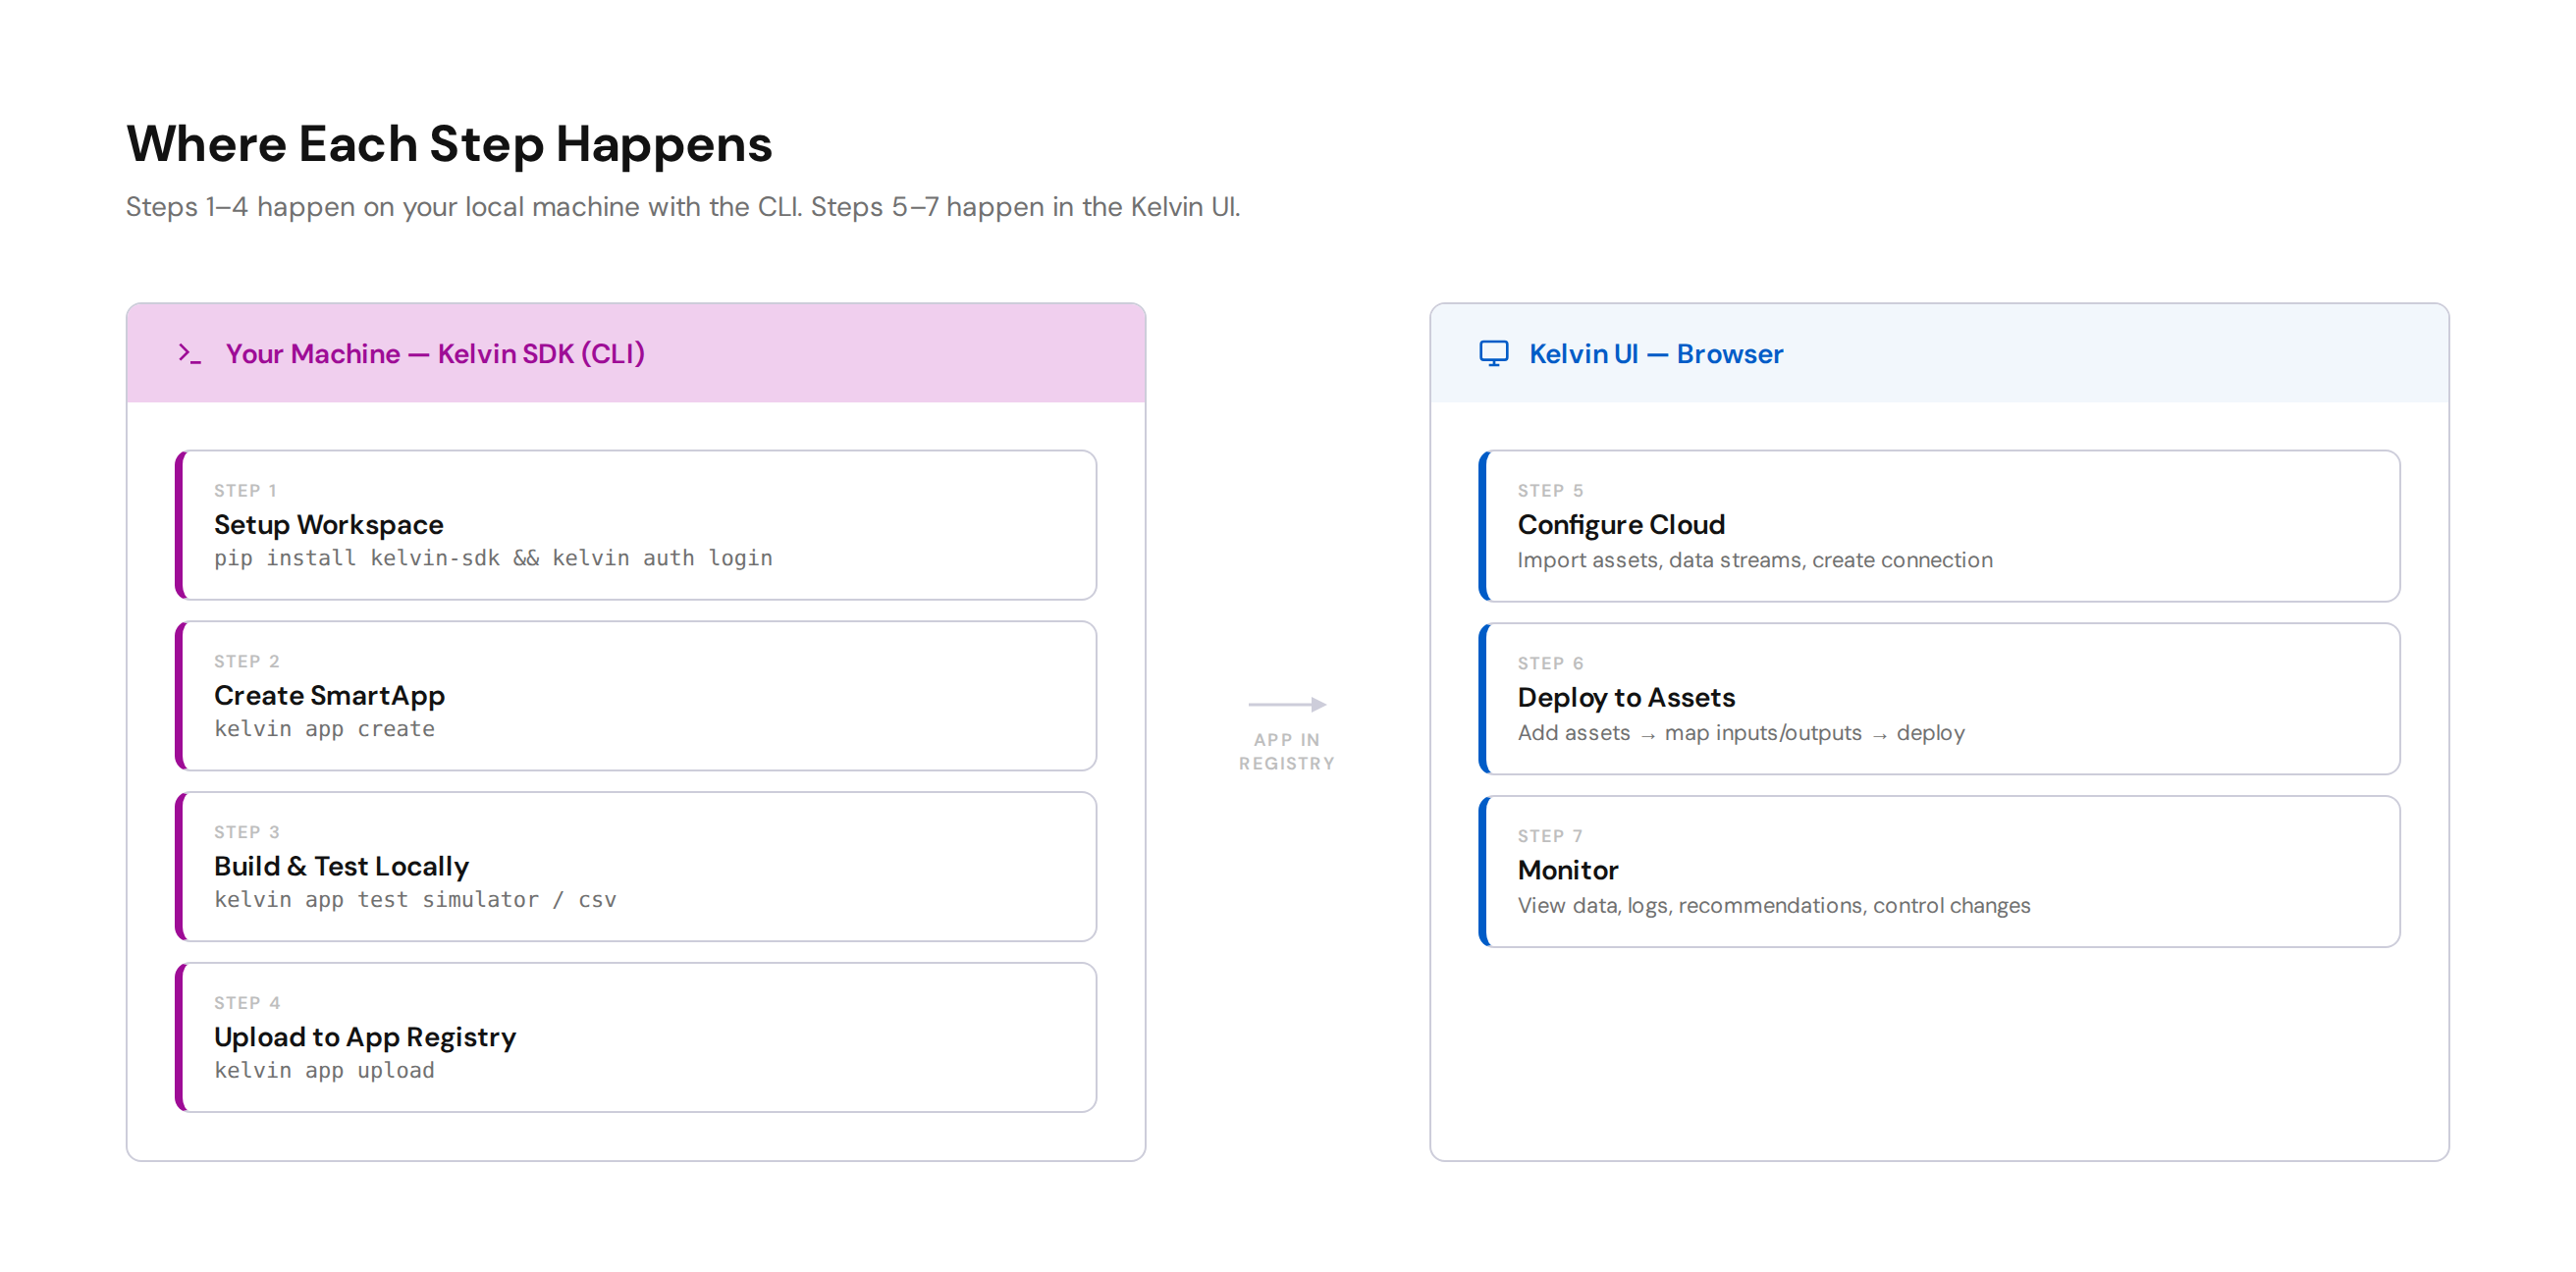
This course will require you to use your own computer and the Kelvin UI.
Outlined here are the tools required for each step.
Quick Start Task
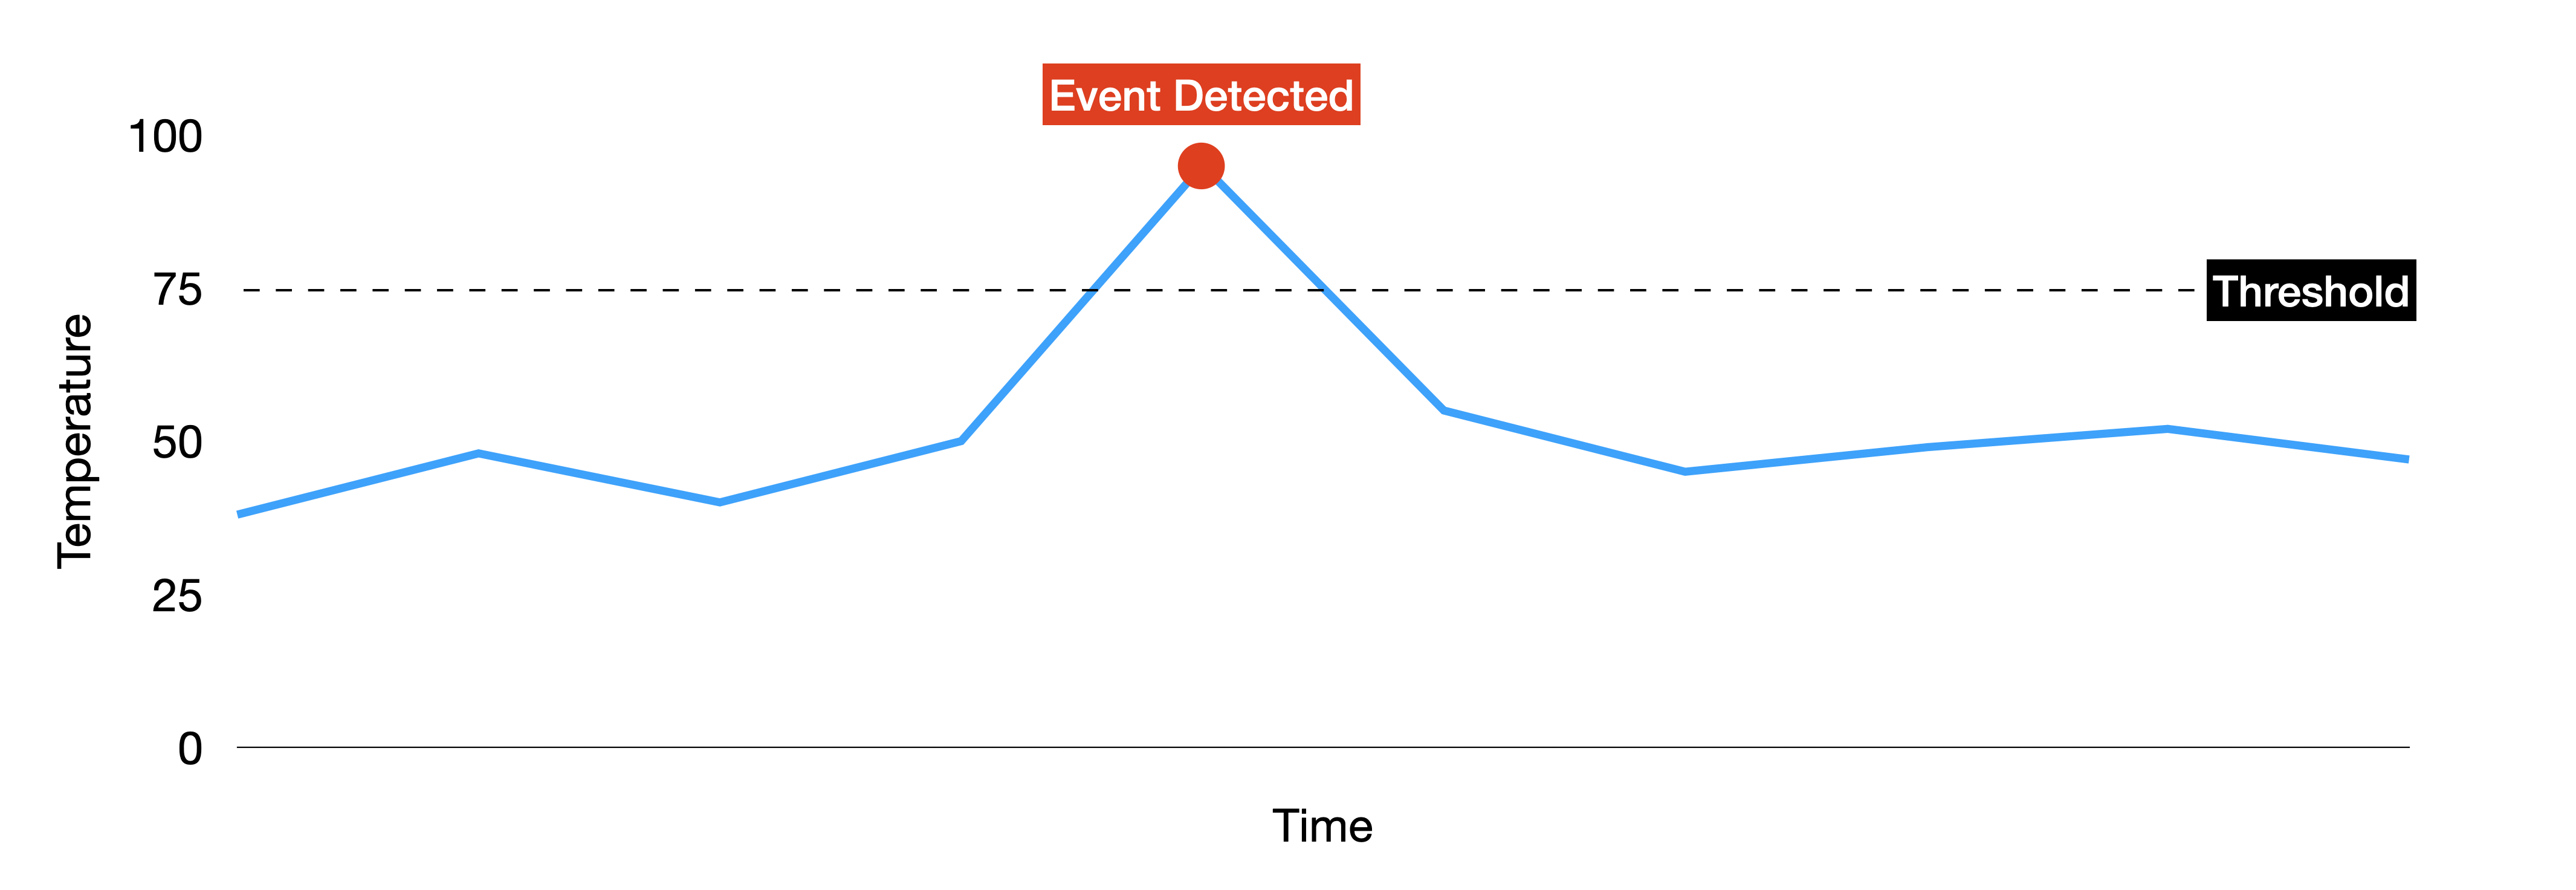
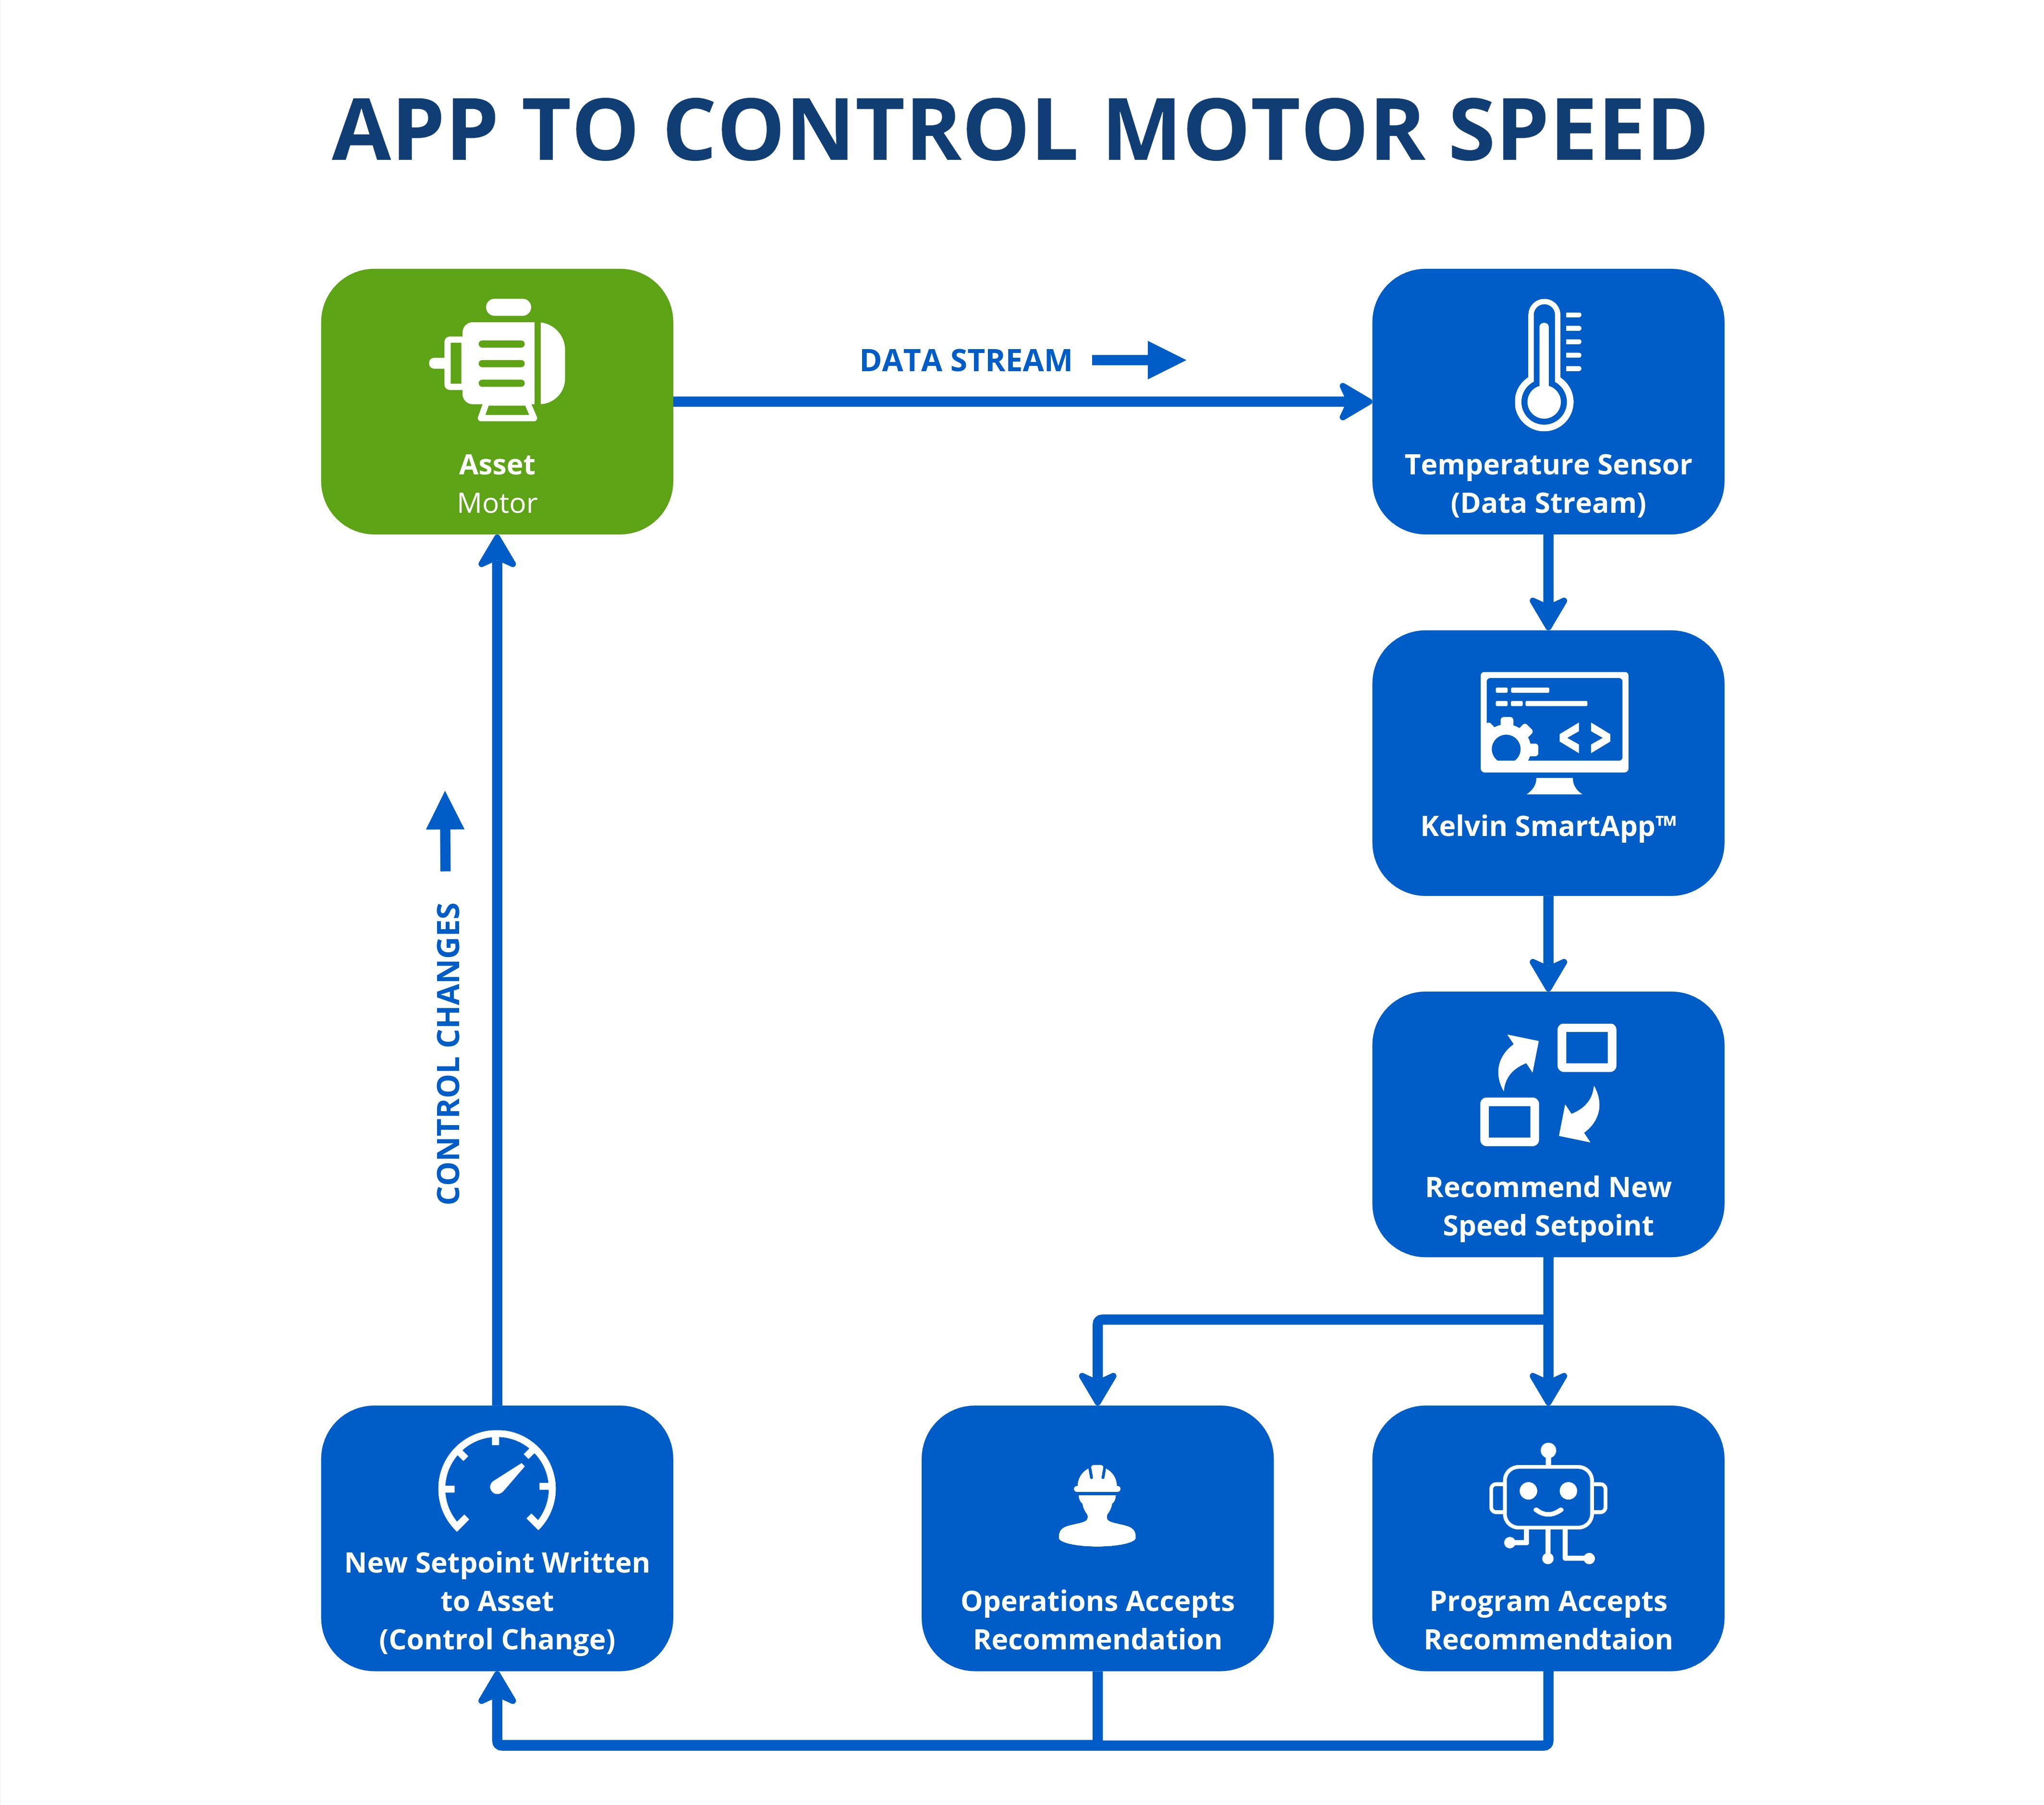
The Python program we will create and package as an Application will continuously monitor a temperature sensor (known as a Data Stream) on a motor (known as an Asset).
If the upper temperature threshold is breached, then the app will automatically generate a new Control Change packaged into a Recommendation that will have a new optimized motor speed setpoint to maintain a lower motor temperature.
Then using the Kelvin UI, the Operations Team will be able to set the parameters of the Application to decide whether the recommendation is automatically accepted, where the control change will be immediately applied to the motor, or an approval has to be manually added to the recommendation before the control change is done.
The Technology
The Kelvin SDK is a Python-based software development kit designed to make it easier to create, test, and deploy Applications. These apps are purpose-built for optimizing the performance of assets, enabling you to develop solutions that can improve operational efficiency.
An Application is a custom Python application developed using the Kelvin SDK. It is designed to apply specific business logic, models and algorithms to optimize the performance of multiple assets. By delivering actionable recommendations and making control adjustments, an Application helps to enhance asset efficiency and performance.
Full Source Code
You can also get the full source code for this quick start guide at Kelvin's Github App Samples.
1. Your Workspace

Installation
Before you can start you need to setup your computer with all the development tools required to make Applications.
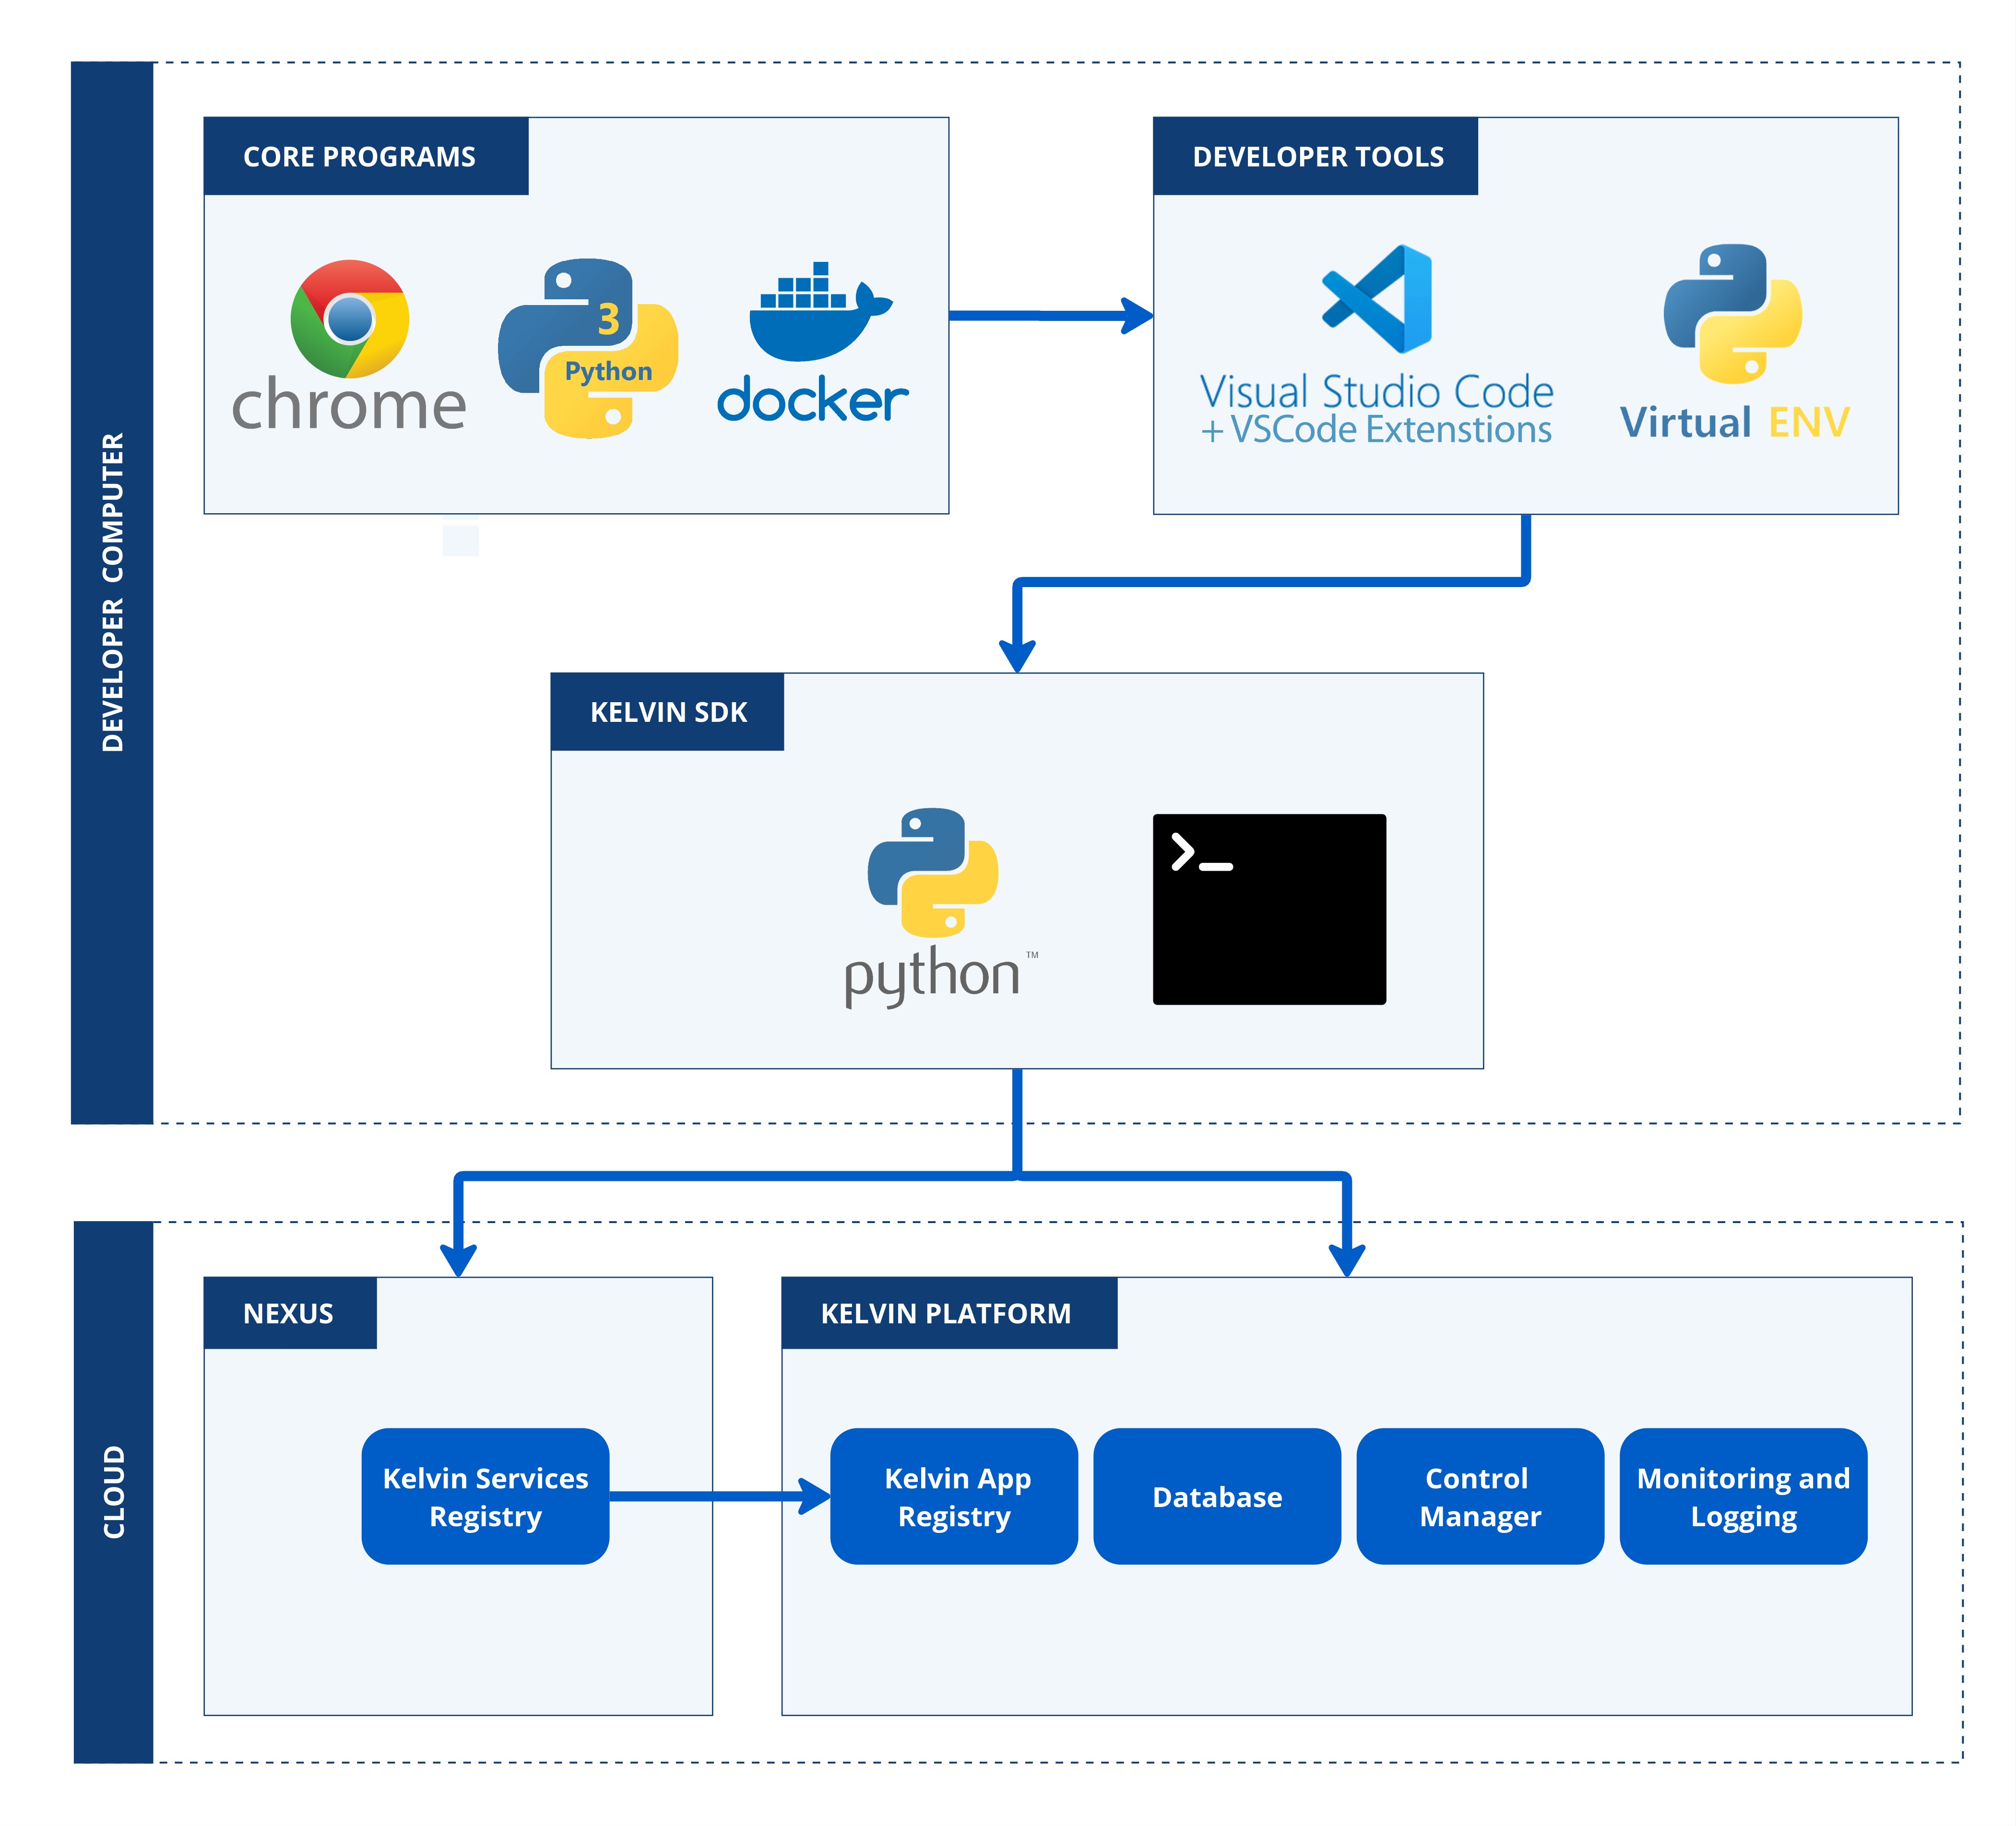
The list of software required for development and testing is;
| Software | Mandatory | Install Method |
|---|---|---|
| Google Chrome | Yes (Kelvin only guarantees on Google Chrome, though most if not all features will work in the other modern browsers) | From website |
| Python 3 | Yes, See Pypi for compatible versions | From website |
| Docker | Yes | From website |
| Visual Studio Code | No, but we now standardize our newer documentation to be shown on VSCode | From website |
| Kelvin SDK | Yes | pip install kelvin-sdk |
There is detailed step-by-step documentation available on how to install all the software and tools required for each OS type.
Login
Once everything is installed, then you need to login to your Kelvin Platform from the terminal.
The Kelvin SDK will then attempt to log you into two systems;
- Kelvin Platform
- Kelvin Docker Registry
Warning
When logging into the Kelvin Docker Registry, you need to have access to Docker with your user. If you don't have this, this step will fail.
To setup local user access to the docker commands;
On Windows and Linux, run this terminal command
| Docker CLI for Local User | |
|---|---|
and on MacOS run this command;
| Docker CLI for Local User | |
|---|---|
Using Username and Password
| CLI Login | |
|---|---|
You will be asked for your login, password and 2fa code.
When you are logged in you will see the following;
Using SSO via Browser
If your organization uses Single Sign-On (SSO), you can login through your browser instead of entering credentials in the terminal.
| CLI Login via SSO | |
|---|---|
This will open your default browser where you can authenticate using your organization's SSO provider. Once authentication is complete, the CLI will automatically receive the login session.
When you are logged in you will see the following;
| CLI Login Example | |
|---|---|
With your workspace setup, now we can start with creating your first Application.
2. Create Application

On this page you will learn how to create and configure an Application.
Version used in Video Tutorial = v5.13
This demonstration video was done in v5.13 using the latest application structures.
Video Guide
Watch this quick start guide performed in real time in less than 8 minutes.
Written Guide
Create Folder
Type the following command to create an Application:
| Kelvin SDK Command Line Example | |
|---|---|
Kelvin SDK will create a new folder named after the project name and automatically create the required files and add a sample Python program for reference. You can now open the folder in your favorite IDE (like Visual Studio Code) and start to modify the files.
Below is a brief description of each file.
| File | Description |
|---|---|
| app.yaml | The app.yaml file serves as the configuration file for the Application, detailing specific parameters and settings of the app. We will modify this file as part of this tutorial in the next couple of steps.You can read more about the |
| main.py | The main.py is used as the entry point of this Application. When it runs, main.py is typically the first script that gets executed, and it usually contains the main logic or orchestrates the flow of apps. We will modify this file as part of this tutorial in the next couple of steps.You can read more about the |
| requirements.txt | This is a list of Python libraries that need to be installed when compiling the Application. This is treated like any normal Python requirements.txt file.The sample You can read more about the |
| Dockerfile | This is a standard Dockerfile that is used to compile the Application into a Docker image. The sample Dockerfile comes with the minimum steps required. This is adequate for this example and does not require any changes. You can read more about the |
| ui_schemas/configuration.json | This JSON file contains all the information on how to display the Application configurations in the Kelvin UI. For example, you can define custom titles or set min/max limit inputs, etc. This is optional, and if not provided, the Kelvin UI will display the configuration settings in a raw JSON or YAML file format without verifying the structure or content before applying them to the Application. |
| ui_schemas/parameters.json | This JSON file contains all the information on how to display the Application parameters in the Kelvin UI. For example, you can define custom titles or set min/max limit inputs, etc. This is optional, and if not provided, the Kelvin UI will display a simple UI interface with the keys as the titles and no restrictions beyond the type of input. |
Inputs and Outputs
The Application stands out for its seamless integration with streaming data. As a developer, you're given a simplified interface. Simply define:
- Inputs: The streaming data your app will consume.
- Outputs: The streaming data your app will produce.
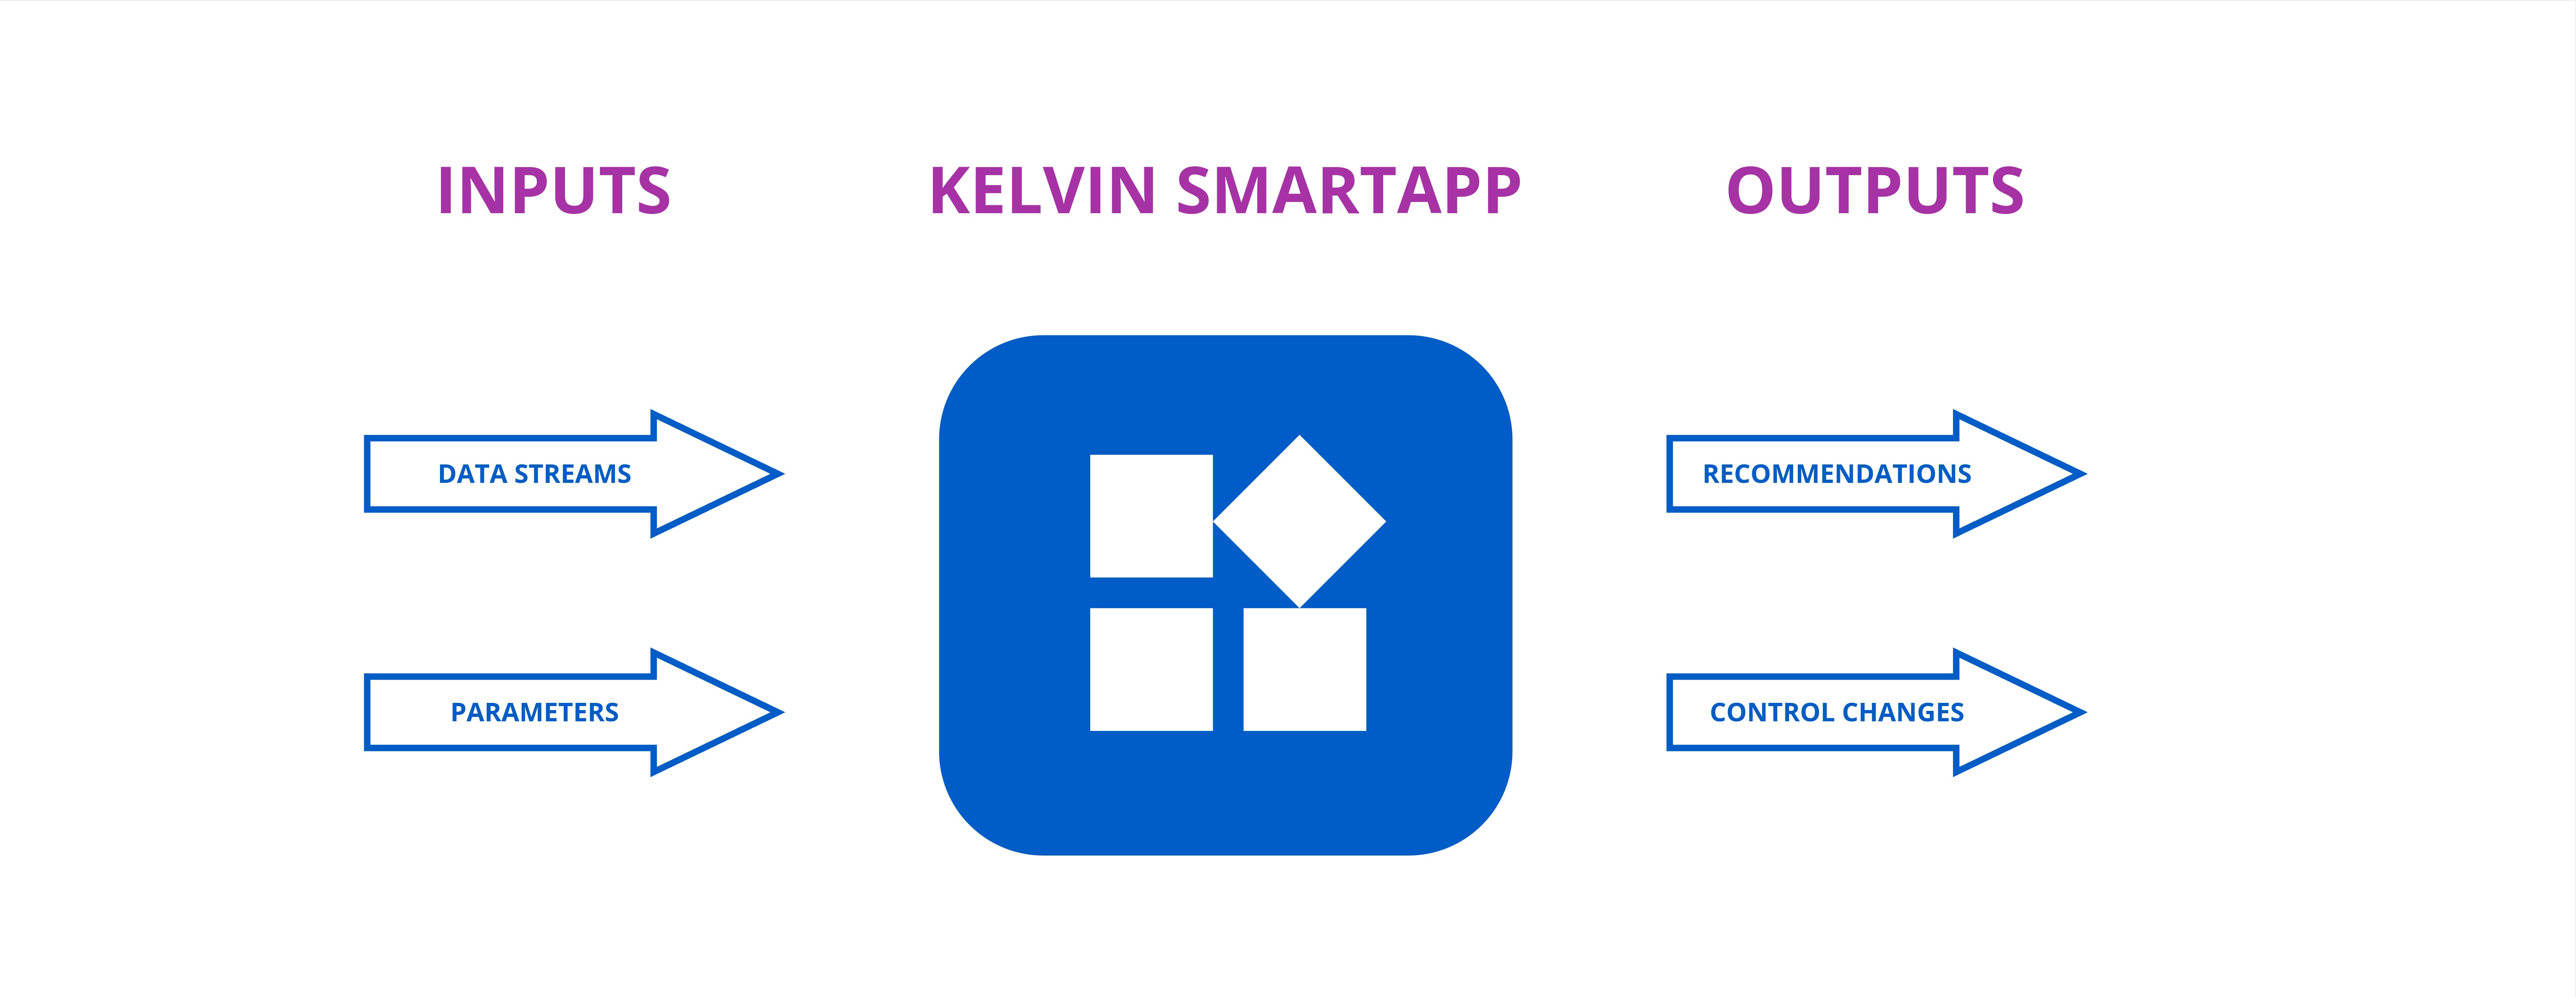
Kelvin takes care of the rest, ensuring reliable communication, fault-tolerance, data serialization, and data integrity.
Data Types
When declaring your inputs and outputs you will need to define the data_type.
Check out our concepts page to understand what a data_type is and what options you have available.
Define Inputs
Inputs are specified within the app.yaml file. Each input requires:
- A unique name to identify the input. This will be used in the Python code to reference the input. It must contain only lowercase alphanumeric characters. The characters
.,_and-are allowed to separate words instead of a space BUT can not be at the beginning or end of the name. - An expected data type, which can be:
number,boolean,stringor an object. All are self-explanatory except object
For this guide, the Event Detection Application is monitoring a motor's temperature.
Edit the app.yaml and add the following input:
Define Outputs
Outputs, similar to inputs, are defined in the app.yaml file. Each output needs:
- A unique name to identify the output. This will be used in the Python code to reference the output. It must contain only lowercase alphanumeric characters. The characters
.,_and-are allowed to separate words instead of a space BUT can not be at the beginning or end of the name. - An expected data type, which can be:
number,boolean,string.
Additionally, some outputs might initiate control changes. For instance, the Event Detection Application determines a need to modify a motor speed.
Edit the app.yaml and add the following output:
There are two types of output, data_streams and control_changes.
data_streams will write the value to the Asset/Data Stream pair on the Kelvin Platform only.
control_changes will also send the value to the Asset at the edge through a Connector.
In this example we want to send this as a control change to the motor.
App Parameters
Application App Parameters allow developers to create dynamic, updatable variables that Operations can edit in the Kelvin UI.
The value of each App Parameter is unique to each Asset in an Application, allowing Operations to set different values for each Asset individually.
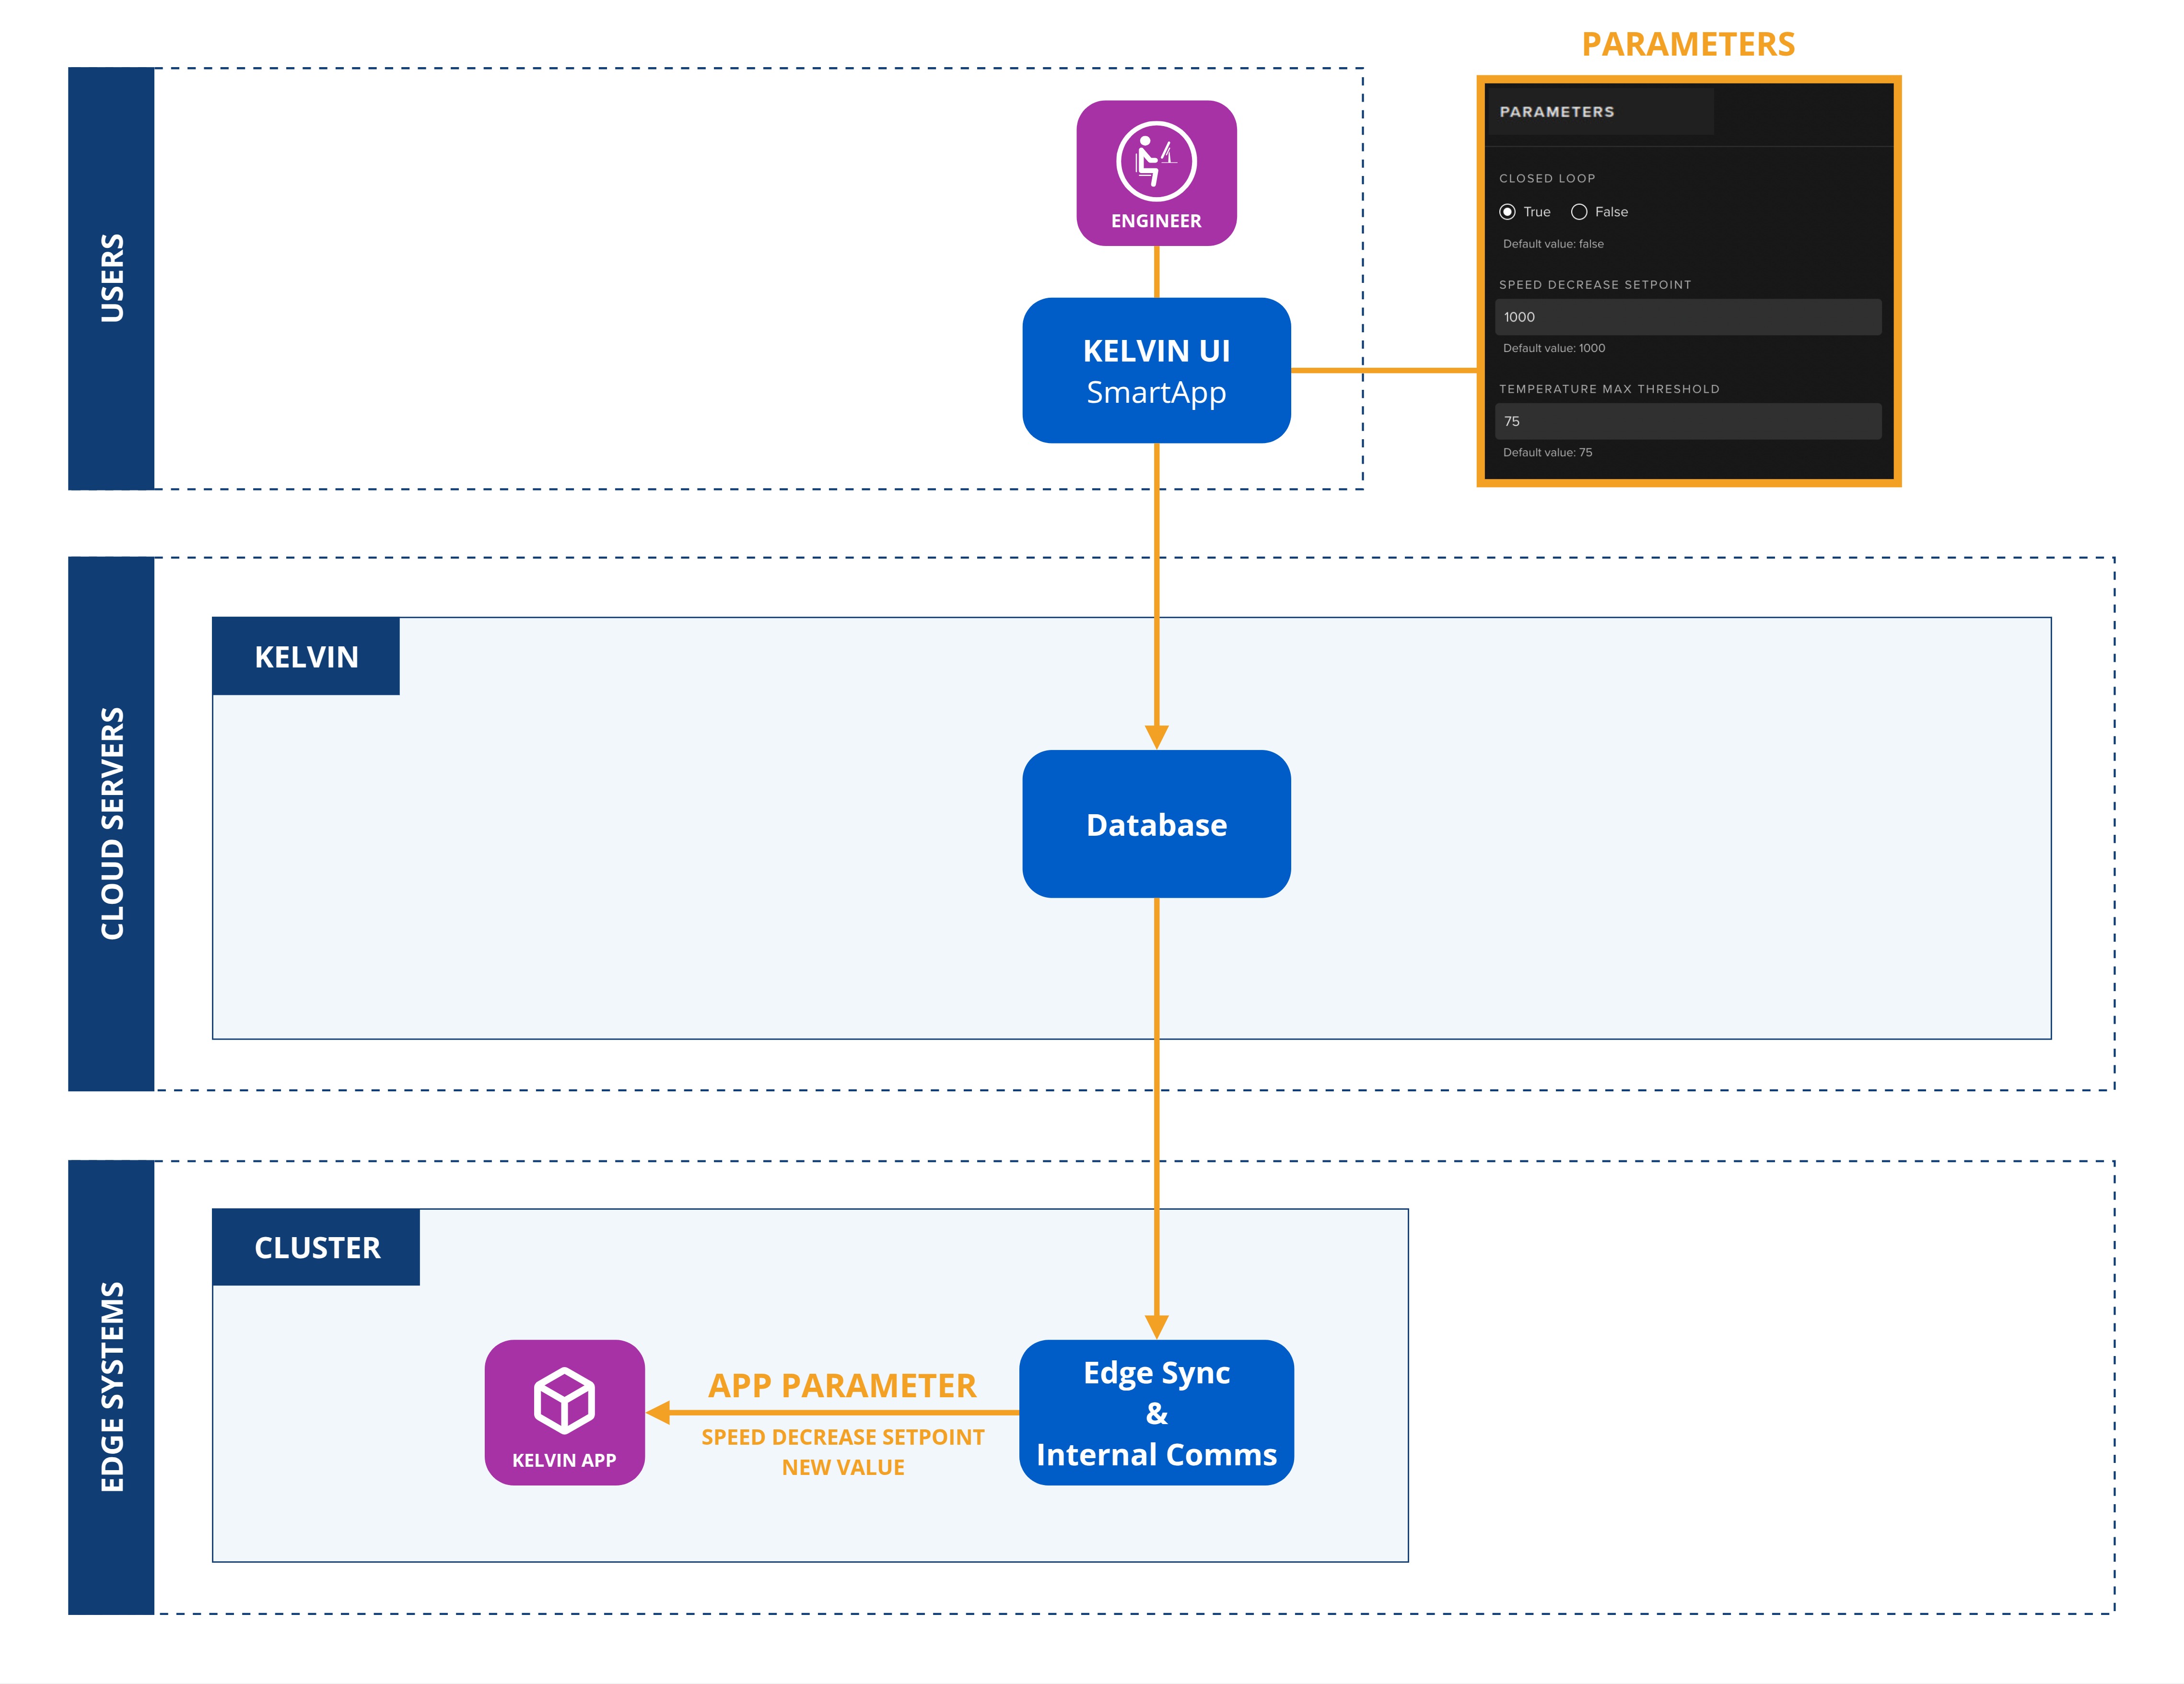
Define App Parameters
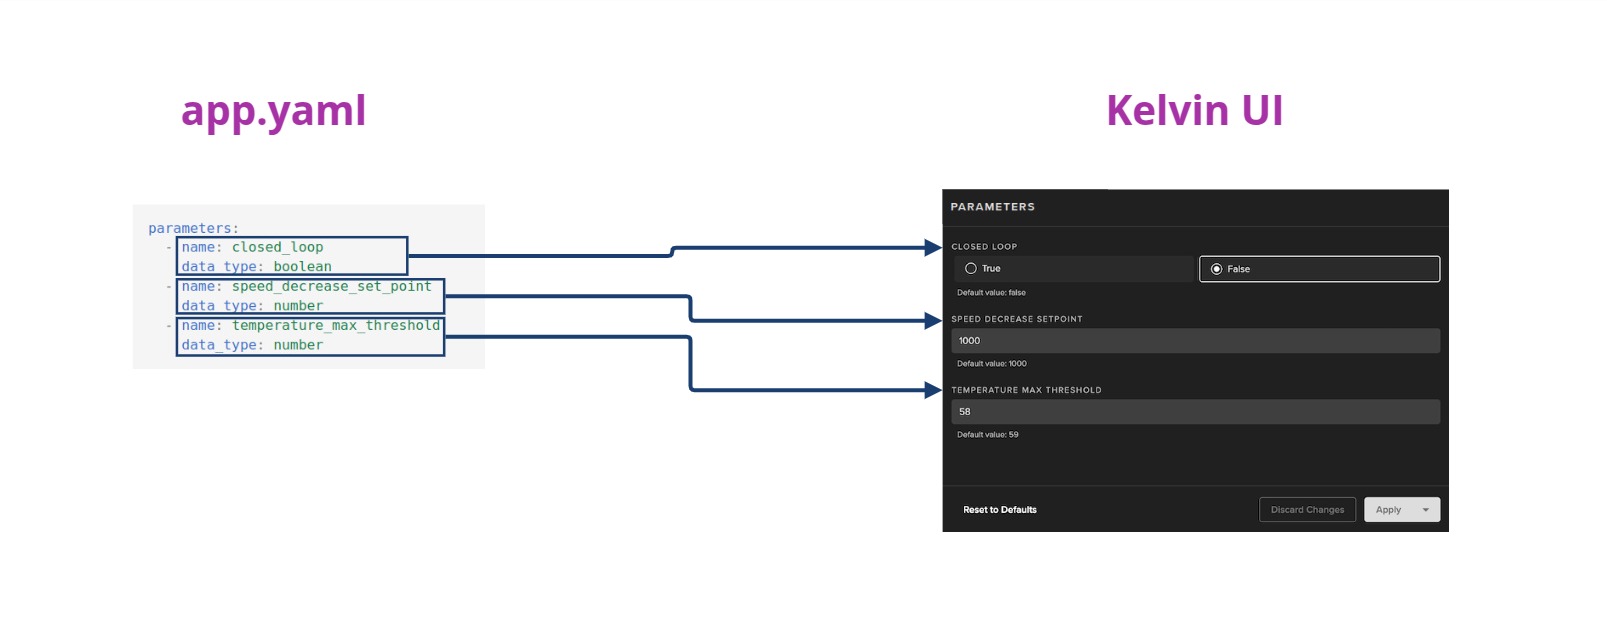
Application App Parameters are defined in three sections in the app.yaml file;
parametersdefines the name and type of the App Parameter.ui_schemasis a link to a JSON file containing all the information about how to display App Parameters in the Kelvin UI.defaults/parametersdefine the default values assigned to each Asset when it is first created or when an Application update introduces a new App Parameter to existing Assets.
App Parameters and default values are also defined in the app.yaml file as follows:
The actual schema on how App Parameters will look and act in the Kelvin UI is kept in a JSON file.
ui_schemas/parameters.json
Which will be displayed on the Kelvin UI as:
Final app.yaml
Your final app.yaml file with Inputs, Outputs and App Parameters should look like:
Next, we'll proceed to the Python code.
Python Code
The main.py file defines the code that will be executed by the Application. In the case of the Event Detection Application we want the code to be like this:
Code Explanation
This script establishes a connection to the Kelvin system and uses a stream decorator to listen for motor_temperature messages. The script continuously monitors incoming motor temperature data and reacts according to predefined parameters.
-
Temperature Monitoring: The script listens for new incoming motor temperature messages which triggers running the
handle_specific_inputsfunction. -
Threshold Check: Upon receiving a temperature message, the script compares the temperature value (payload) to a predefined threshold, specified by the temperature_max_threshold App Parameter.
-
Control Action: If the received temperature exceeds the temperature_max_threshold, the script triggers an action based on the closed_loop parameter:
-
closed_loop=True: The script sends a direct Control Change command to the Kelvin system to adjust the motor speed to the value specified by speed_decrease_set_point. -
closed_loop=False: The script sends a Recommendation to adjust the motor speed to the speed_decrease_set_point value, without making the change directly. This Recommendation will be shown on the Kelvin UI for users to accept or reject.
-
-
Continuous Operation: The stream decorator will continue to monitor for new incoming messages while the
app.run()will keep your Application running indefinitely.
Success
Congratulations! You have successfully created your Application.
Once you have successfully created your first Application, it's crucial to test it locally to ensure it works as expected. Local testing allows you to catch and fix issues early, improving the quality and reliability of your app.
Let's now move on to testing this Application.
3. Test Application

In the Kelvin SDK there is a test tool to help you ingest data to the inputs and debug the outputs to test the performance of your Application. Some of the features include:
- Ingest Simulated Data: Inject random values at a specified interval to the app inputs using the command
kelvin app test simulator - Ingest CSV file: Read a CSV file and send the data to the app inputs using the command
kelvin app test csv - Verify outputs: Verify the outputs of the app like control changes and recommendations
Testing with historical CSV file
The Kelvin SDK test csv tool is designed to allow testers to ingest messages from a CSV file for testing purposes.
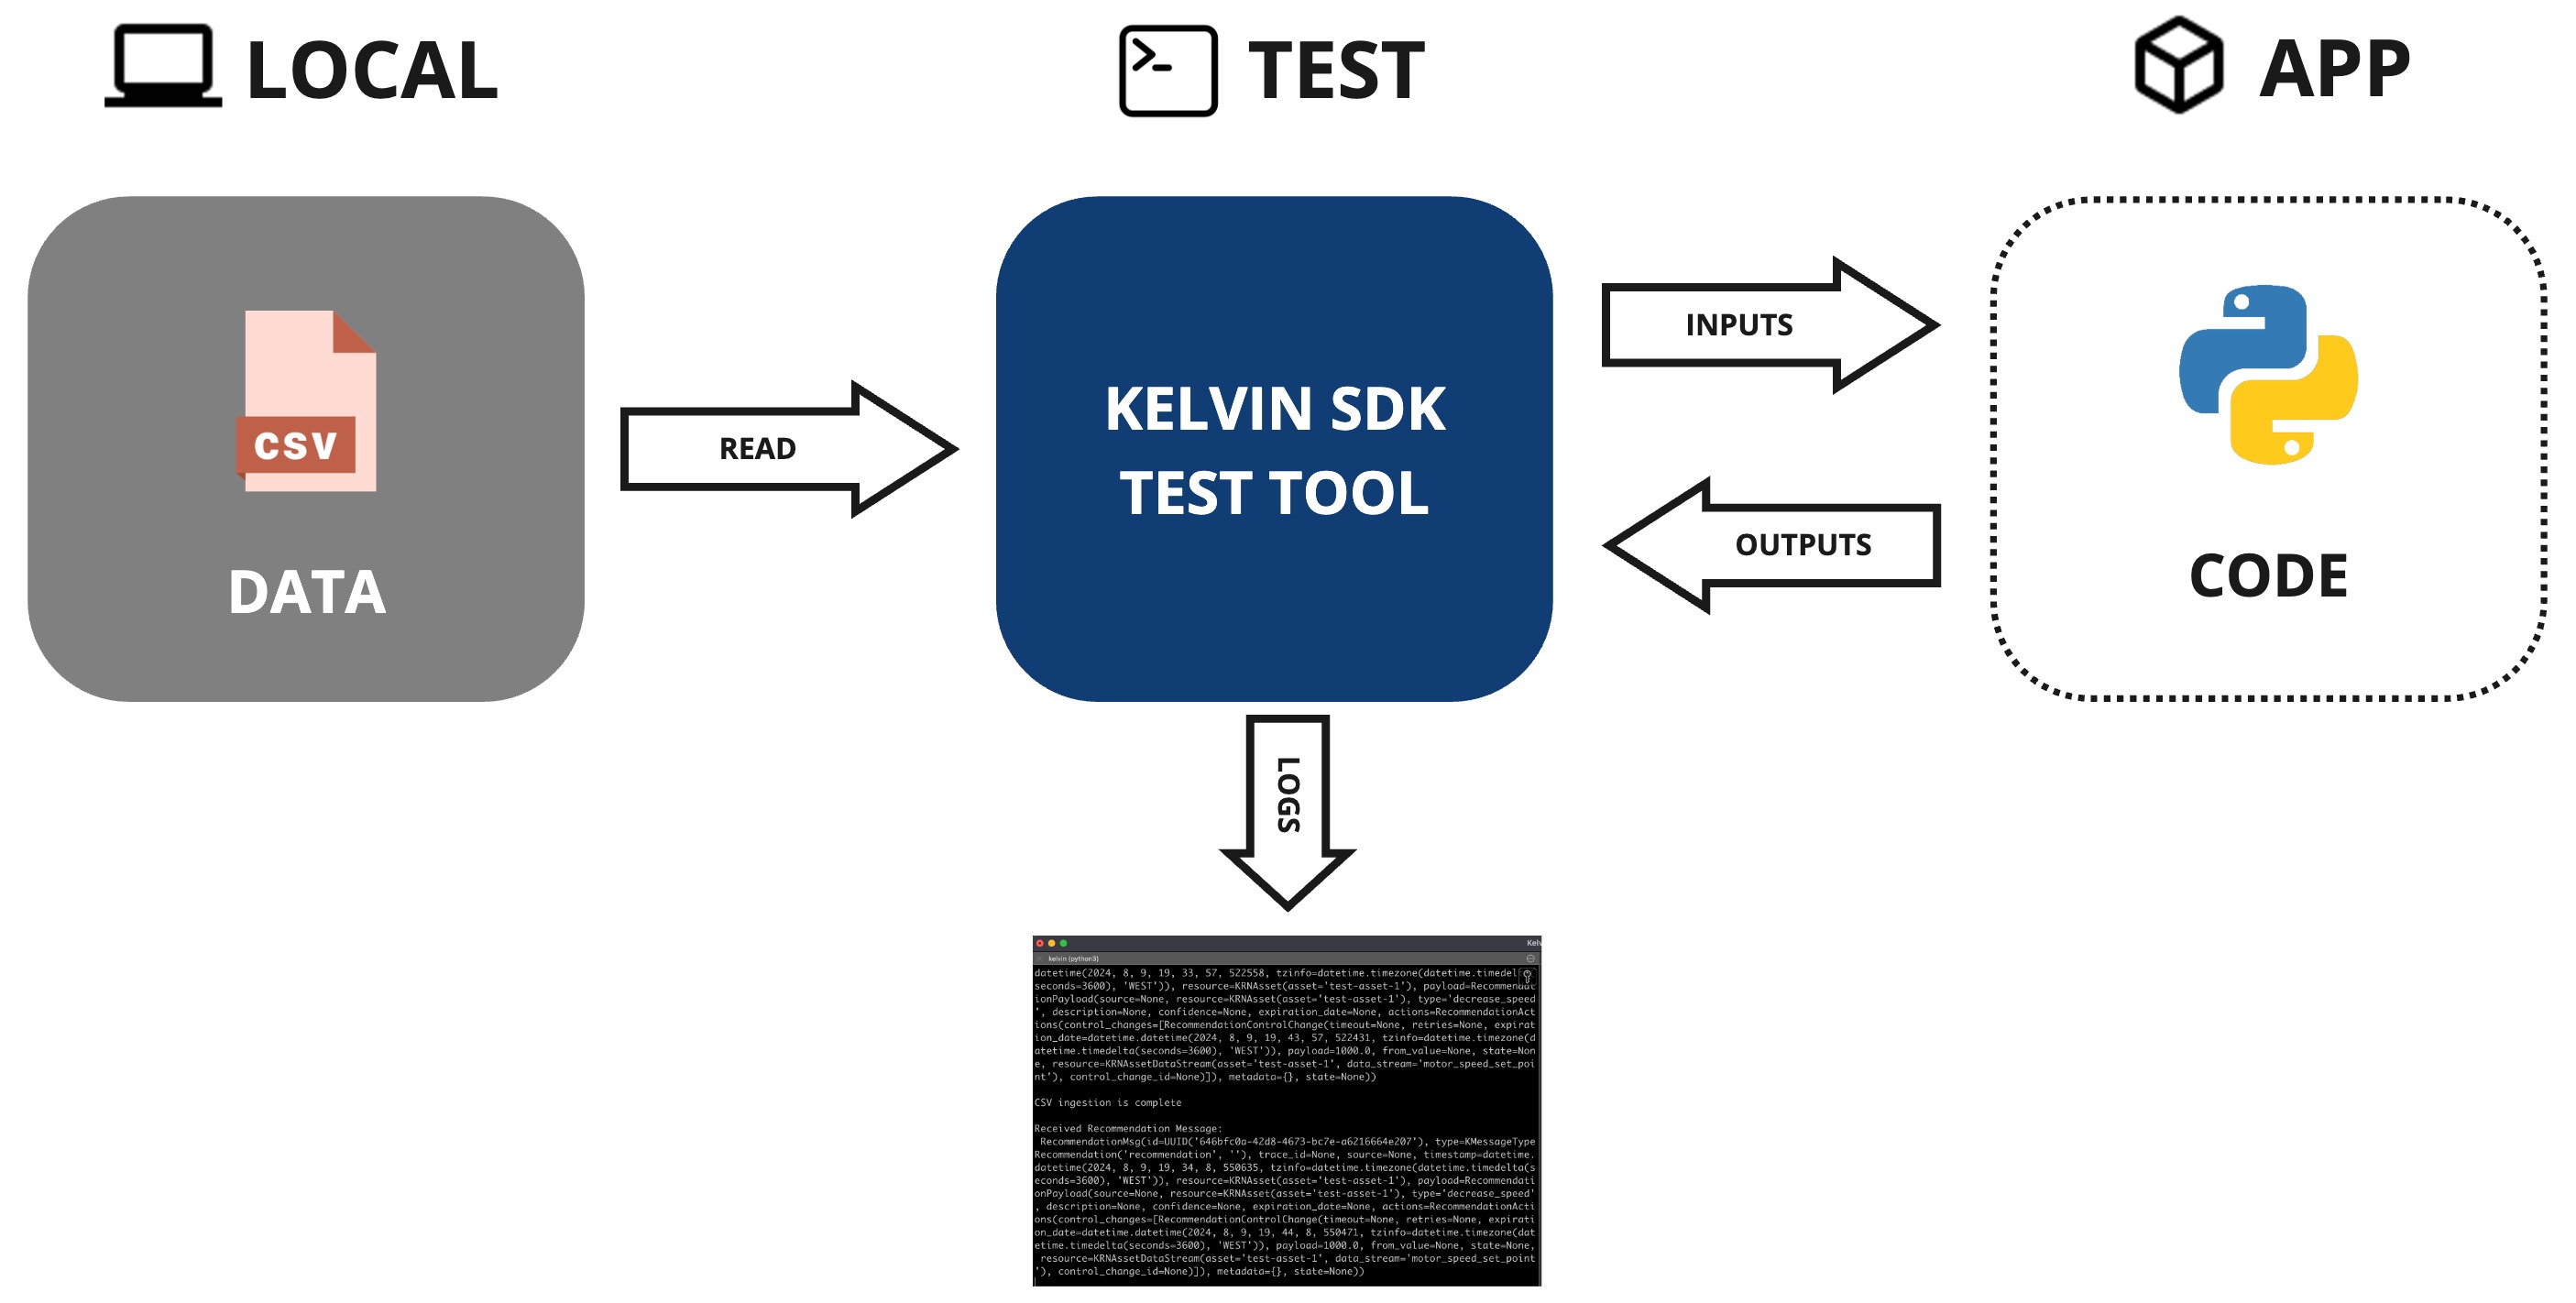
CSV Tool Overview
The test csv tool supports a variety of options to customize its behavior. Below is a list of the available options:
| Test Parameters | Required | Description | Note |
|---|---|---|---|
--csv TEXT |
required | Path to the CSV file | N/A |
--config TEXT |
optional | Path to the app.yaml |
Default: Current directory |
--publish-interval CSV|FLOAT |
optional | Publish interval. Set either to "csv" to use the interval between csv rows or to a number to set afixed publishing interval in seconds. | Default: csv |
--ignore-timestamps |
optional | Ignore CSV timestamps | N/A |
--now-offset |
optional | Offsets the first csv timestamp to the current time | N/A |
--replay |
optional | Continuously publish data from CSV when reaching EOF | N/A |
--asset-count INTEGER |
optional | Number of Assets (test-asset-N) | Default: 1 |
--assets PATH |
optional | Assets Info (Properties) CSV file | N/A |
--asset-parameter TEXT |
optional | Sets App Parameter | Can be used multiple times |
CSV File Structure
To structure the CSV file for your application, please follow the rules outlined below:
-
Timestamp Column:
- The first column should be labeled as timestamp.
- The timestamp should follow one of the supported formats by the Arrow library. Examples of accepted formats include:
YYYY-MM-DD HH:mm:ssYYYY/M/D HH:mmYYYYDDDD HH:mm- Other Arrow-compatible formats
-
Asset Column:
Note
If you use the
--asset-countoption, then thisassetcolumn and external asset CSV file will be ignored.- Optionally include an
assetcolumn to link it to a list of assets and their properties stored in another CSV file, as specified by the--assetoption. - During testing, the
assetname in the CSV column will be matched with theassetname in the external asset CSV file, injecting all associated asset properties.
The asset CSV file contains the asset name and associated properties.
The first column (Name ID) must contain the asset names, and any subsequent columns should define property names and their corresponding values, with each column representing one property.
Example of an asset CSV file with asset names and the properties
diameterandtype: - Optionally include an
-
Input Columns:
Note
If you do not use the
--assetoption mentioned above then you can define the number of assets to test using the--asset-countoption.- Include additional columns for each input defined in your
app.yamlfile. These columns represent the various data stream inputs your application receives. - Example input columns might include:
- motor_temperature
- pressure
- gas_flow
- Include additional columns for each input defined in your
-
Optional App Parameters:
- If you have optional app parameters defined in your
app.yamlfile, include them as additional columns. These parameters can be useful for evaluating different operational behaviors. - Example optional parameter columns might include:
- temperature_max_threshold
- speed_decrease_set_point
- closed_loop
- If you have optional app parameters defined in your
Download CSV Test File
Now that you're familiar with the basics of the test csv tool, it's time to put the Event Detection Application to the test using a CSV file.
Download the CSV file from the link below and save it to your local machine:
Important Reminder
Make sure to copy the downloaded CSV file into the directory of your Application project before proceeding.
The CSV file you downloaded contains the following data:
You can view the guide in our video tutorial or read our step by step written guide.
Video Guide
Watch the test section of the develop quick start guide.
Success
This will start the video playback at the 5 minute 30 second mark. You can rewind to see the full process of developing and testing an Application in under 8 minutes.
Written Guide
Test your Event Detection Application
Open a terminal window on the folder of your Application project and follow the steps below to test your Event Detection Application using the CSV file you downloaded:
-
Run the CSV Test Tool:
Starting Test Tool with CSV File Data and you should see the following output:
Test Tool Output -
Open a NEW terminal window and run the Application:
and you should see the following output:
-
Go to the CSV Tool terminal and check the logs:
And here is a video showing the test in action:
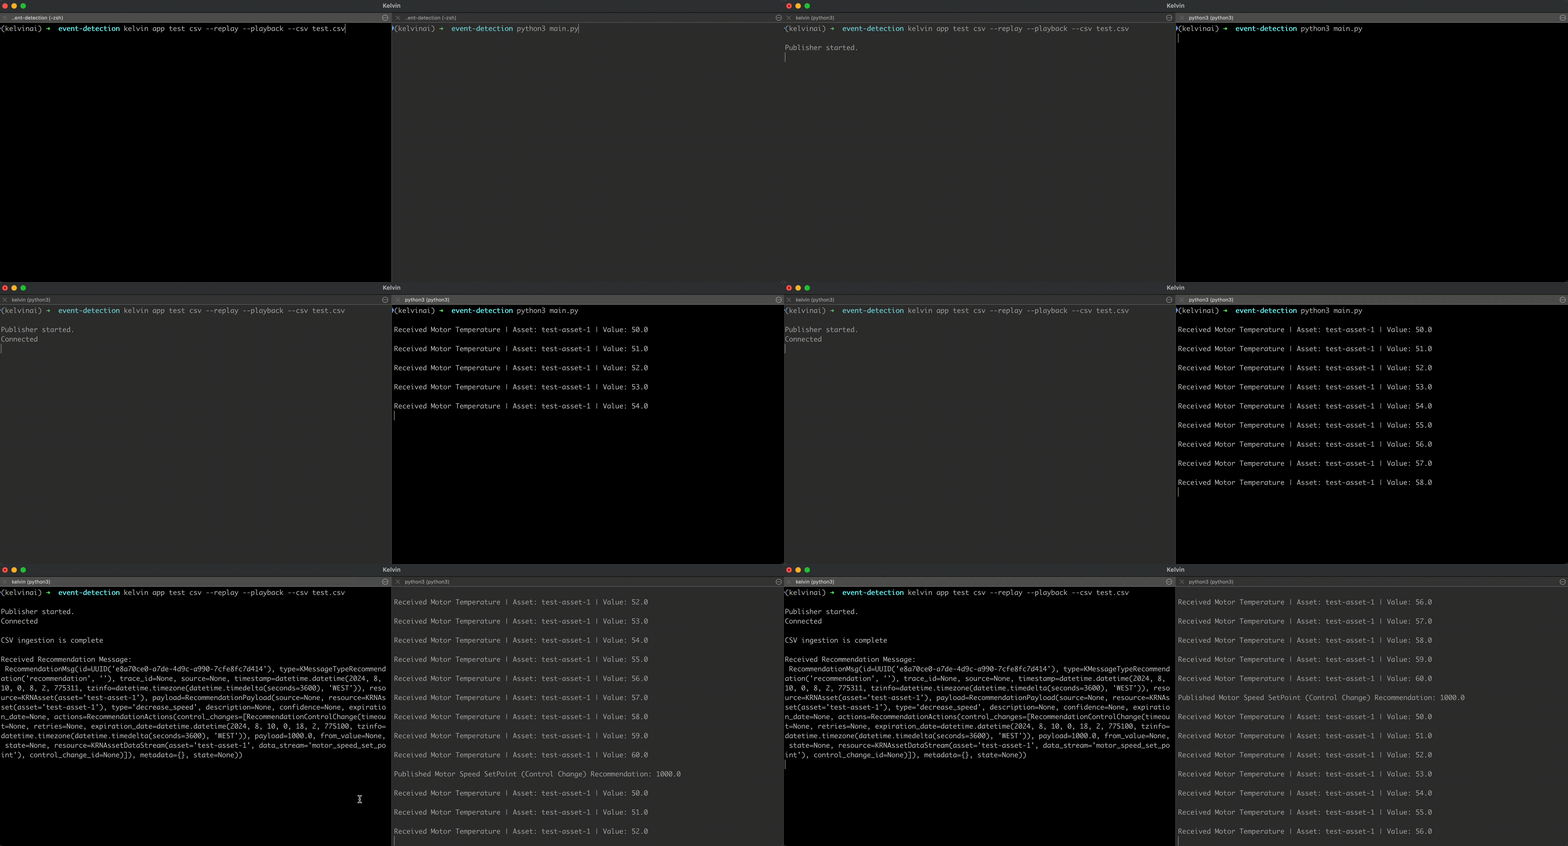
As you can see, the Application is receiving the motor temperature data and publishing a control change recommendation to decrease the motor speed set point.
Success
Congratulations! You have successfully tested your Application.
After successfully testing your Application, we can now move onto packaging and uploading it to your Kelvin Cloud instance.
4. Upload Application

Now it is time to build your image and upload it to the Kelvin Cloud instance.
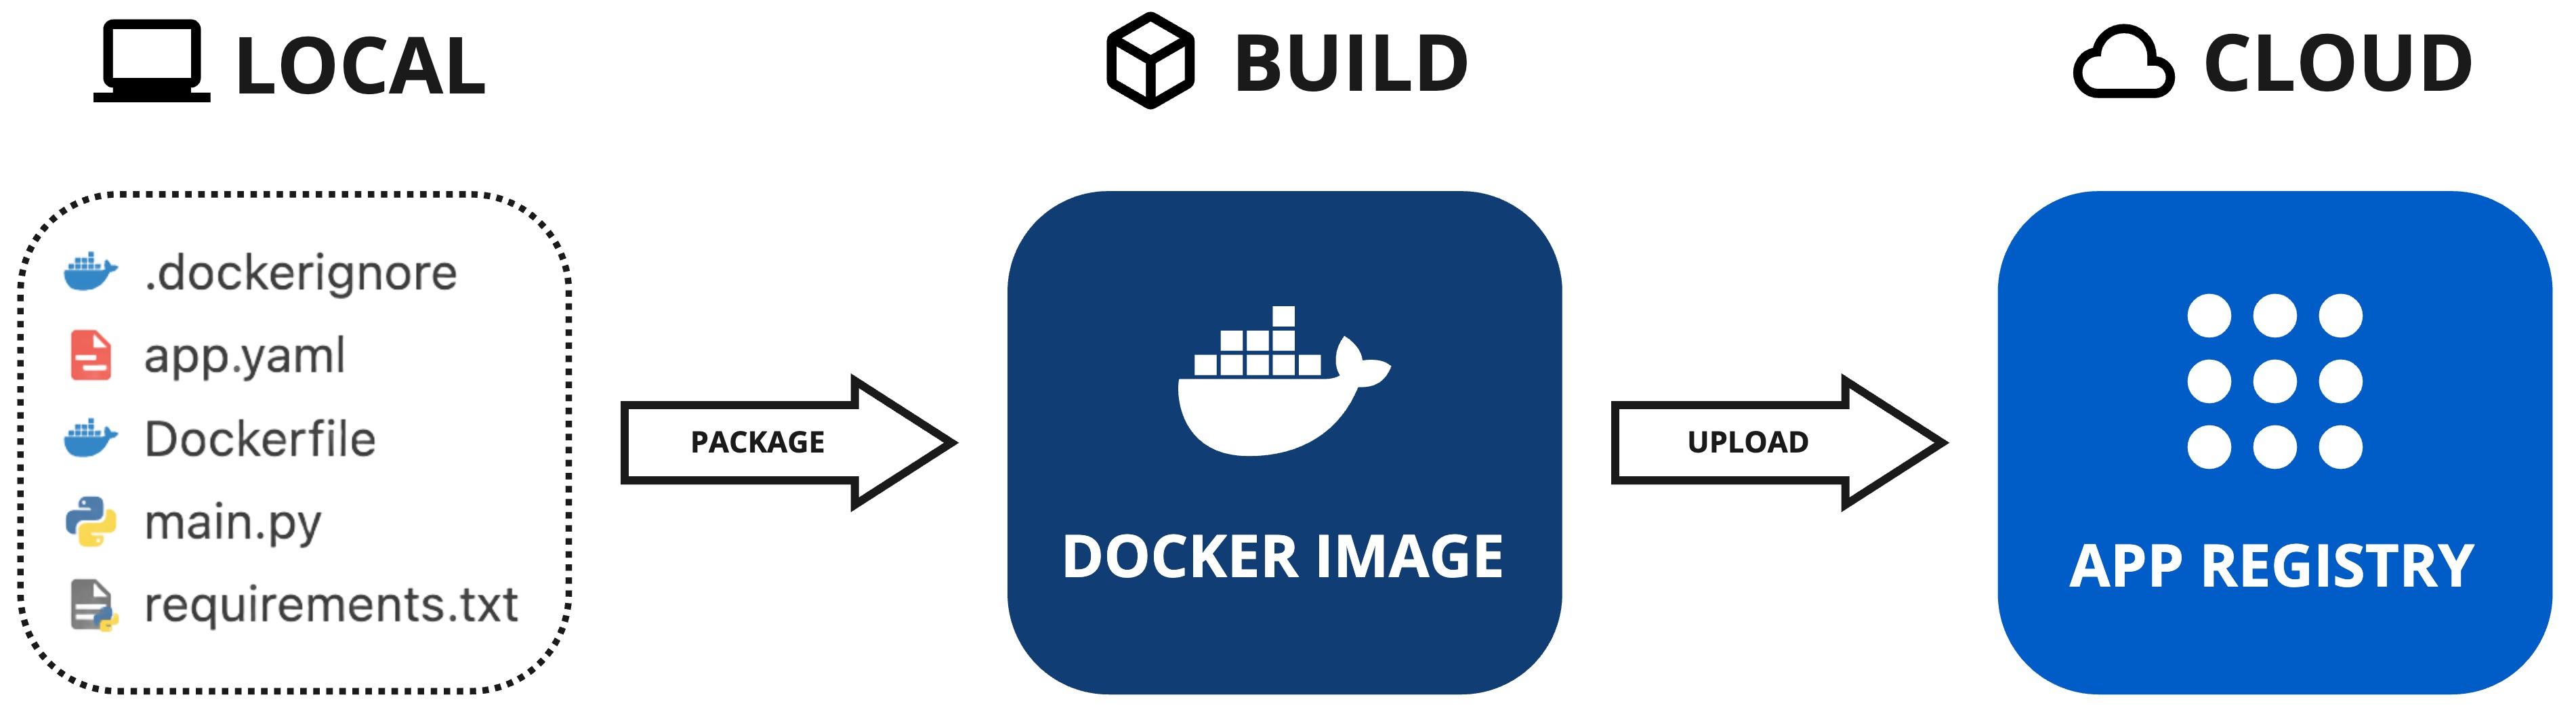
The App Registry is a centralized repository that stores all the Applications you create. Once uploaded, you can deploy your Application to any Kelvin Edge cluster connected to your Kelvin Cloud instance.
Let's start by making sure your Application is ready for upload.
Prerequisites
The main section in the app.yaml file defines crucial attributes such as the unique name, display name, description, and version of your app. Below is an example of what your app.yaml file might look like:
| app.yaml Example | |
|---|---|
Conflicting Versions
If you try to upload an app with the same version number as an existing one in the App Registry, you'll encounter an error. Always ensure you increment the version number before uploading.
SDK Login
Before uploading your app, you need to login the SDK with your Kelvin Cloud credentials.
Open a terminal and run the following command:
| Kelvin SDK Command Line Login | |
|---|---|
And type in your Kelvin Cloud credentials when prompted.
Build (optional)
Before uploading, you have the option to build your application to verify that all components compile successfully.
Note
This step is optional. You can proceed directly to the upload step, which will automatically build the Application as part of the process.
Open a terminal in the directory where your app and its associated files are located, and run the following command:
| Building Your Application | |
|---|---|
| Options | Description |
|---|---|
--app-dir PATH |
The path to the application's directory. Assumes the current directory if not specified. |
--build-arg TEXT |
Additional custom arguments that are passed straight to the docker build command. |
--multiarch TEXT |
Comma-separated list of architectures to build.Supported Architectures: amd64,arm64,arm32. ny other value will be passed to docker build engine as is.Default is amd64 |
-v, --verbose |
Display all executed steps to the screen. |
--help |
Show this message and exit. |
Upload
Uploading your app is straightforward and requires just a single command. Open a terminal in the directory where your app and its associated files are located, and run the following command:
Reminder
Make sure Docker is installed and running before executing the upload command. Docker is essential for packaging and uploading apps to the App Registry.
| Kelvin SDK Command Line Example | |
|---|---|
As the command runs, you will observe the app being packaged and subsequently uploaded to the App Registry. Here's a sample output:
Congratulations! You successfully uploaded your Kelvin Application™ to the App Registry.
The next step is to configure your Kelvin Cloud instance to simulate a real-world edge deployment.
5. Configure Application

In this section, you will learn how to configure your Kelvin Cloud instance. We will configure the environment to simulate a real-world scenario. Here is a high-level overview of the steps involved:
-
Importing Assets: An Asset in Kelvin denotes a digital representation of a physical or virtual equipment. Each asset is characterized by a set of properties that detail its attributes and by datastreams, which are channels of continuous or time-stamped data related to the asset's operation or state
-
Importing Data Streams: Data streams are the primary source of data for Applications. They represent the real-time data generated by assets and are used as inputs to the Application to generate actionable recommendations and control system adjustments.
-
CSV Connection: A connection in Kelvin is a data source that provides a data stream feed to Applications. In this guide, we will create a CSV connection that will continuously replay a CSV timeseries file.
This demonstration video was done in v5.9.
There may be slight differences with the latest version.
Check the latest documentation for the specific tasks should any feature not quite work as expected.
Video Guide
Watch this quick start guide performed in real time in less than 6 minutes.
Written Guide
Import Assets
In this brief demo you can see how to do this;
Open your browser and navigate to https://<instance>.kelvin.ai. Login with your credentials and you will be presented with the Kelvin UI.
Click on the Asset Management section on the left navigation menu
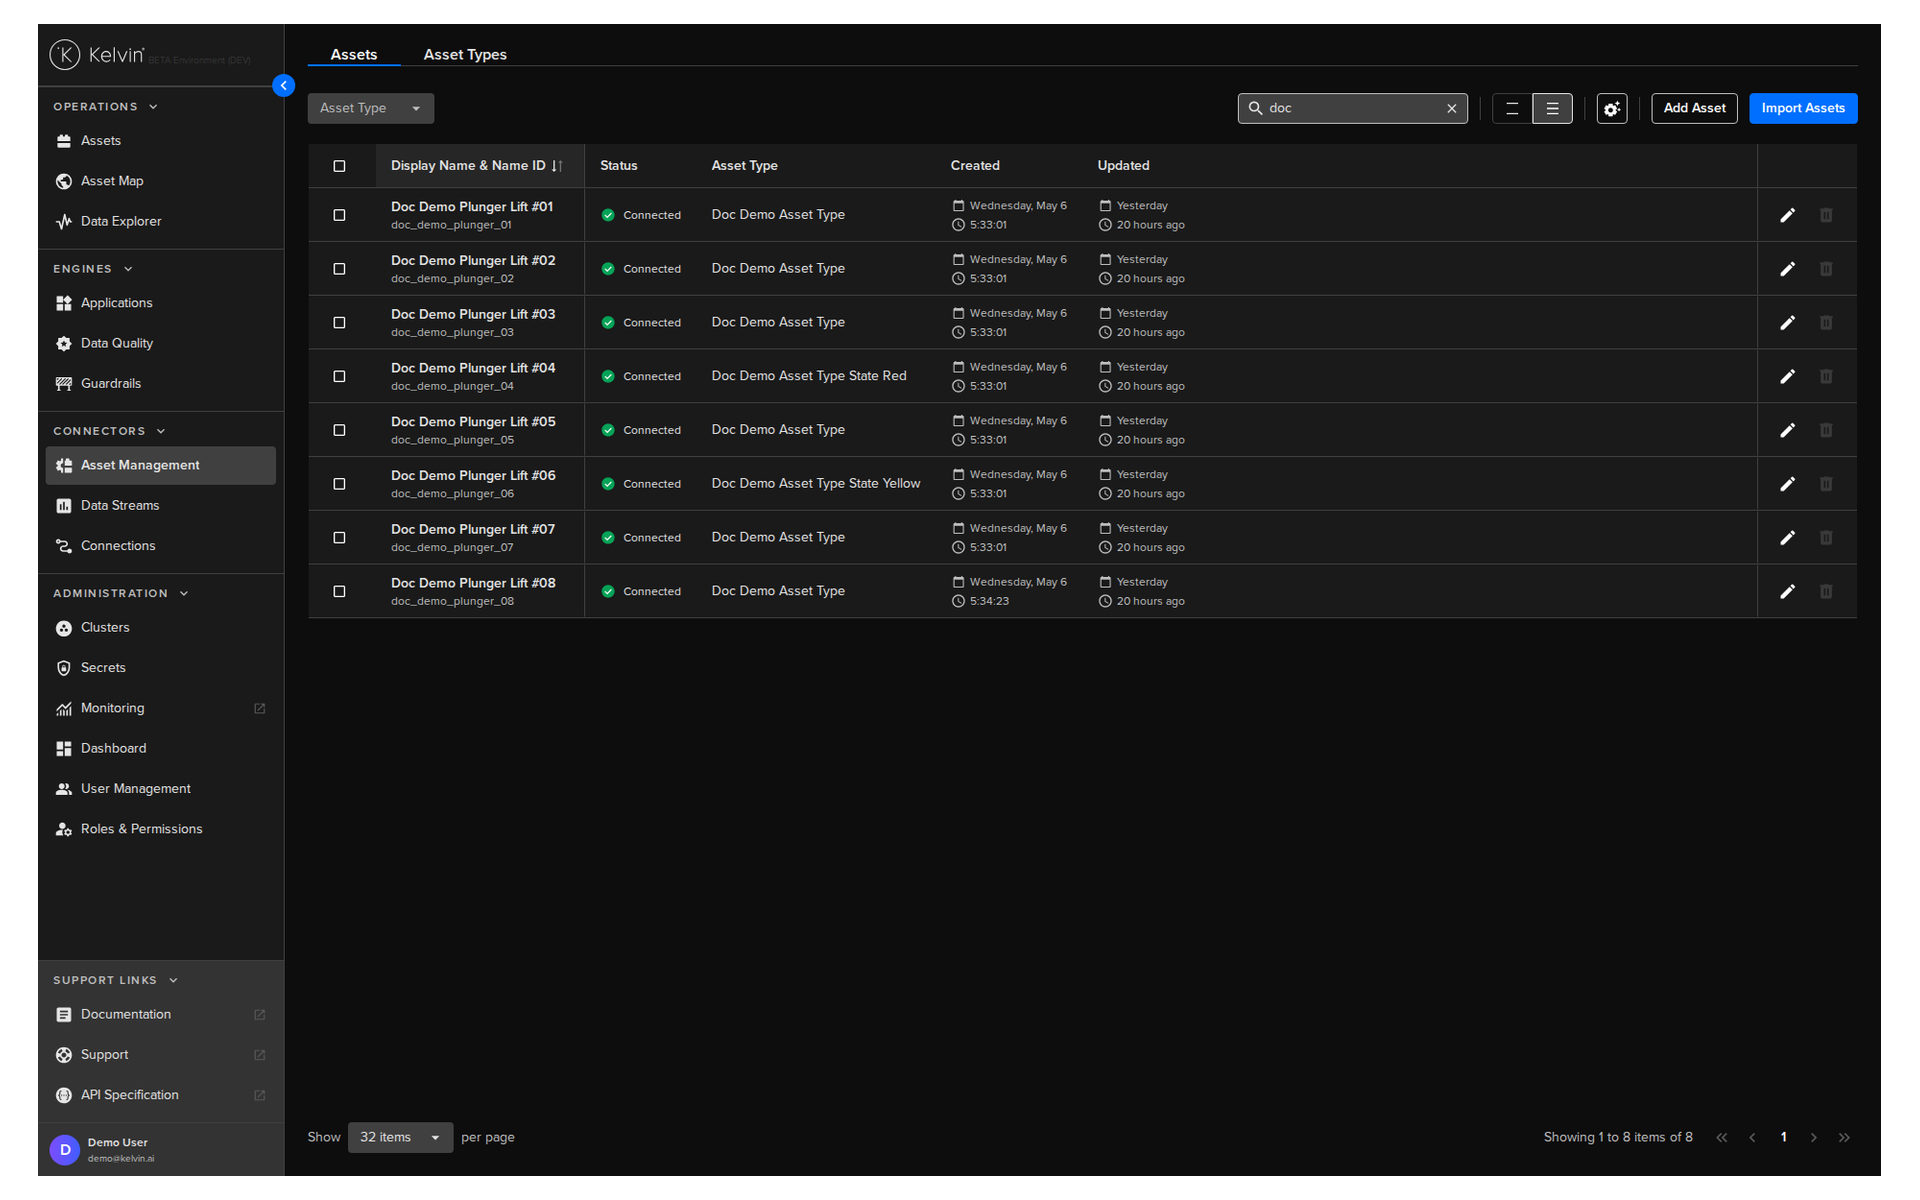
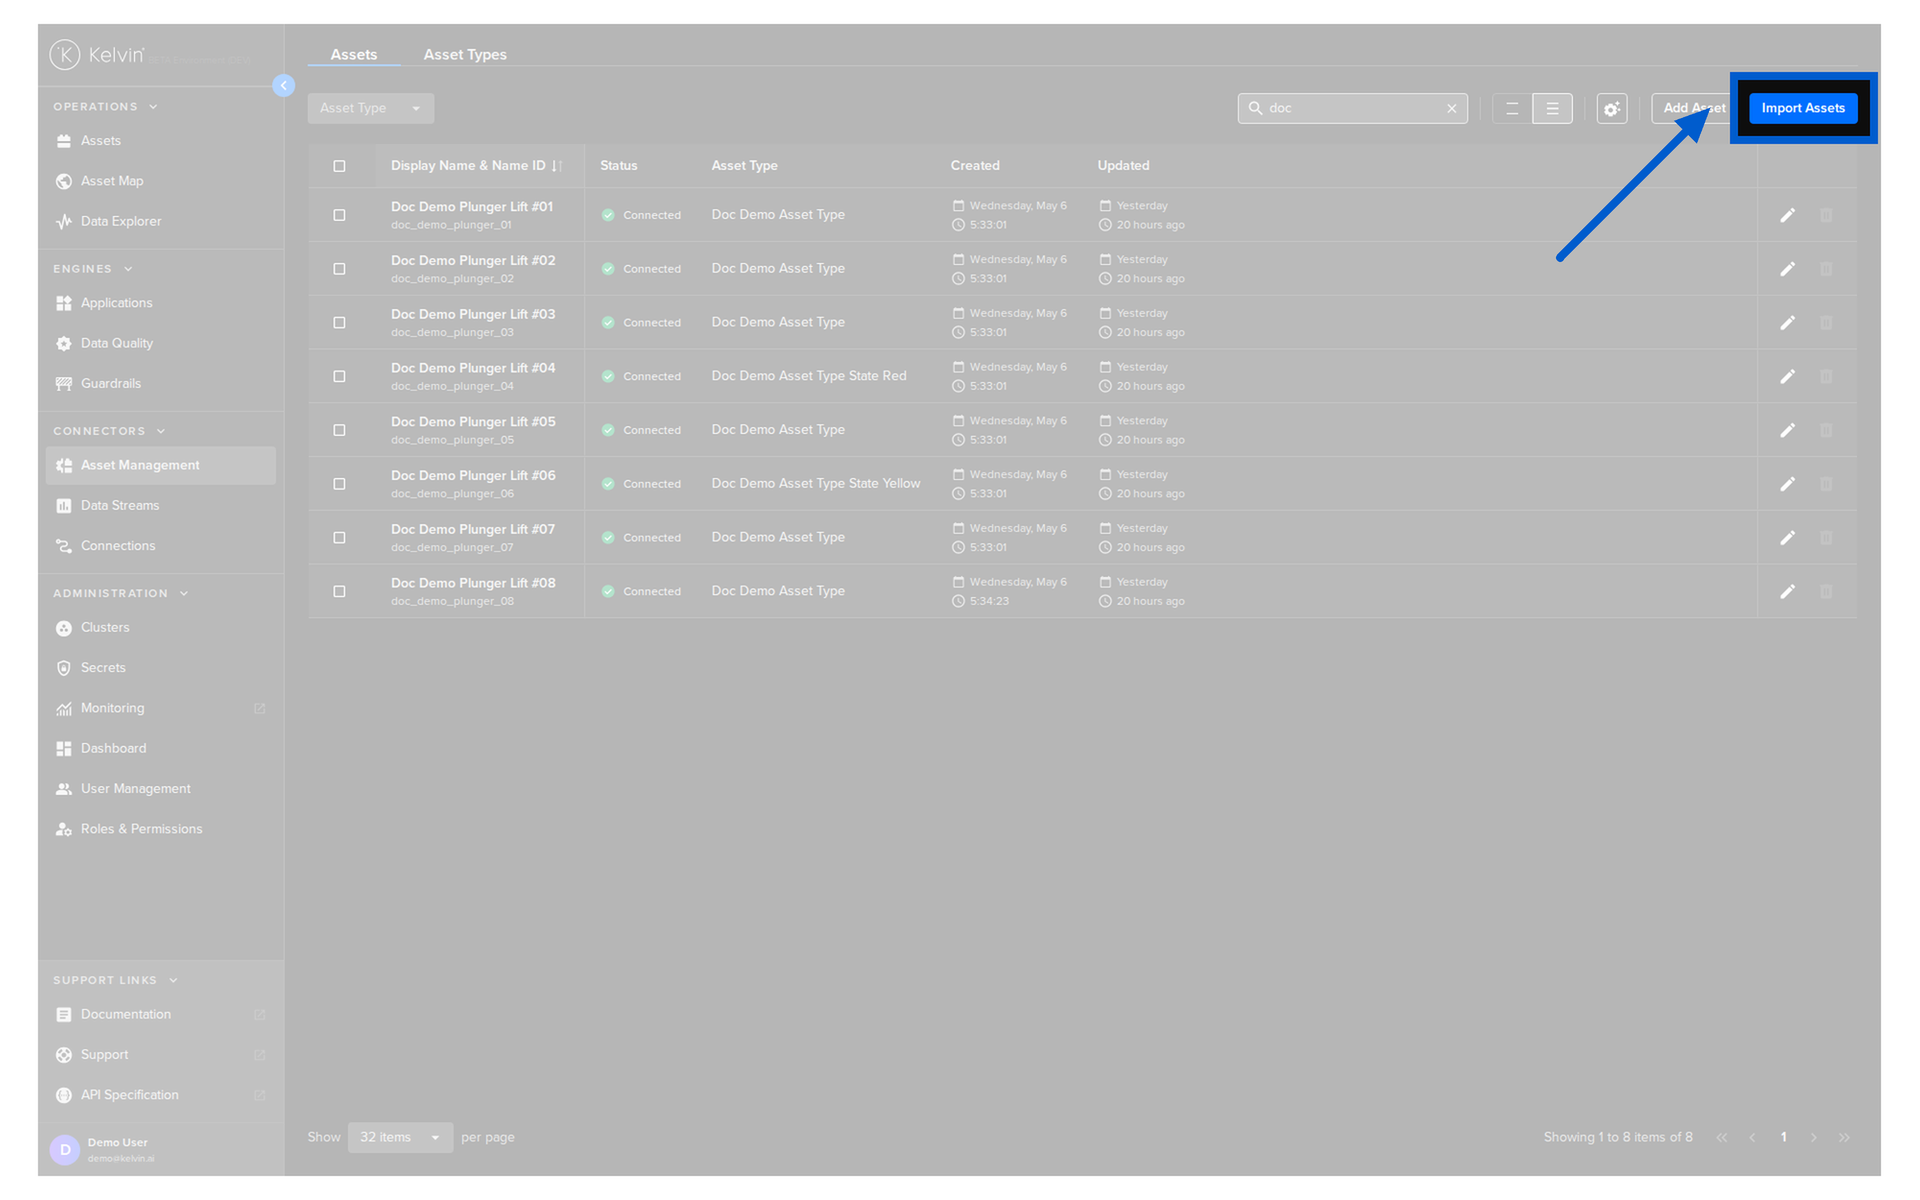
And then click on the Import Assets button on the top right of the page.
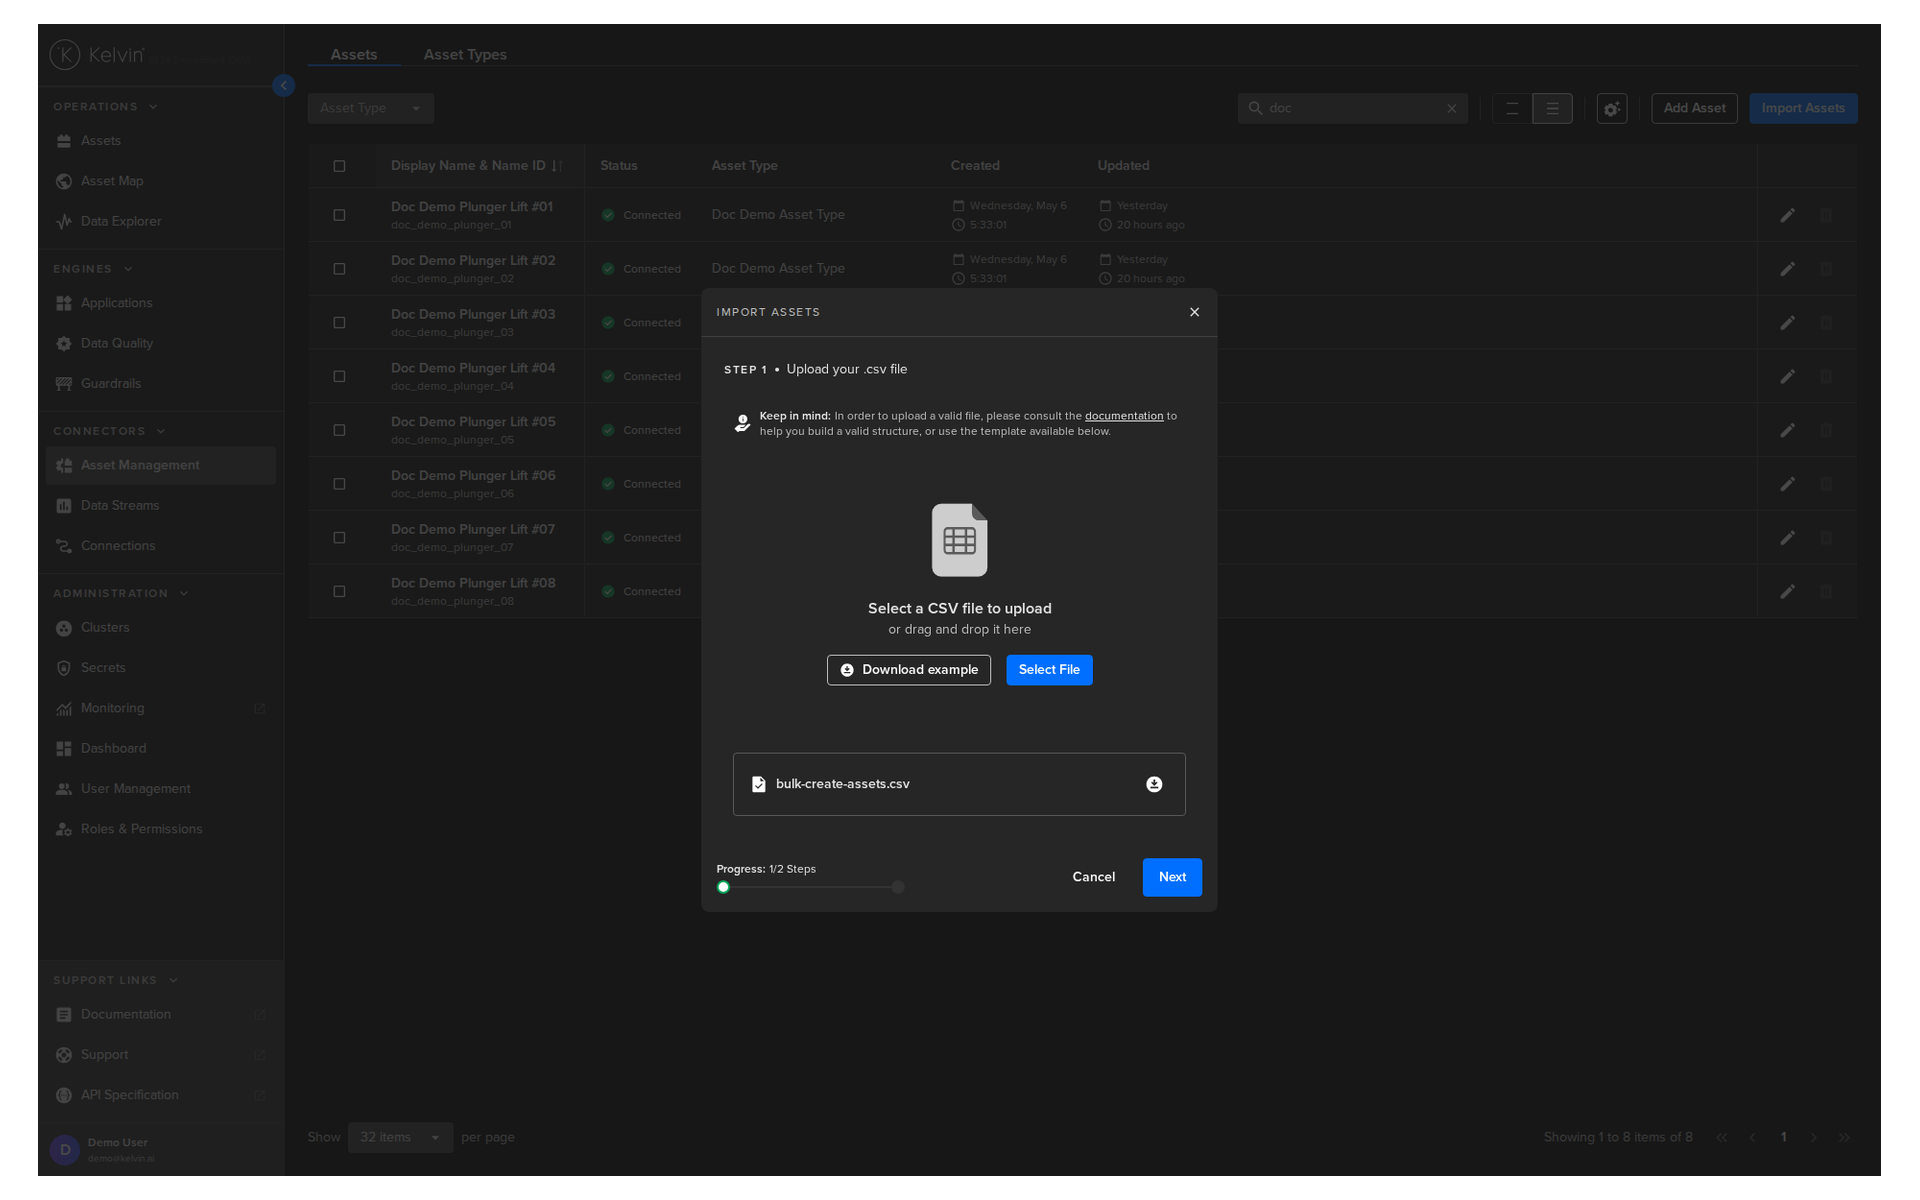
In the popup, you will have the option to download the sample template that gives you the structure you need to follow. Go ahead and click on the Download Template button and save the file.
Info
We have prepared an assets.csv file for you to test. You can download it from the link below and save it to your local machine:
Modify the template with the following data (or just download our ready made CSV file):
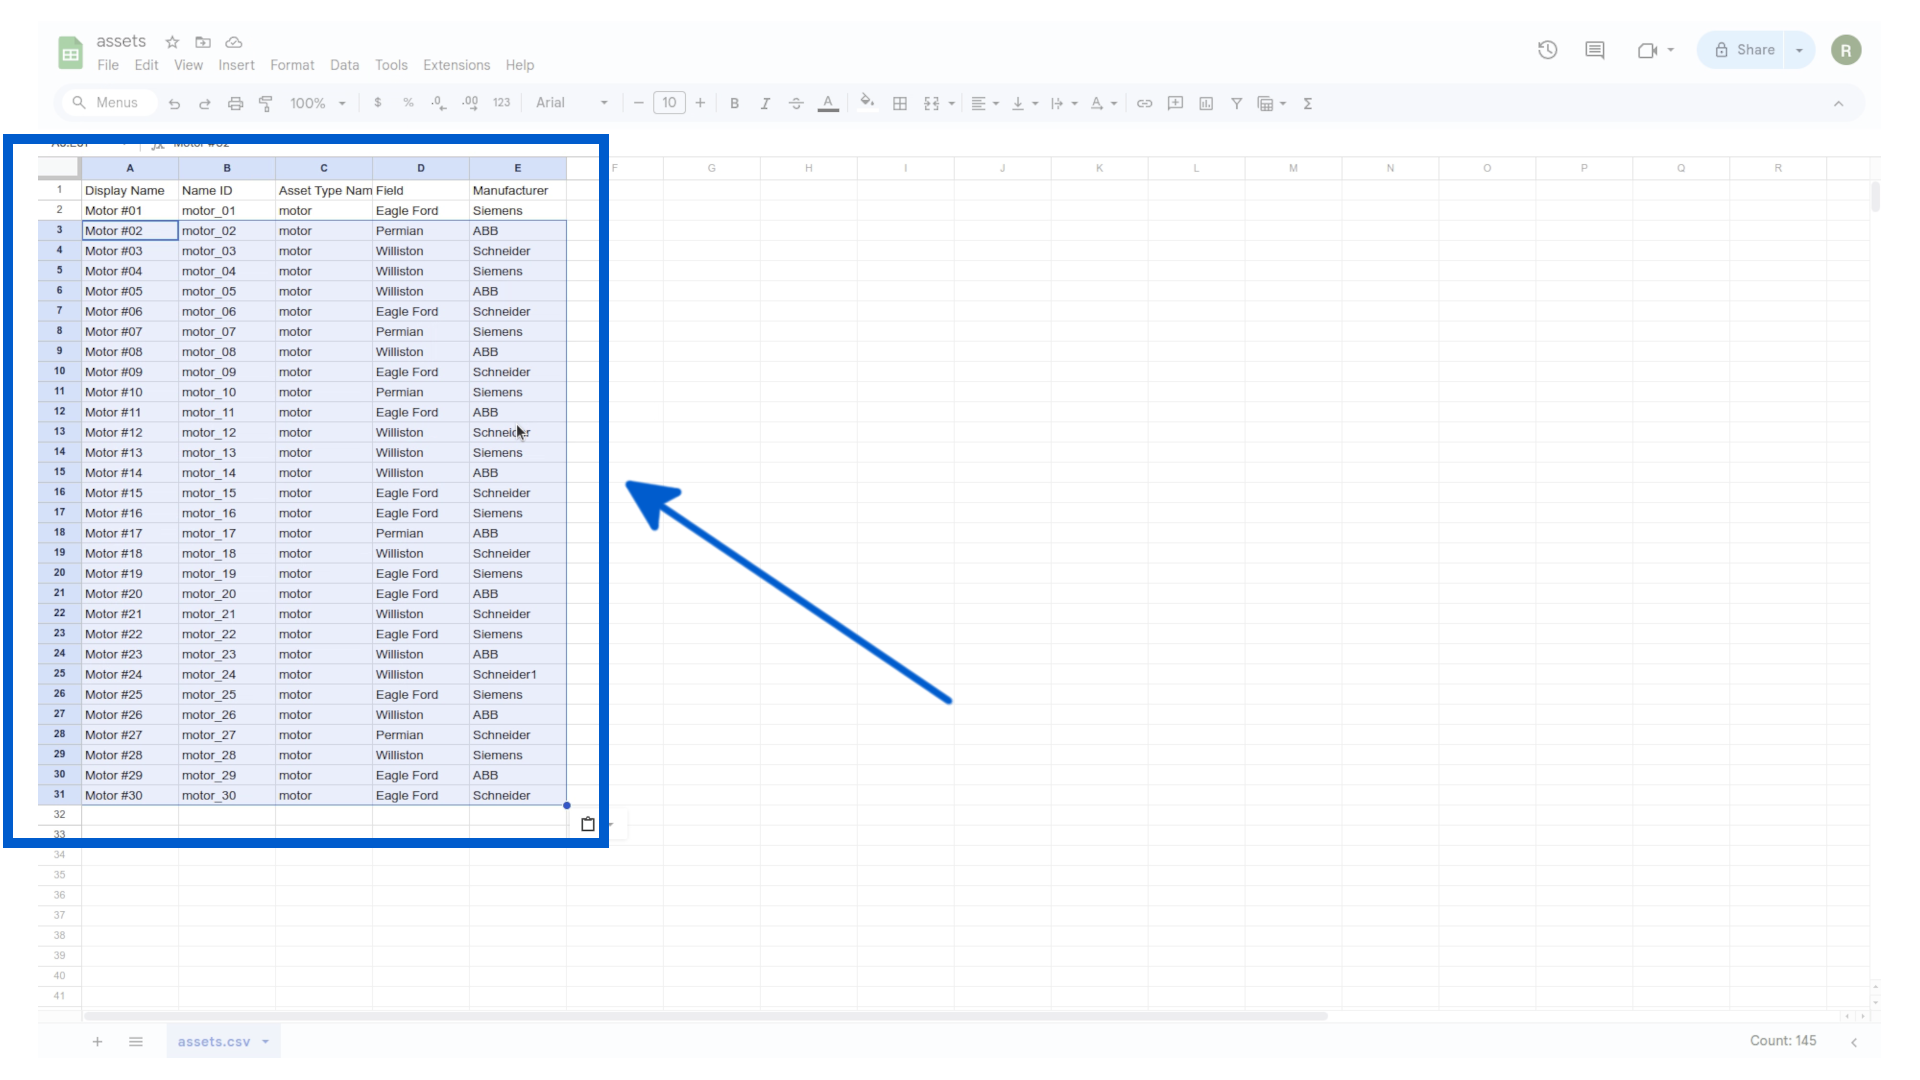
A brief explanation of the columns in the CSV file:
- Display Name: The name of the asset as it will appear in the Kelvin UI.
- Name ID: A unique identifier for the asset.
- Asset Type Name ID: The type of asset (e.g., motor, pump, compressor).
- Field: This is an optional Asset Property with metadata where the asset is located.
- Manufacturer: This is an optional Asset Property with metadata about the manufacturer of the asset.
You can add as many additional Asset Properties as needed, like Location, PLC Type, Well Depth, Motor Configuration, etc.
Next, let's import the assets into your Kelvin Cloud instance.
Upload the previously downloaded assets.csv file and click Next.
Note
In the screenshot you will see the file named assets-filled.csv. when uploading your file, you will see the name of your csv file here instead.
The contents of the file will be validated to make sure there are no errors. If there are any errors, you will be prompted to correct them before proceeding. Next, click on the Import button.
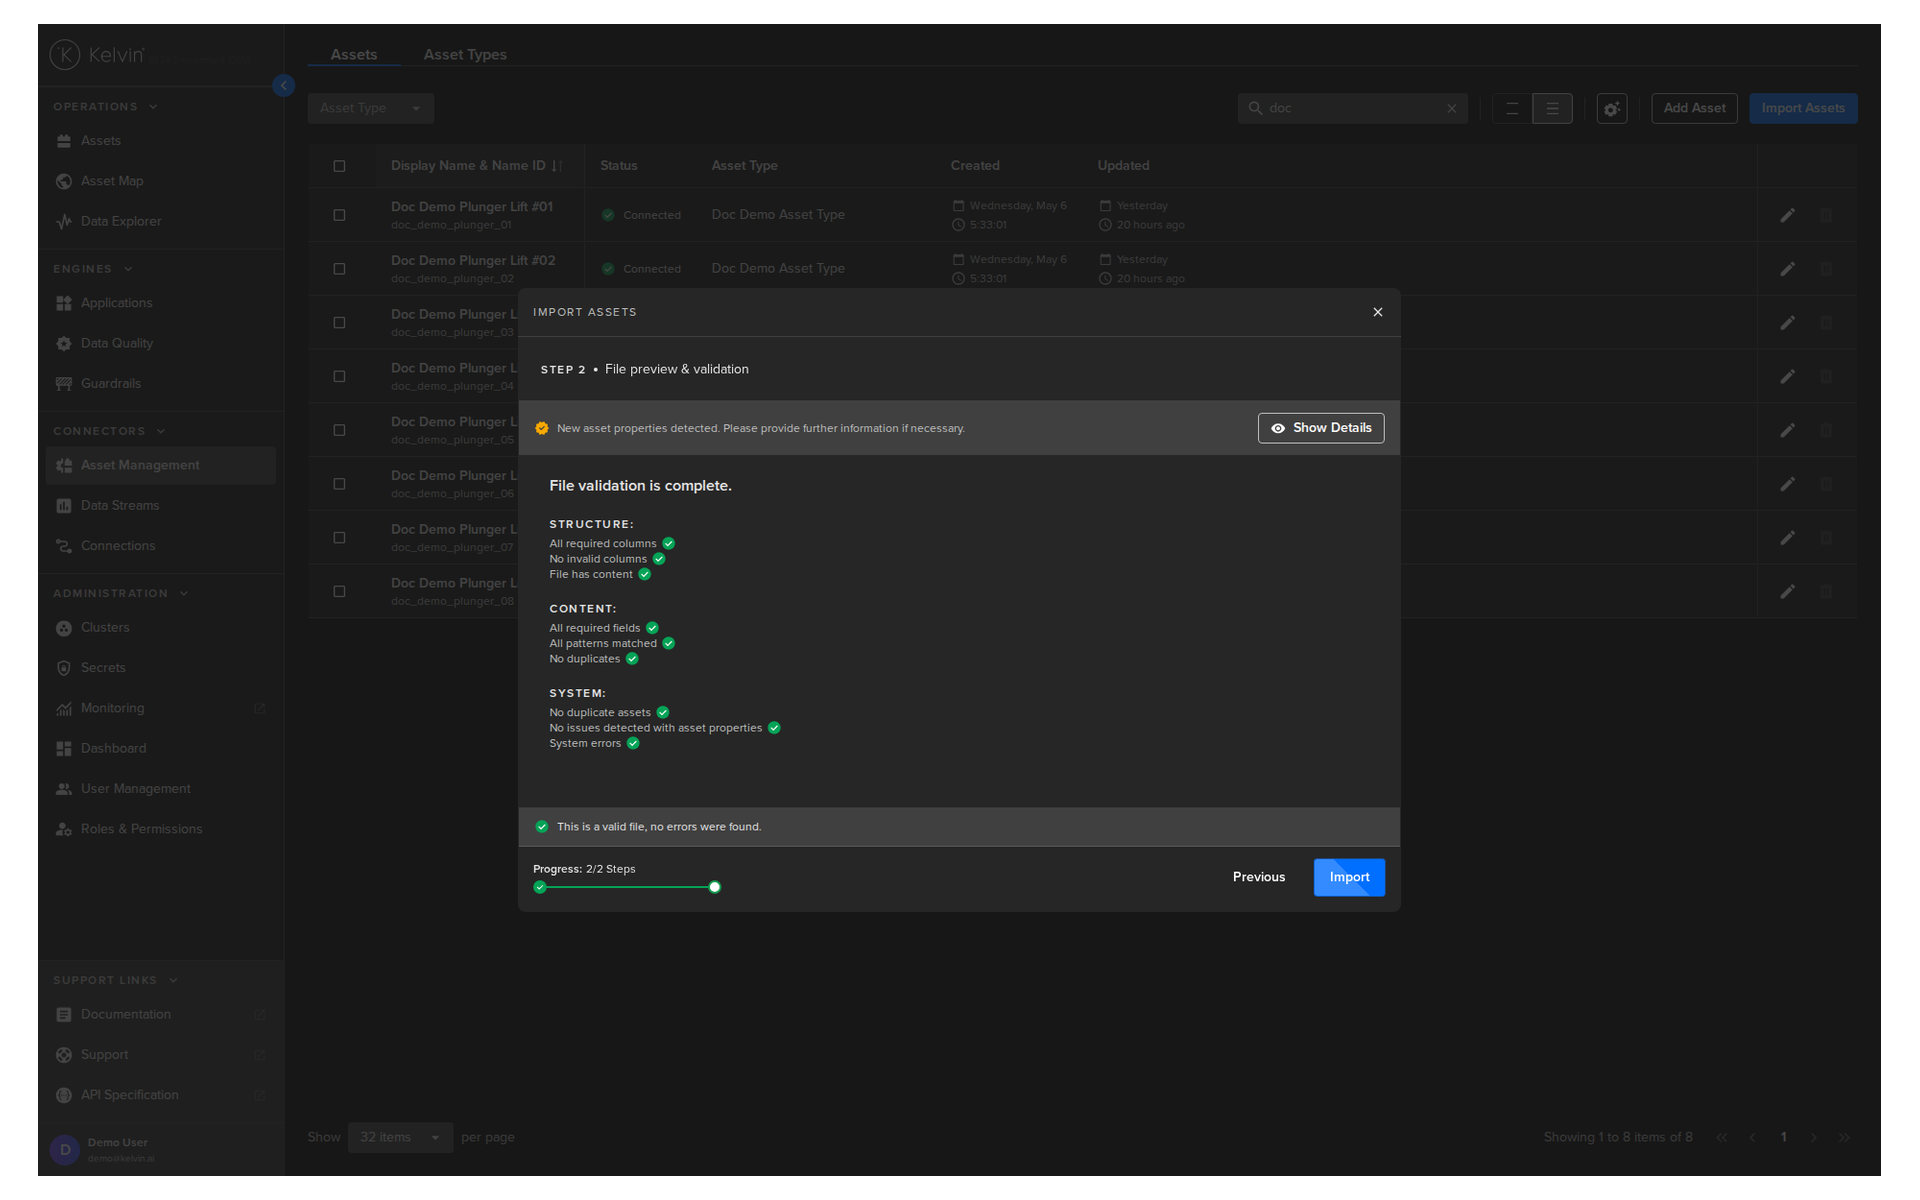
You will then see the assets you imported in the Asset Management section.
Success
Congratulations! You have successfully configured your assets.
Import Data Streams
In this brief demo you can see how to do this;
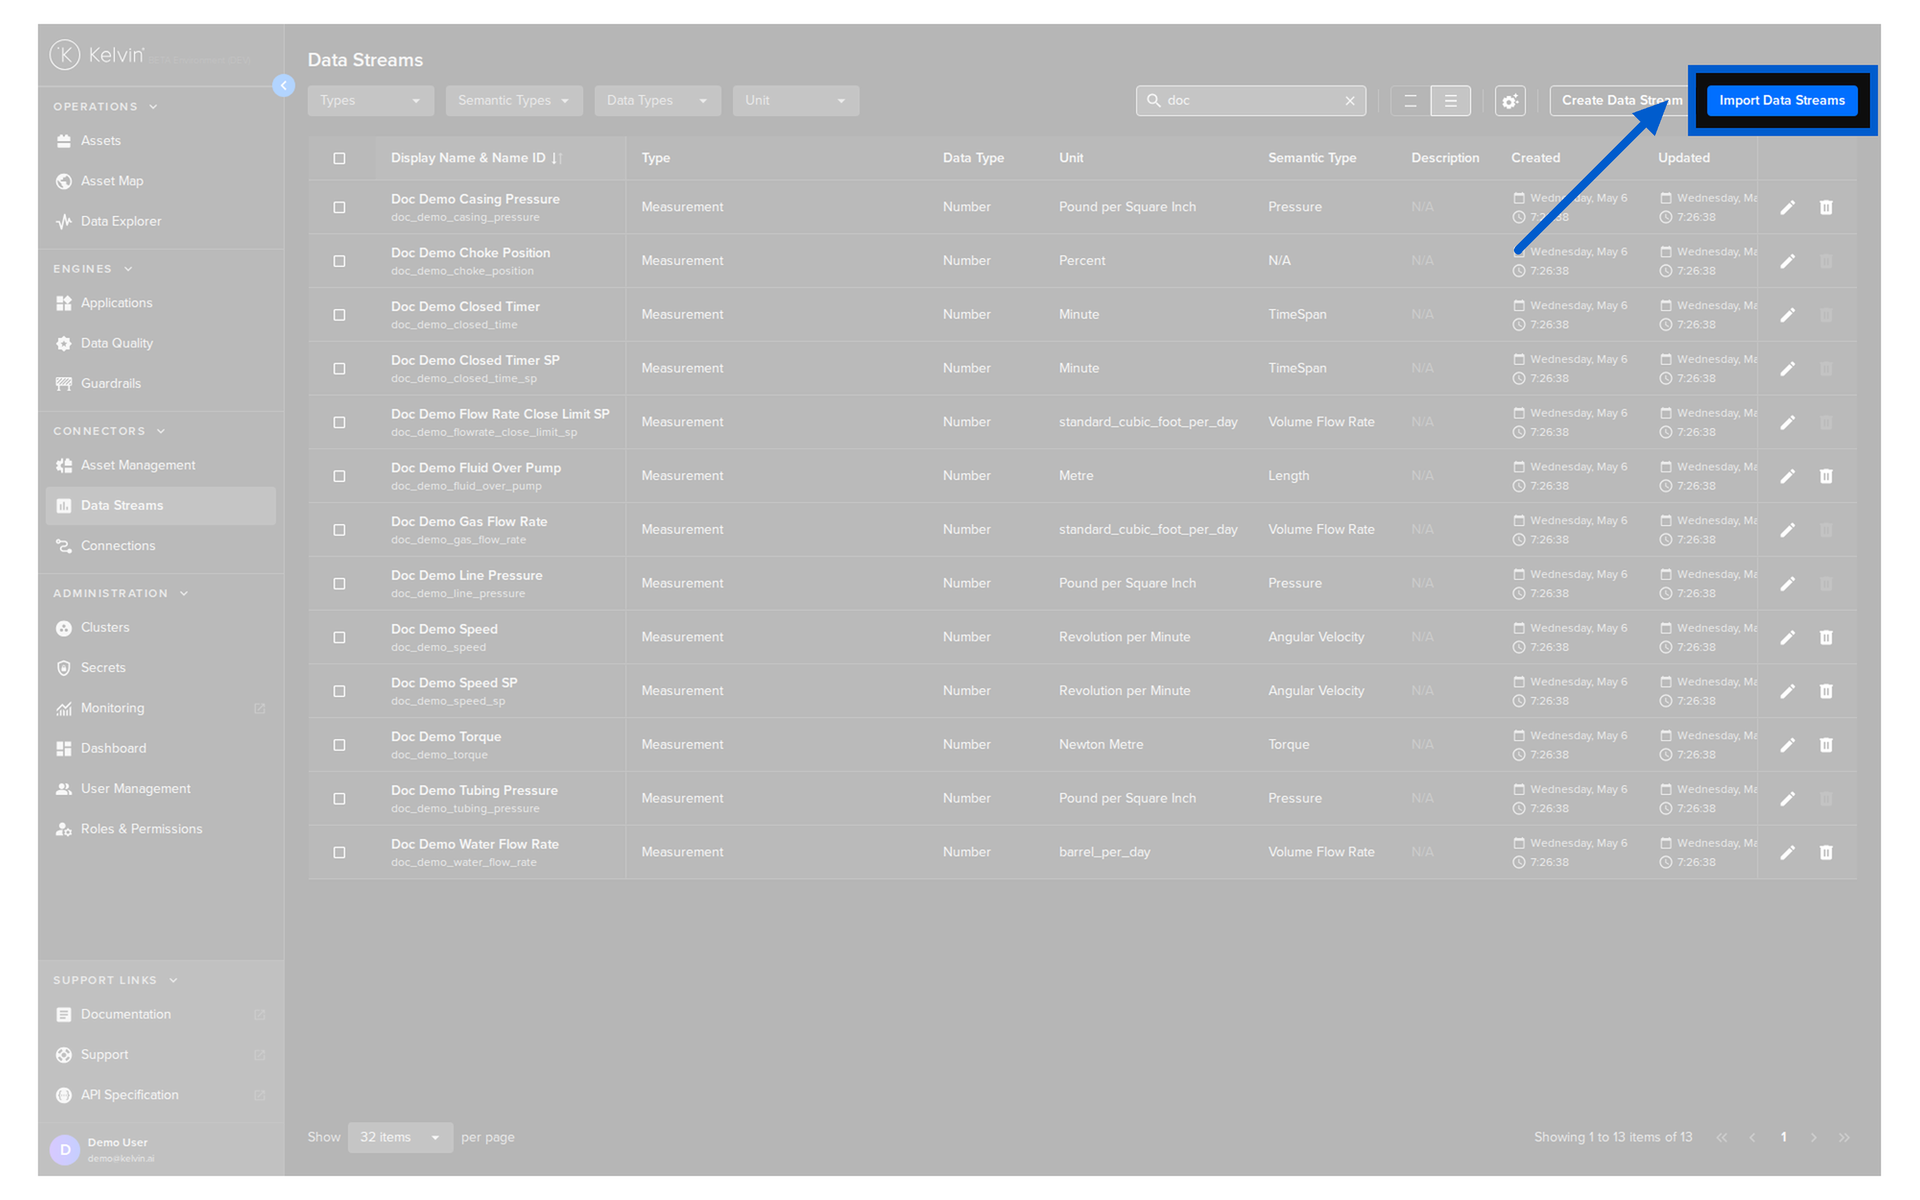
Go to the Kelvin UI. Click on the Data Streams section on the left navigation menu and then click on the Import Data Streams button on the top right of the page.
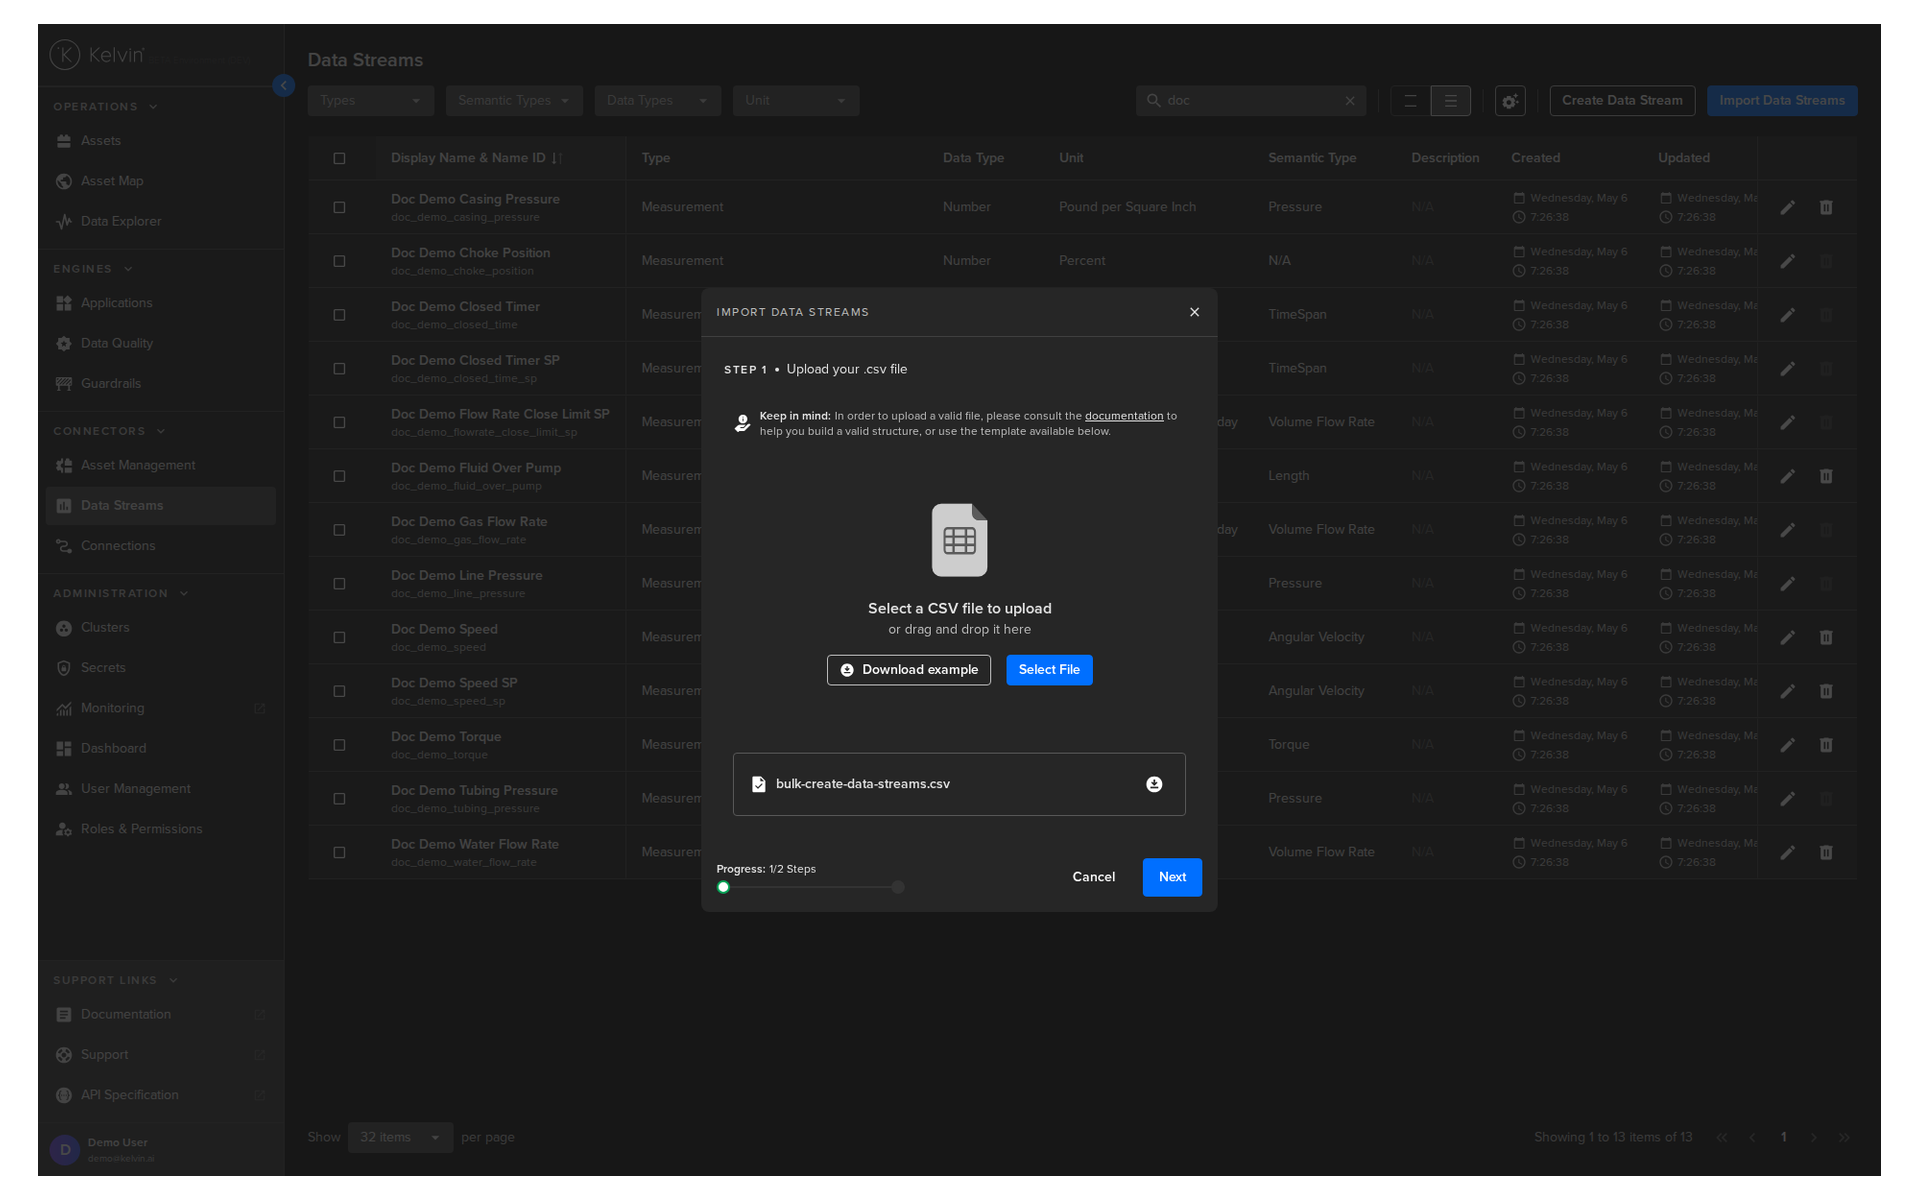
In the popup, you will have the option to download the sample template that gives you the structure you need to follow. Go ahead and click on the Download Template button and save the file.
Info
We have prepared a datastreams.csv file for you to test. You can download it from the link below and save it to your local machine:
Modify the template with the following data (or just download our ready made CSV file):
| Import Data Streams CSV File | |
|---|---|
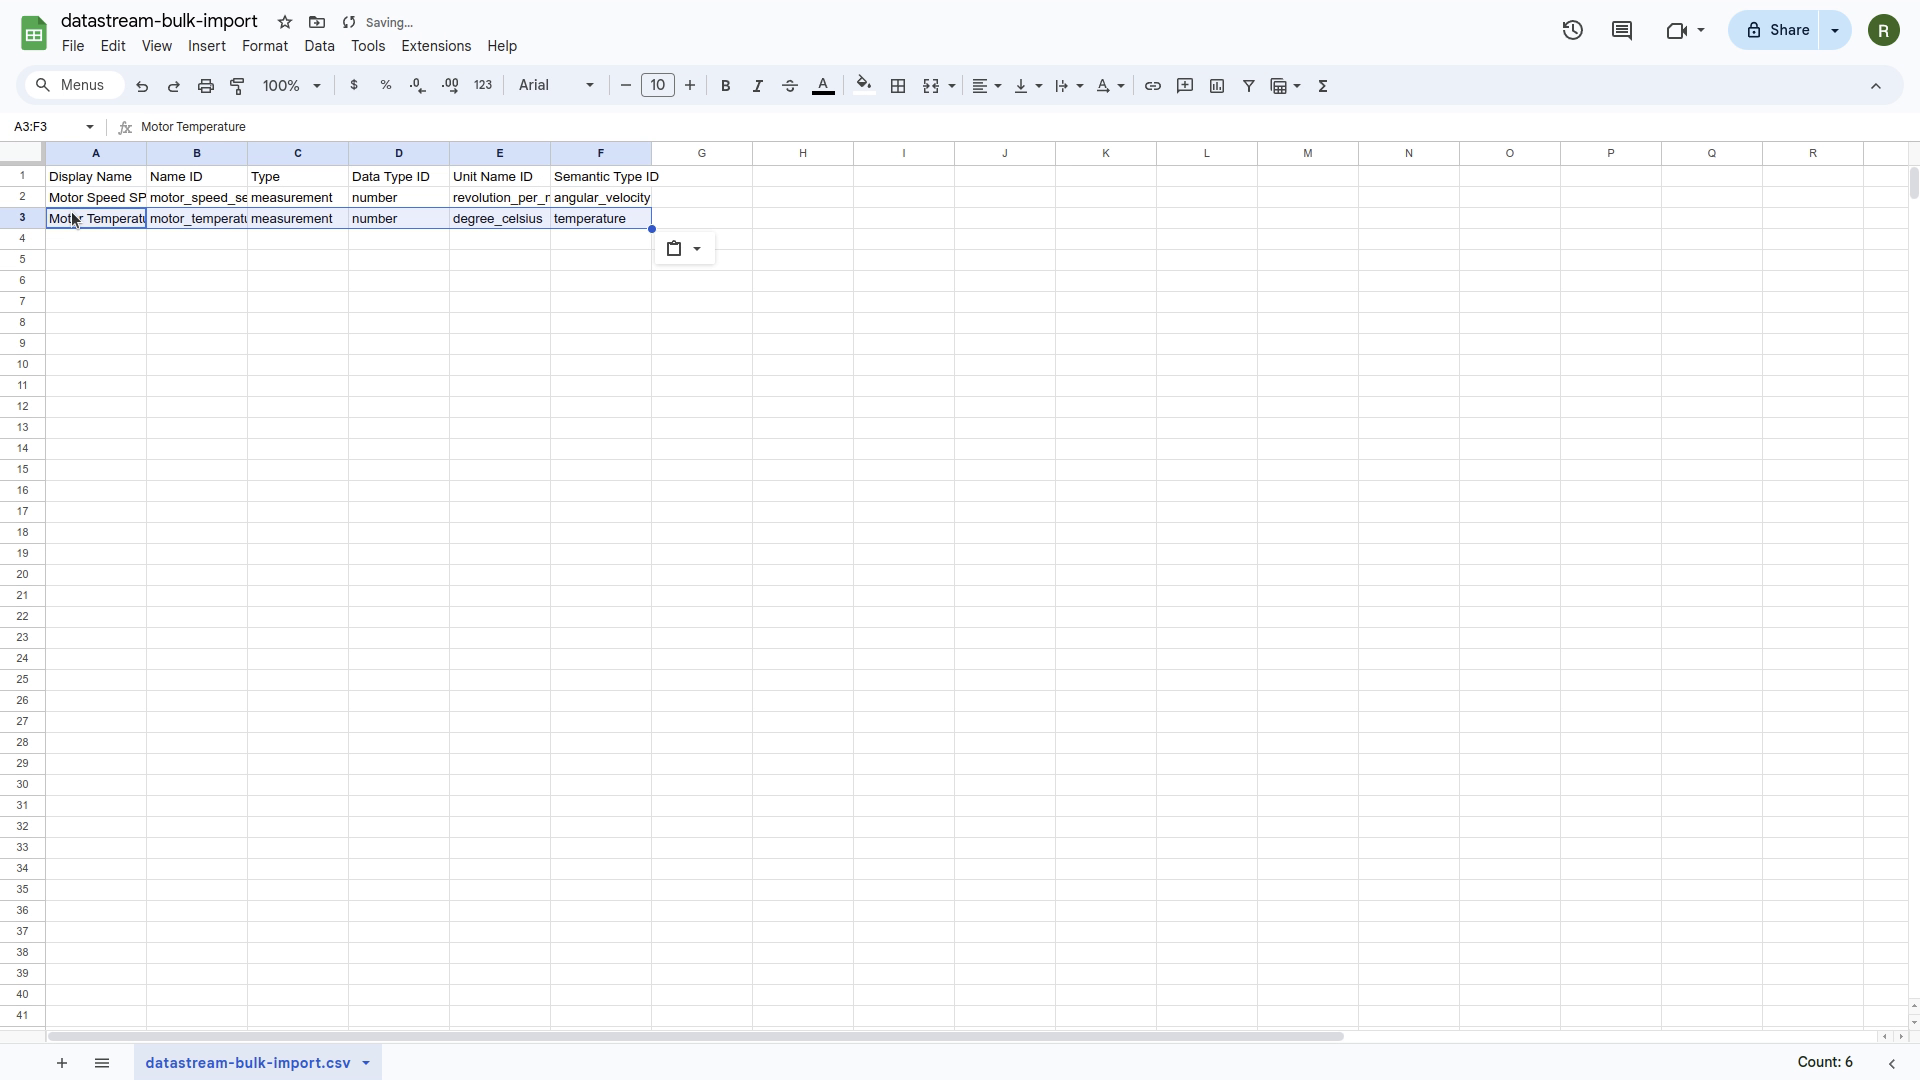
A brief explanation of the columns in the CSV file:
| Column Name | Mandatory | Description |
|---|---|---|
| Display Name | Yes | The name of the data stream as it will appear in the Kelvin UI. |
| Name ID | Yes | A unique identifier for the data stream. |
| Type | Yes | The type of data stream (e.g., measurement or computed). |
| Data Type ID | Yes | The data type of the data stream (e.g., number, string, boolean). |
| Unit Name ID | No | The unit of measurement for the data stream (e.g., revolution_per_minute, degree_celsius, pound_per_square_inch). More information on the available units can be found in the API documentation. |
| Semantic Type ID | No | The semantic type of the data stream (e.g., temperature, pressure, volume_flow_rate). More information on the available semantic types can be found in the API documentation. |
Next, let's import the data streams into your Kelvin Cloud instance.
Upload the previously downloaded datastreams.csv file and click Next.
Note
In the screenshot you will see the file named datastreams-bulk-import.csv. when uploading your file, you will see the name of your csv file here instead.
The contents of the file will be validated to make sure there are no errors. If there are any errors, you will be prompted to correct them before proceeding. Next, click on the Import button.
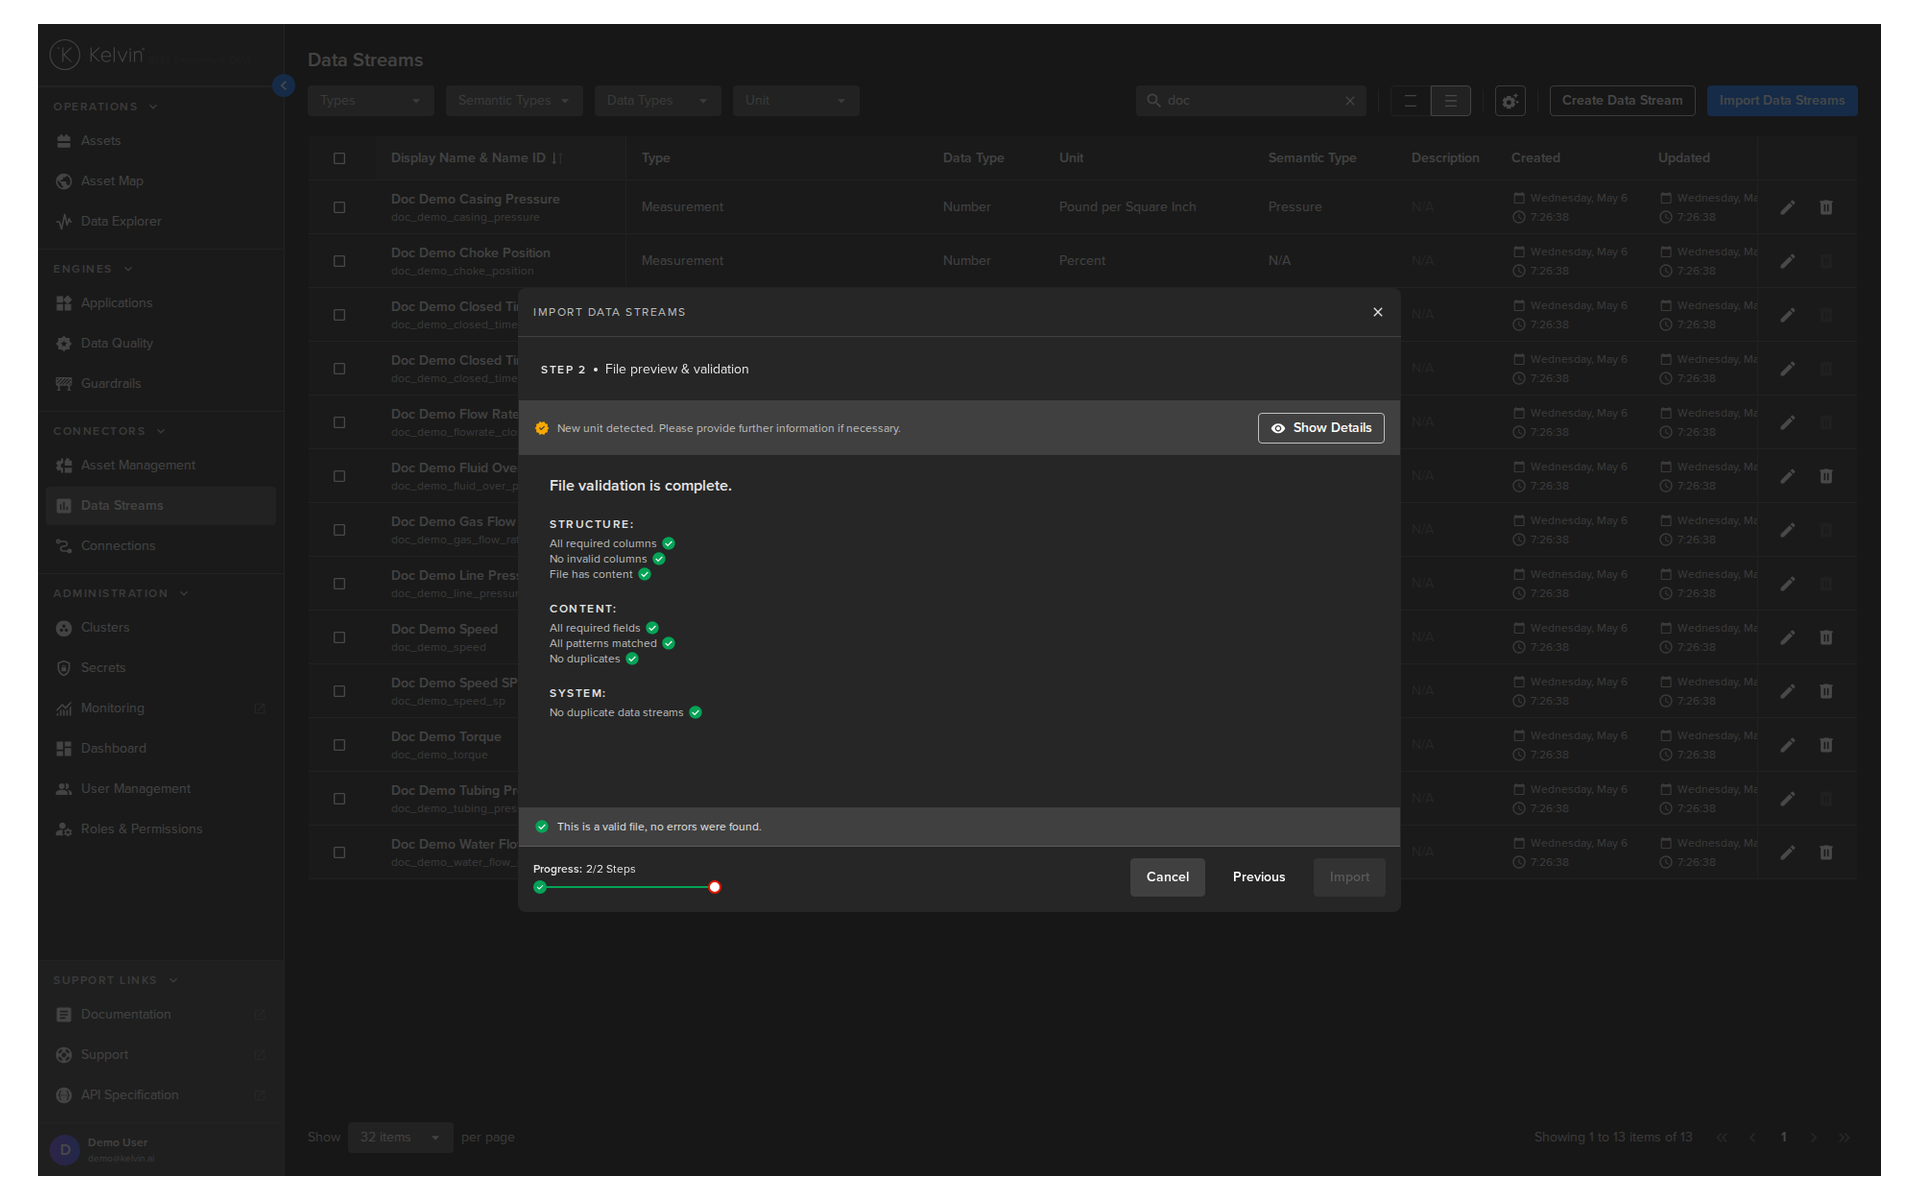
You should see the data streams you imported in the Data Streams section.
Success
Congratulations! You have successfully configured your data streams.
Create a CSV Connection
Go to the Kelvin UI. Click on the Connections section on the left navigation menu
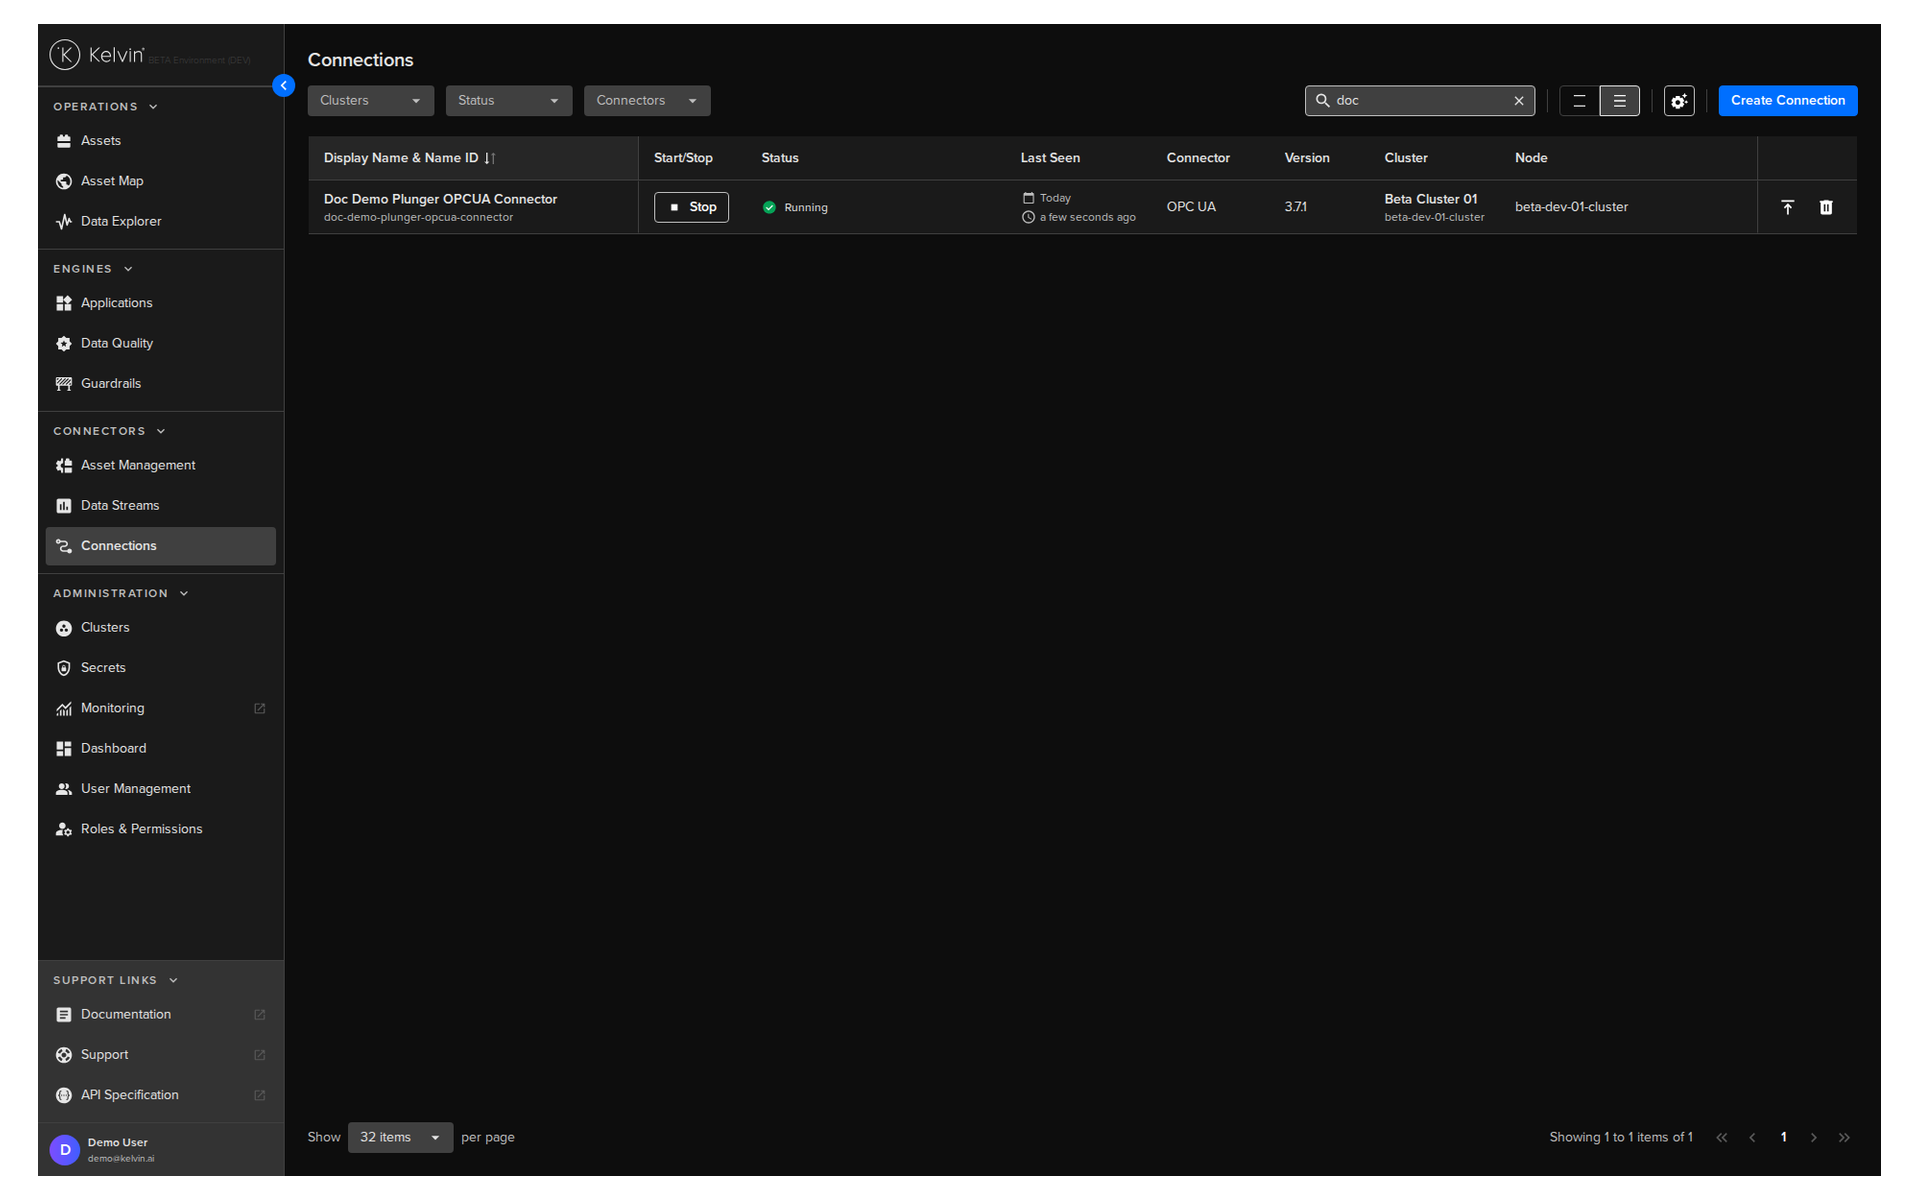
And then click on the Create Connection button on the top right of the page.
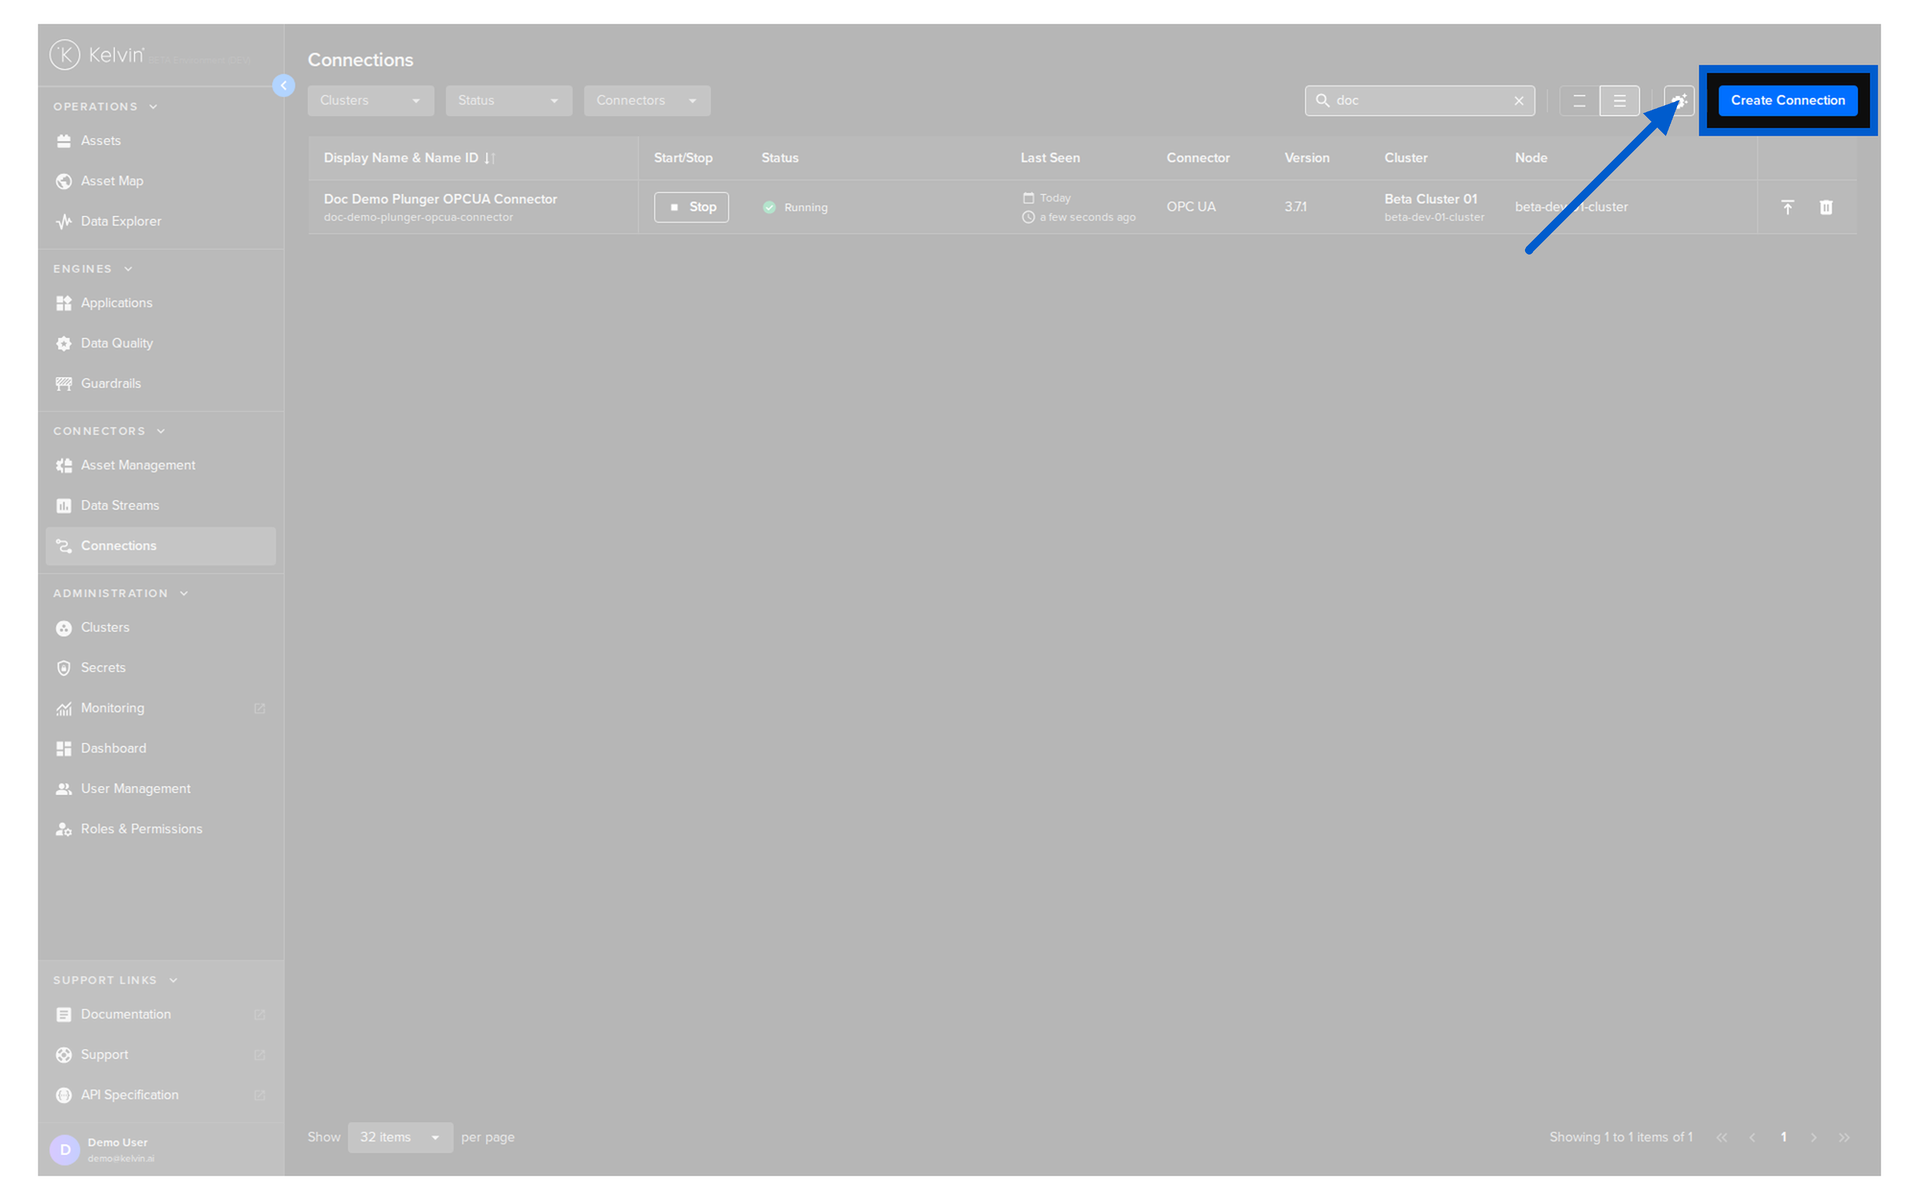
Warning
The following screenshots for creating a CSV Publisher are from the general documentation in the Platform Administration section here.
The actual information you need to enter will differ from the defaults in the screenshots.
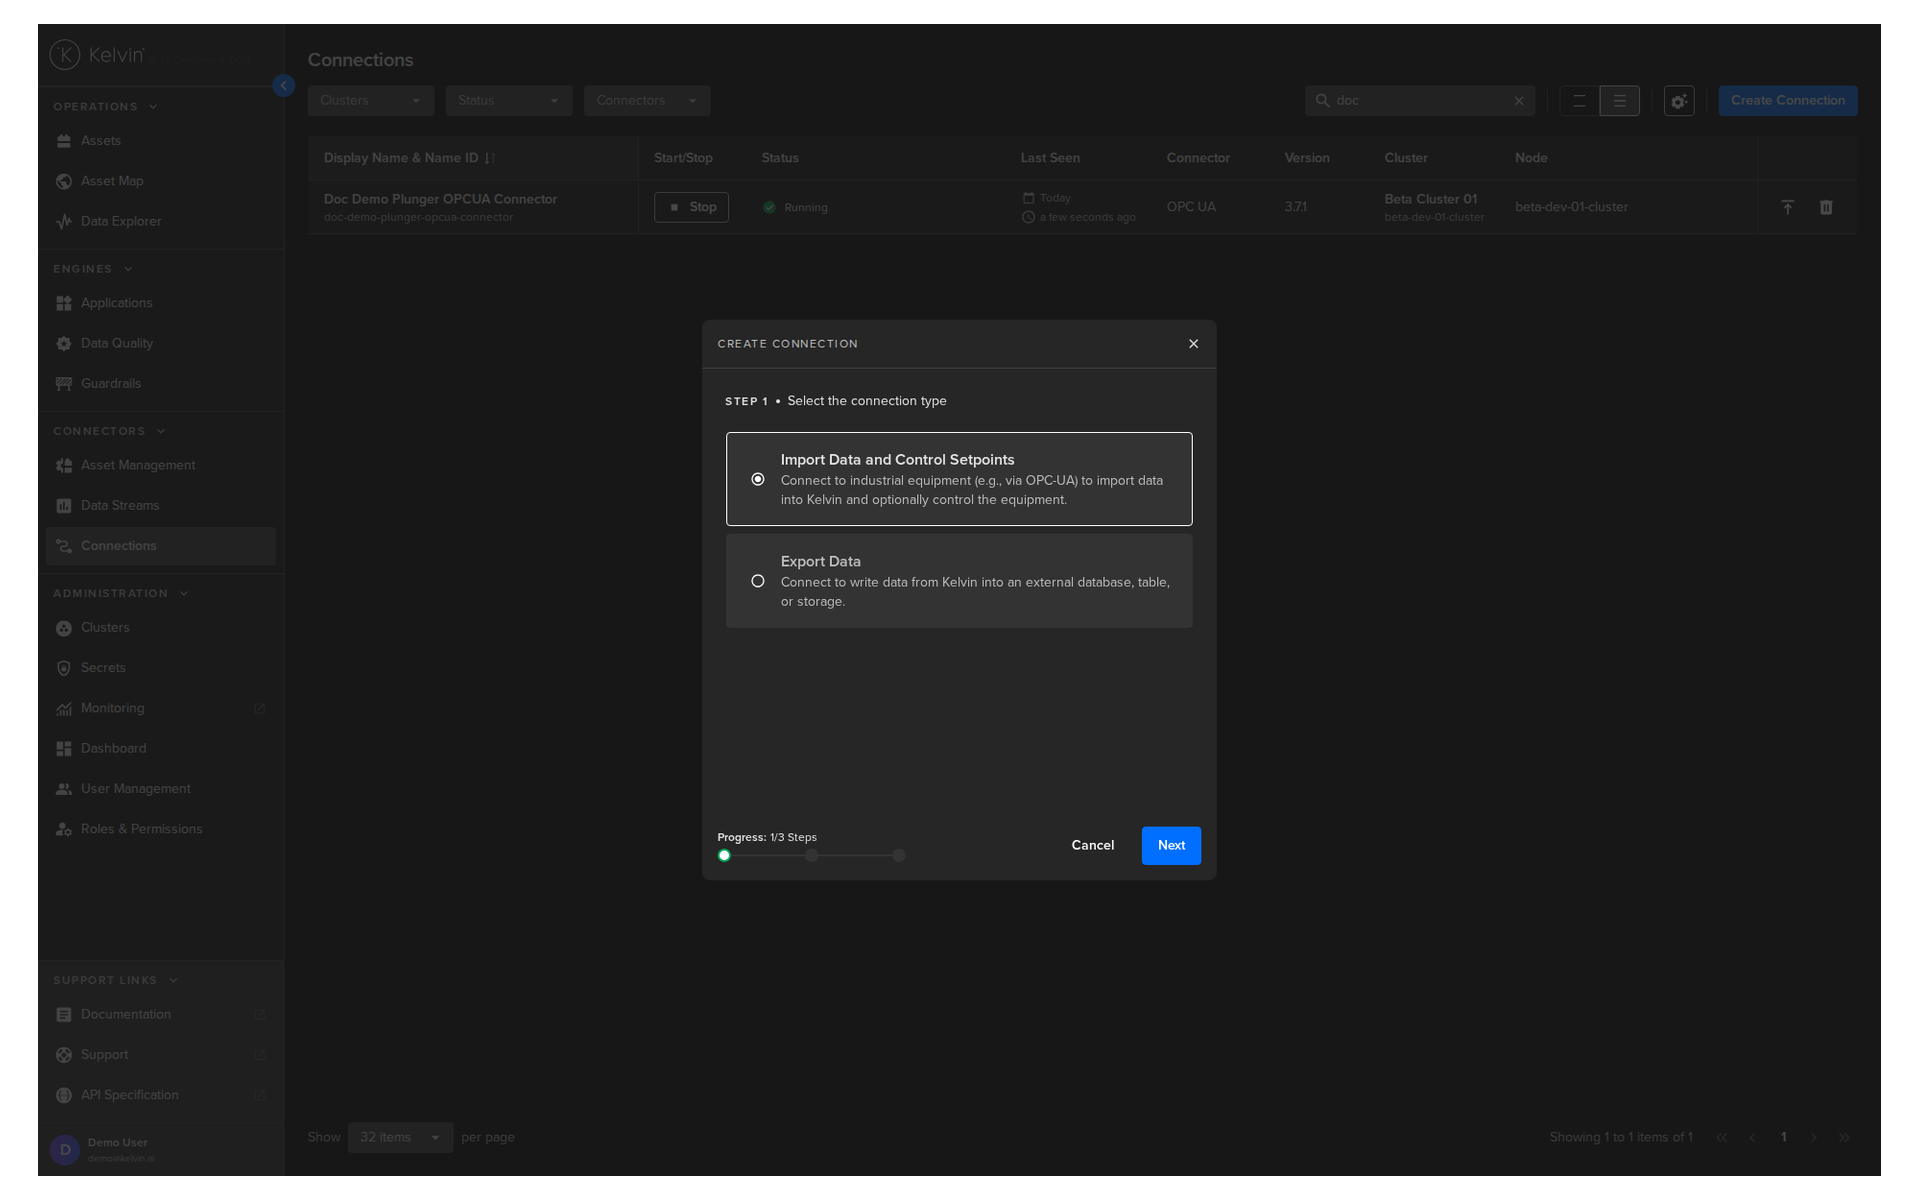
Step 1
Select Import Data and Control Setpoints and click Next.
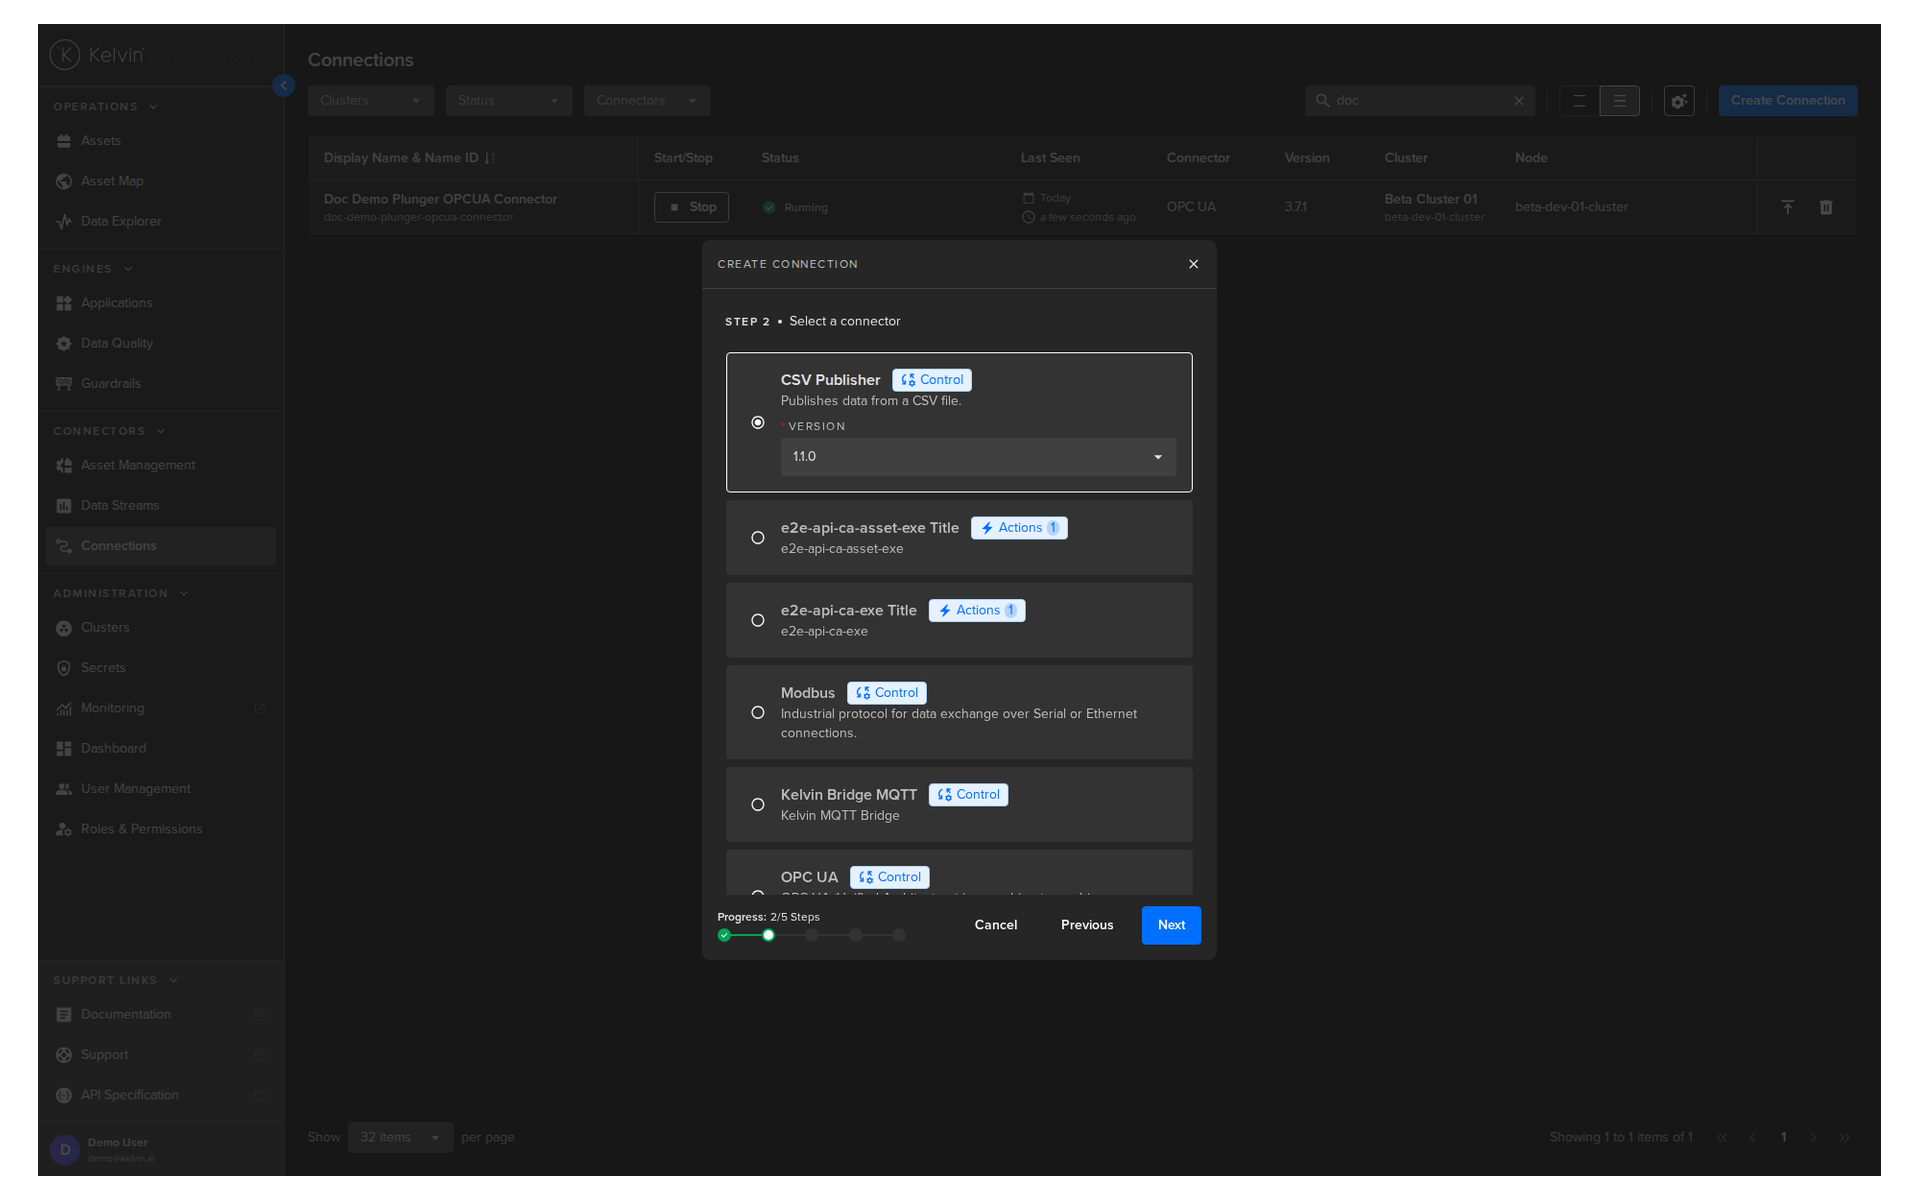
Step 2
Select the Kelvin CSV Publisher Connector option, select a Version and click Next.
Step 3
Drag and drop or select your file to upload.
At this stage you can also download a sample template for reference on how to create a valid publishing CSV file.
Info
We have prepared a connection.csv file for you to test. You can download it from the link below and save it to your local machine:
Modify the template with the following data (or just download our ready made CSV file):
| Simulation Data CSV File | |
|---|---|
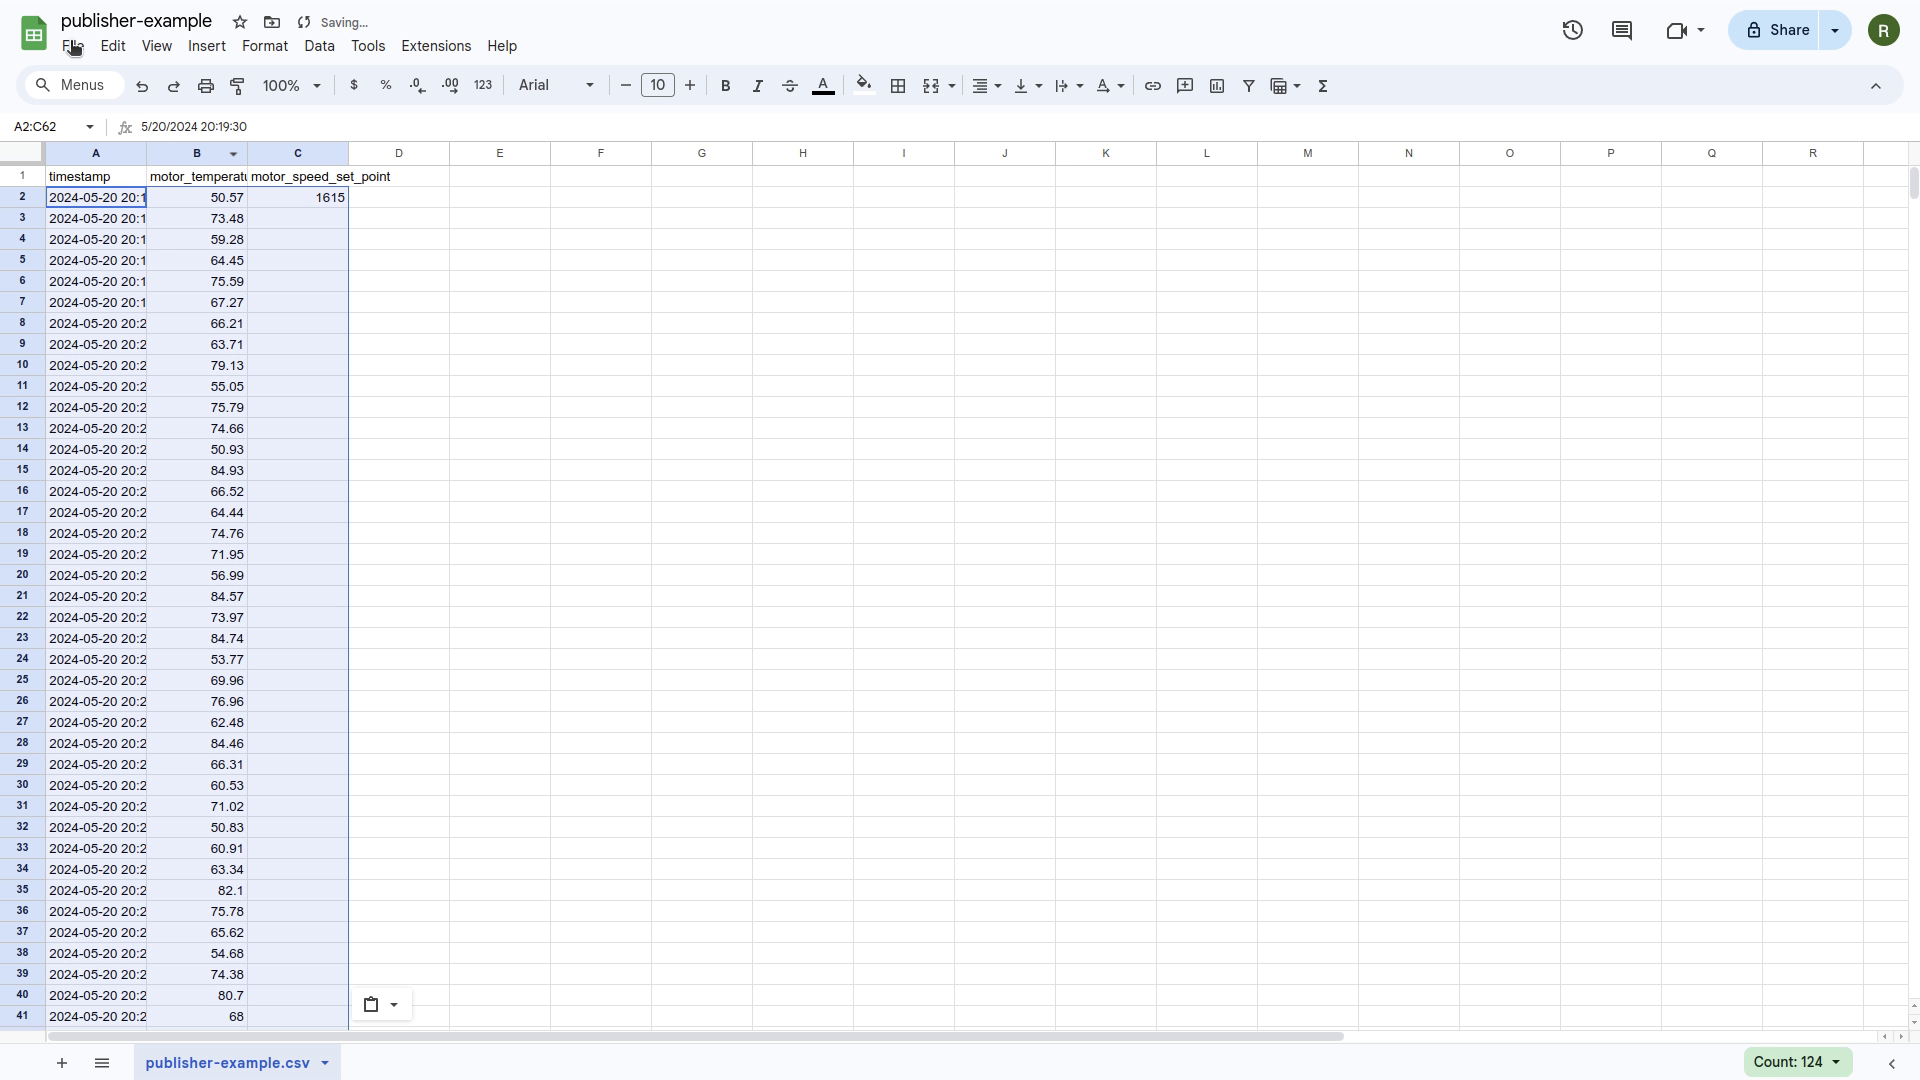
A brief explanation of the columns in the CSV file:
- timestamp: The timestamp of the data point. There are a number of different formats that are accepted.
Accepted Timestamp formats
- motor_temperature: The motor temperature data stream.
- motor_speed_set_point: The motor speed set point data stream. We start with an initial value and leave the rest of the values empty, which means the set point will remain constant. This set point will be changed by our Event Detection Application.
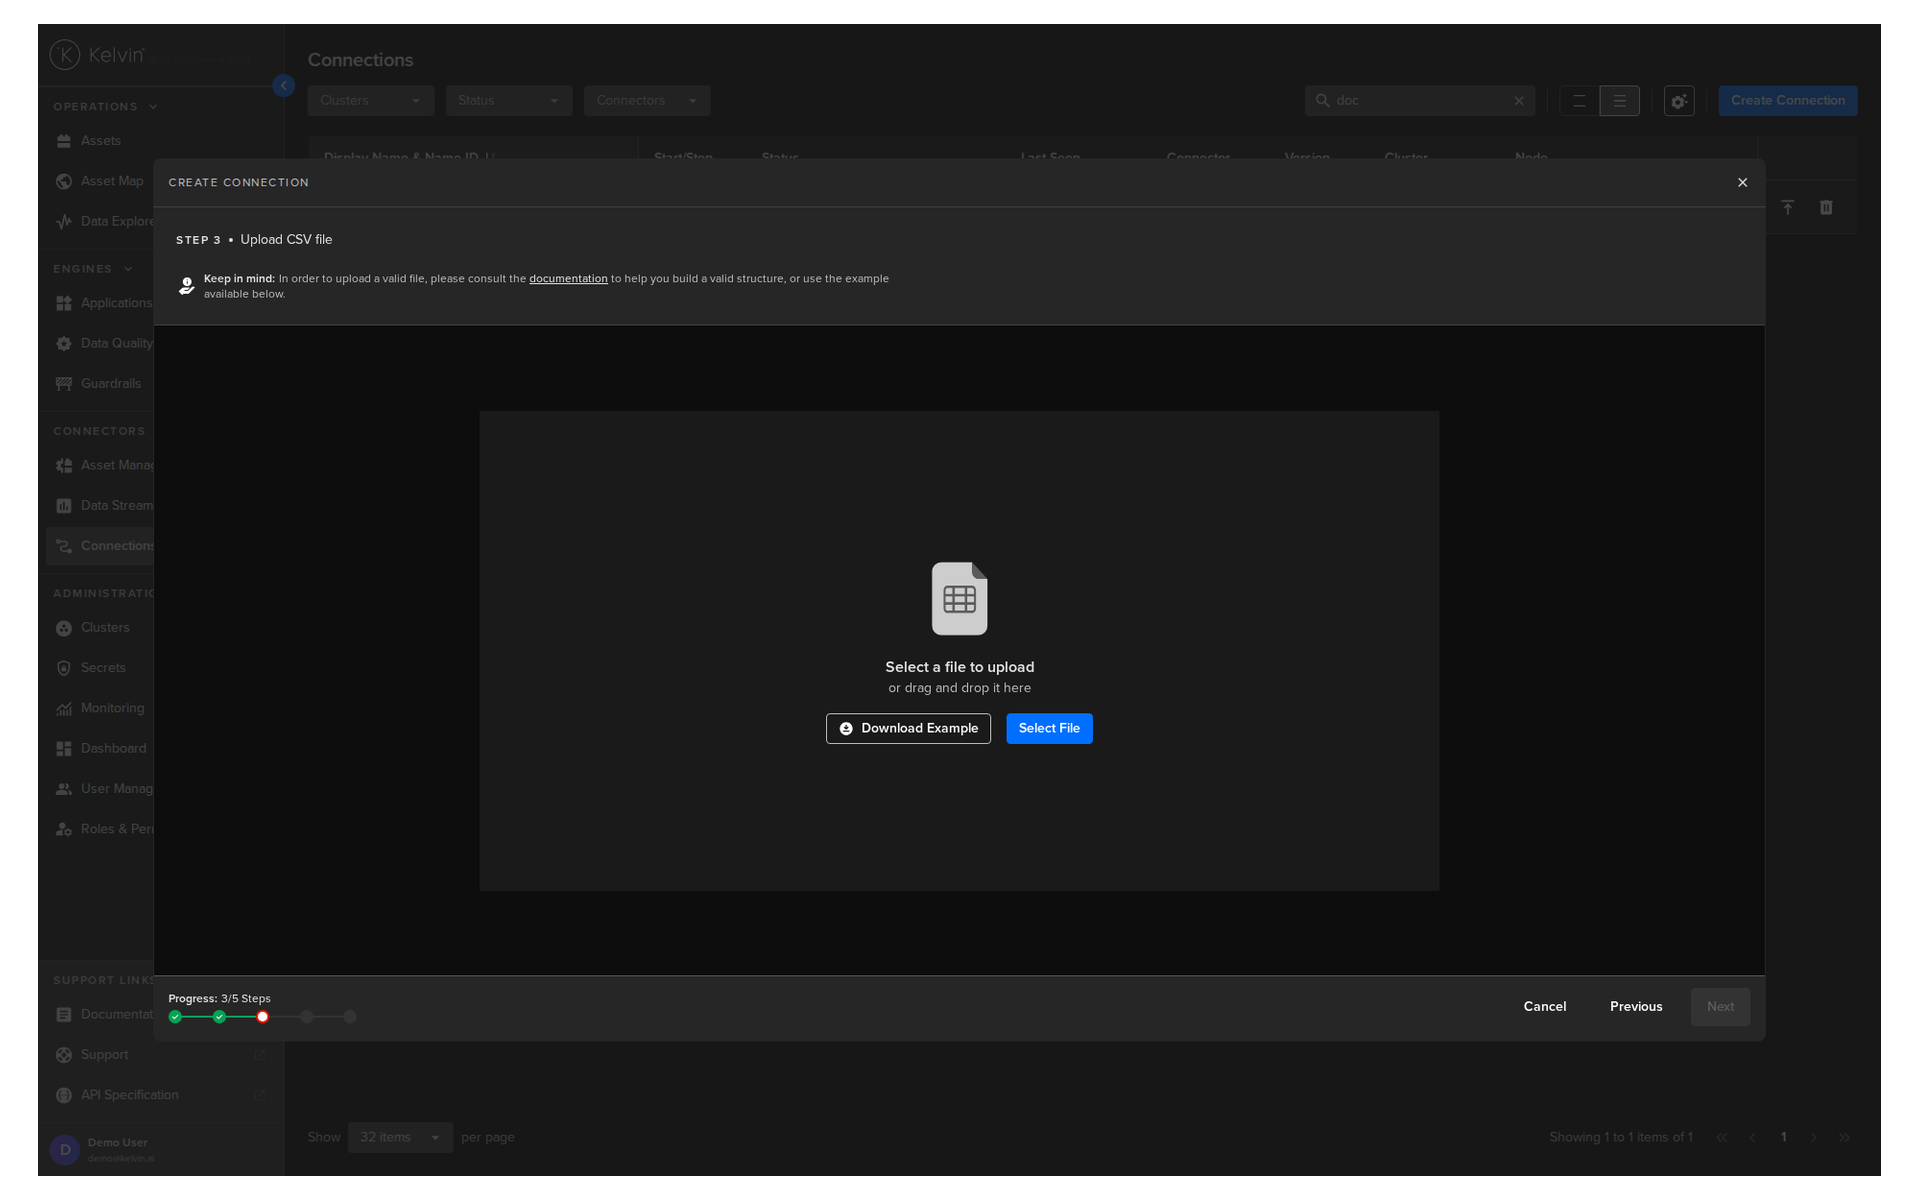
When you have selected the file, it will be validated before the Next button is activated.
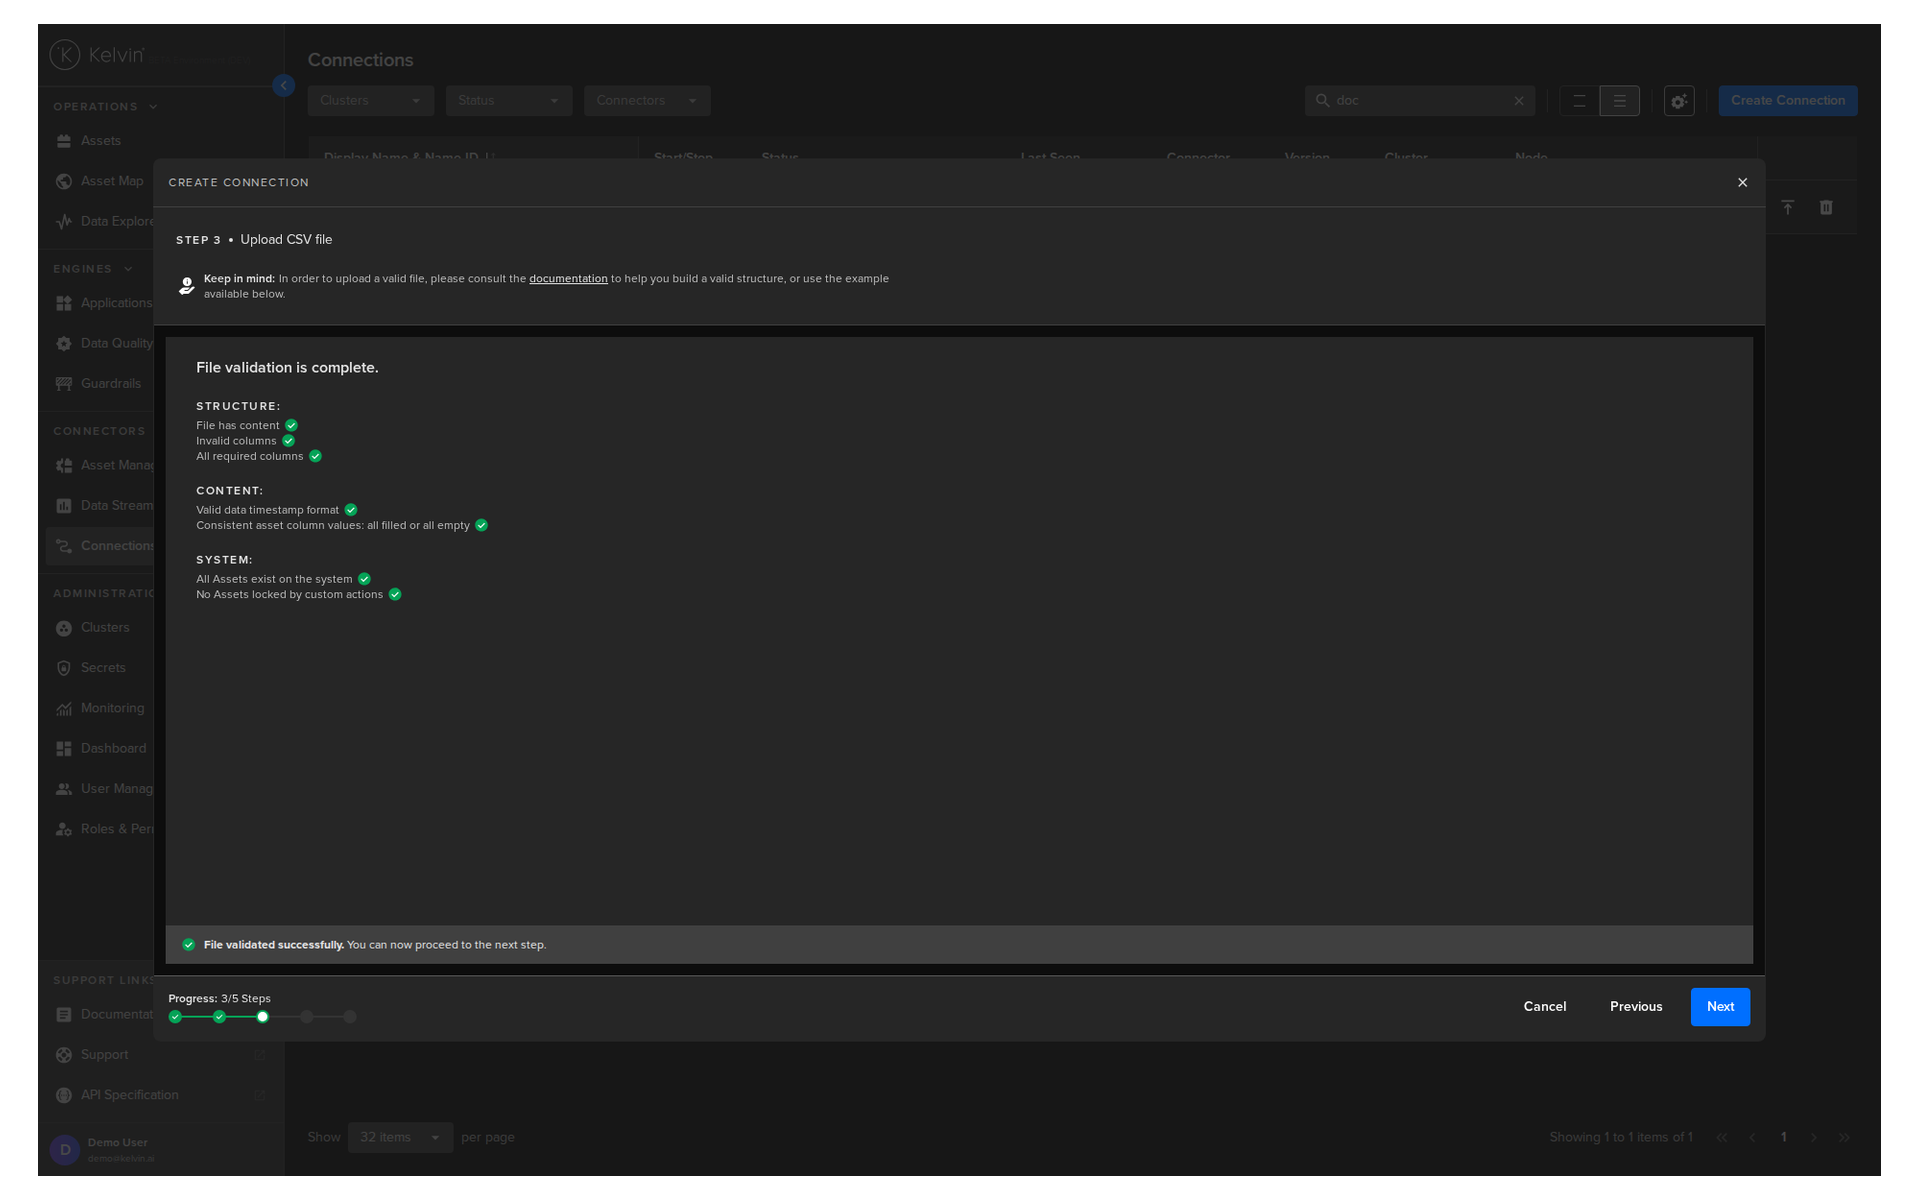
Once validated you can click Next.
Step 4
Select the Asset where the data will be sent to.
You can only select one Asset. Select one of the Assets we created earlier, for example Motor #01.
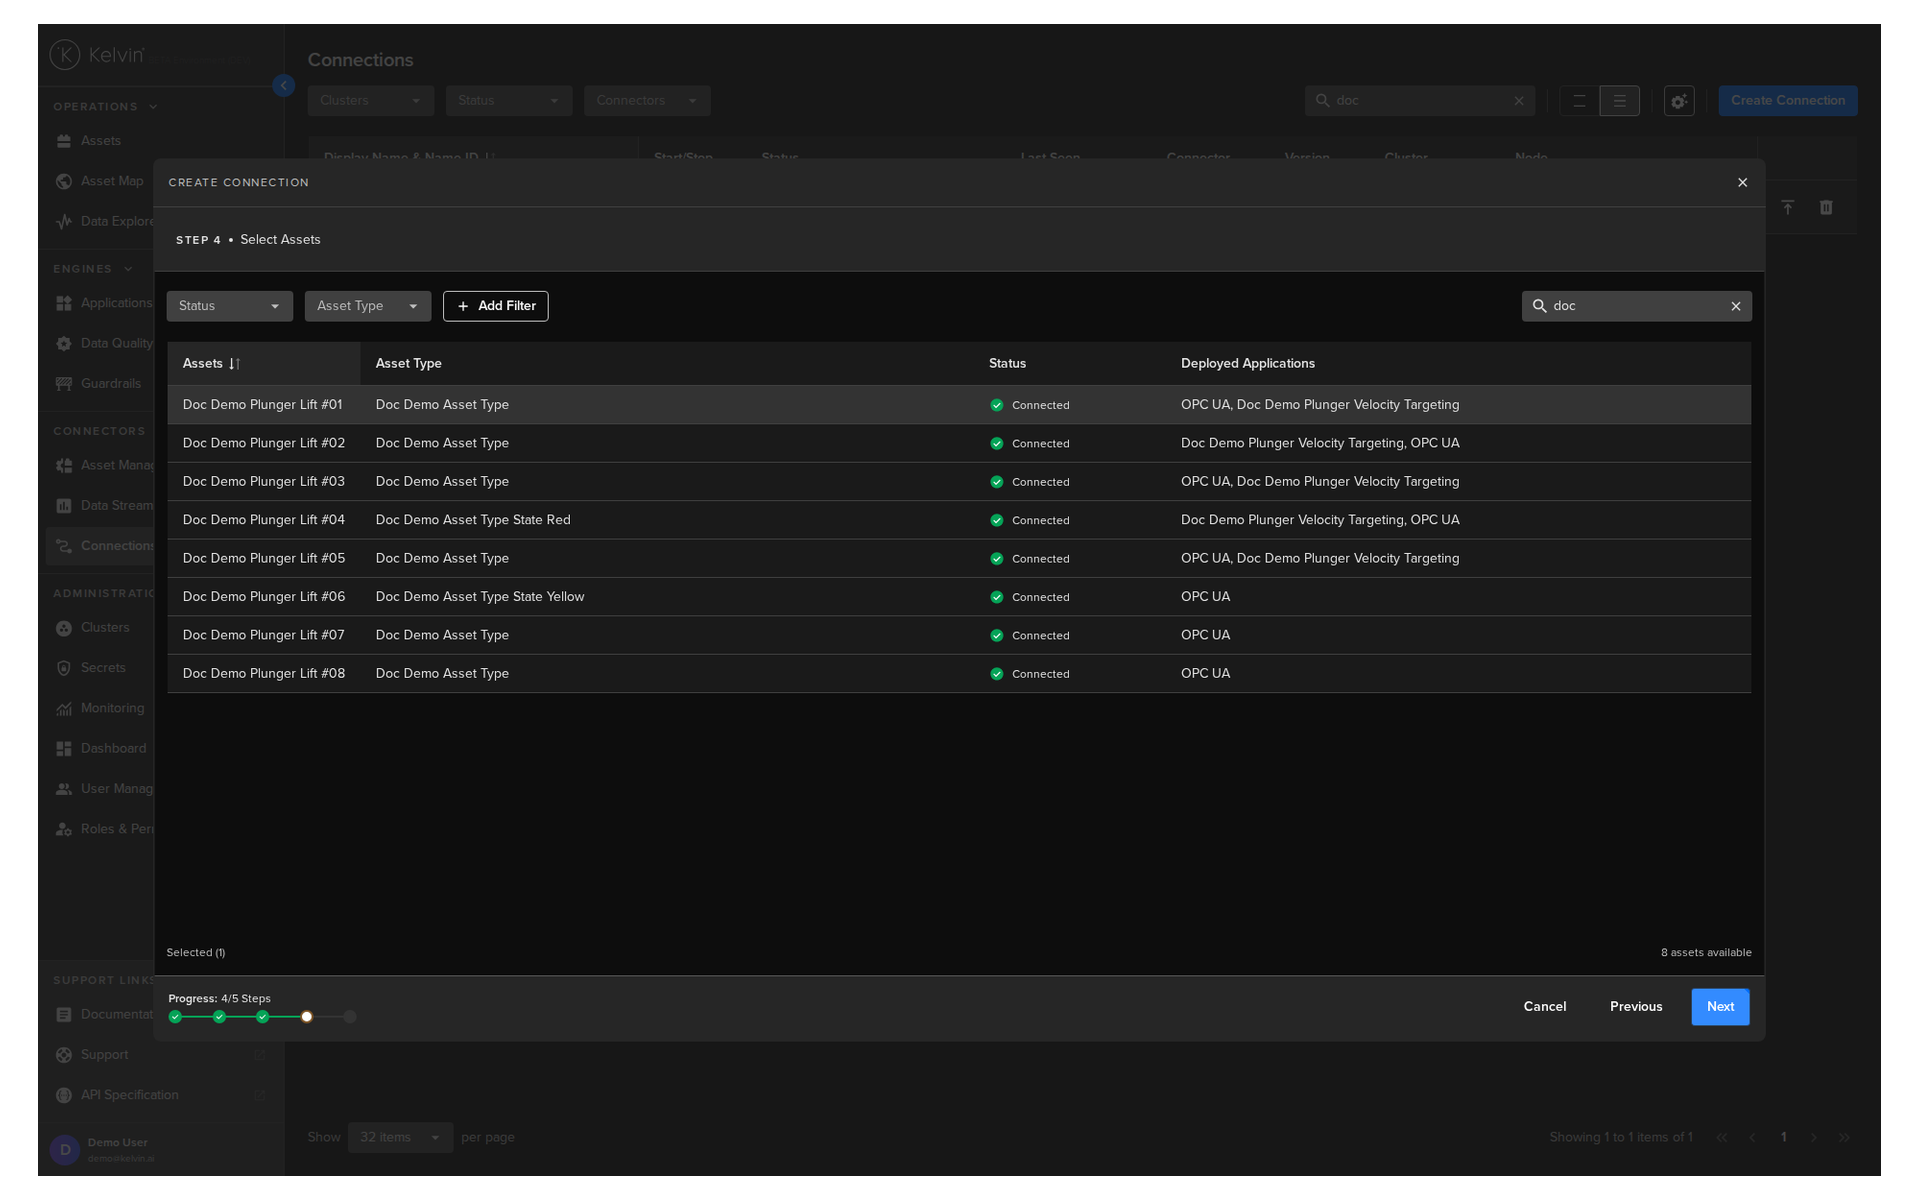
When ready click Next.
Step 5
In Step 5 you have a range of options available.
Make sure all the options have a green check mark  next to it.
For this example we will only highlight some key areas to be aware;
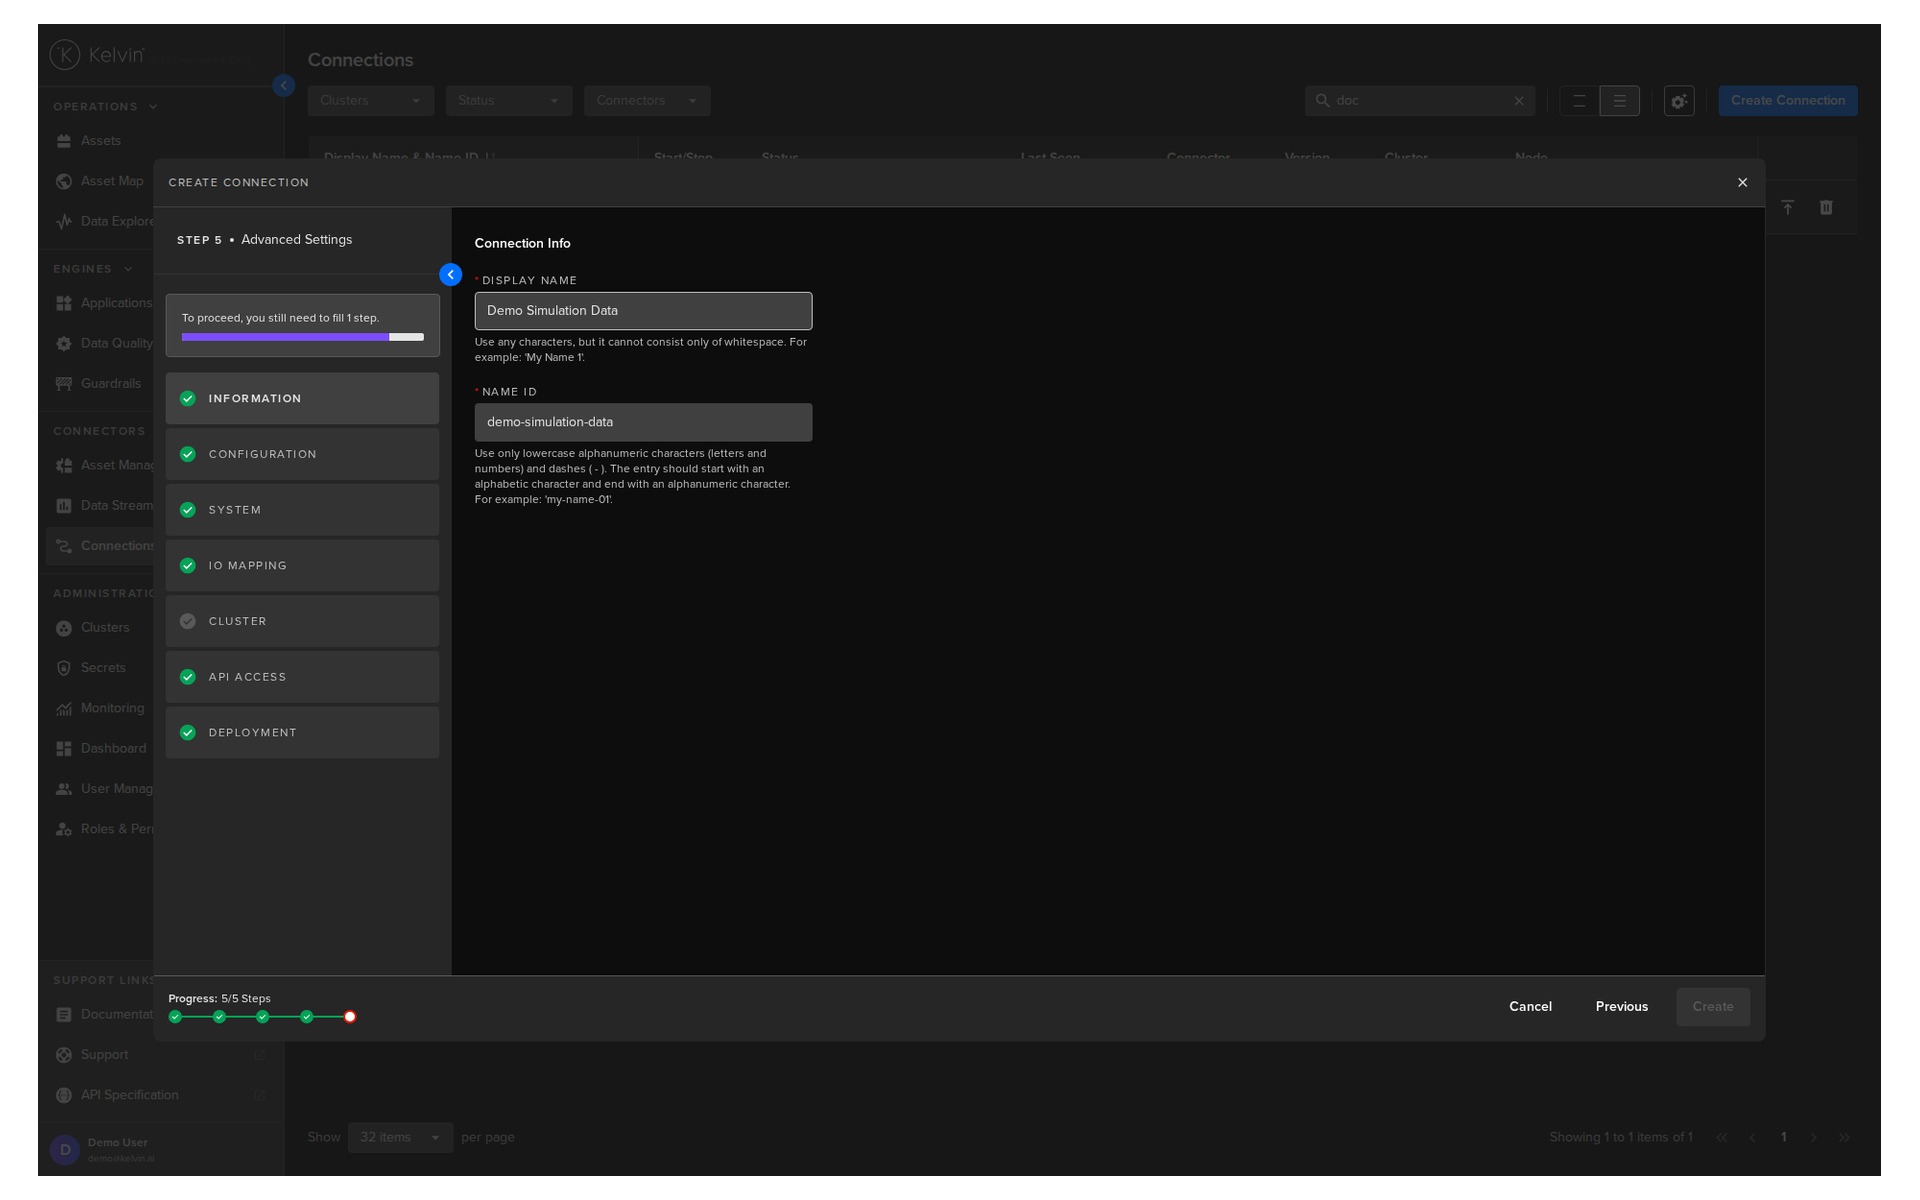
Information
Type in a memorable name in the Display Name text input. You can use any letters, numbers and special characters.
The Connection Name text input will be automatically converted and filled in as you type in the Display Name section. The conversion ensures the Connection Name only contains lowercase alphanumeric characters and ., _ or - characters.
Configuration
Configure the CSV Publisher connection to be CSV Playback and Replay File as Yes.
Info
Make sure you choose to use the UI view for easily setting the configuration.
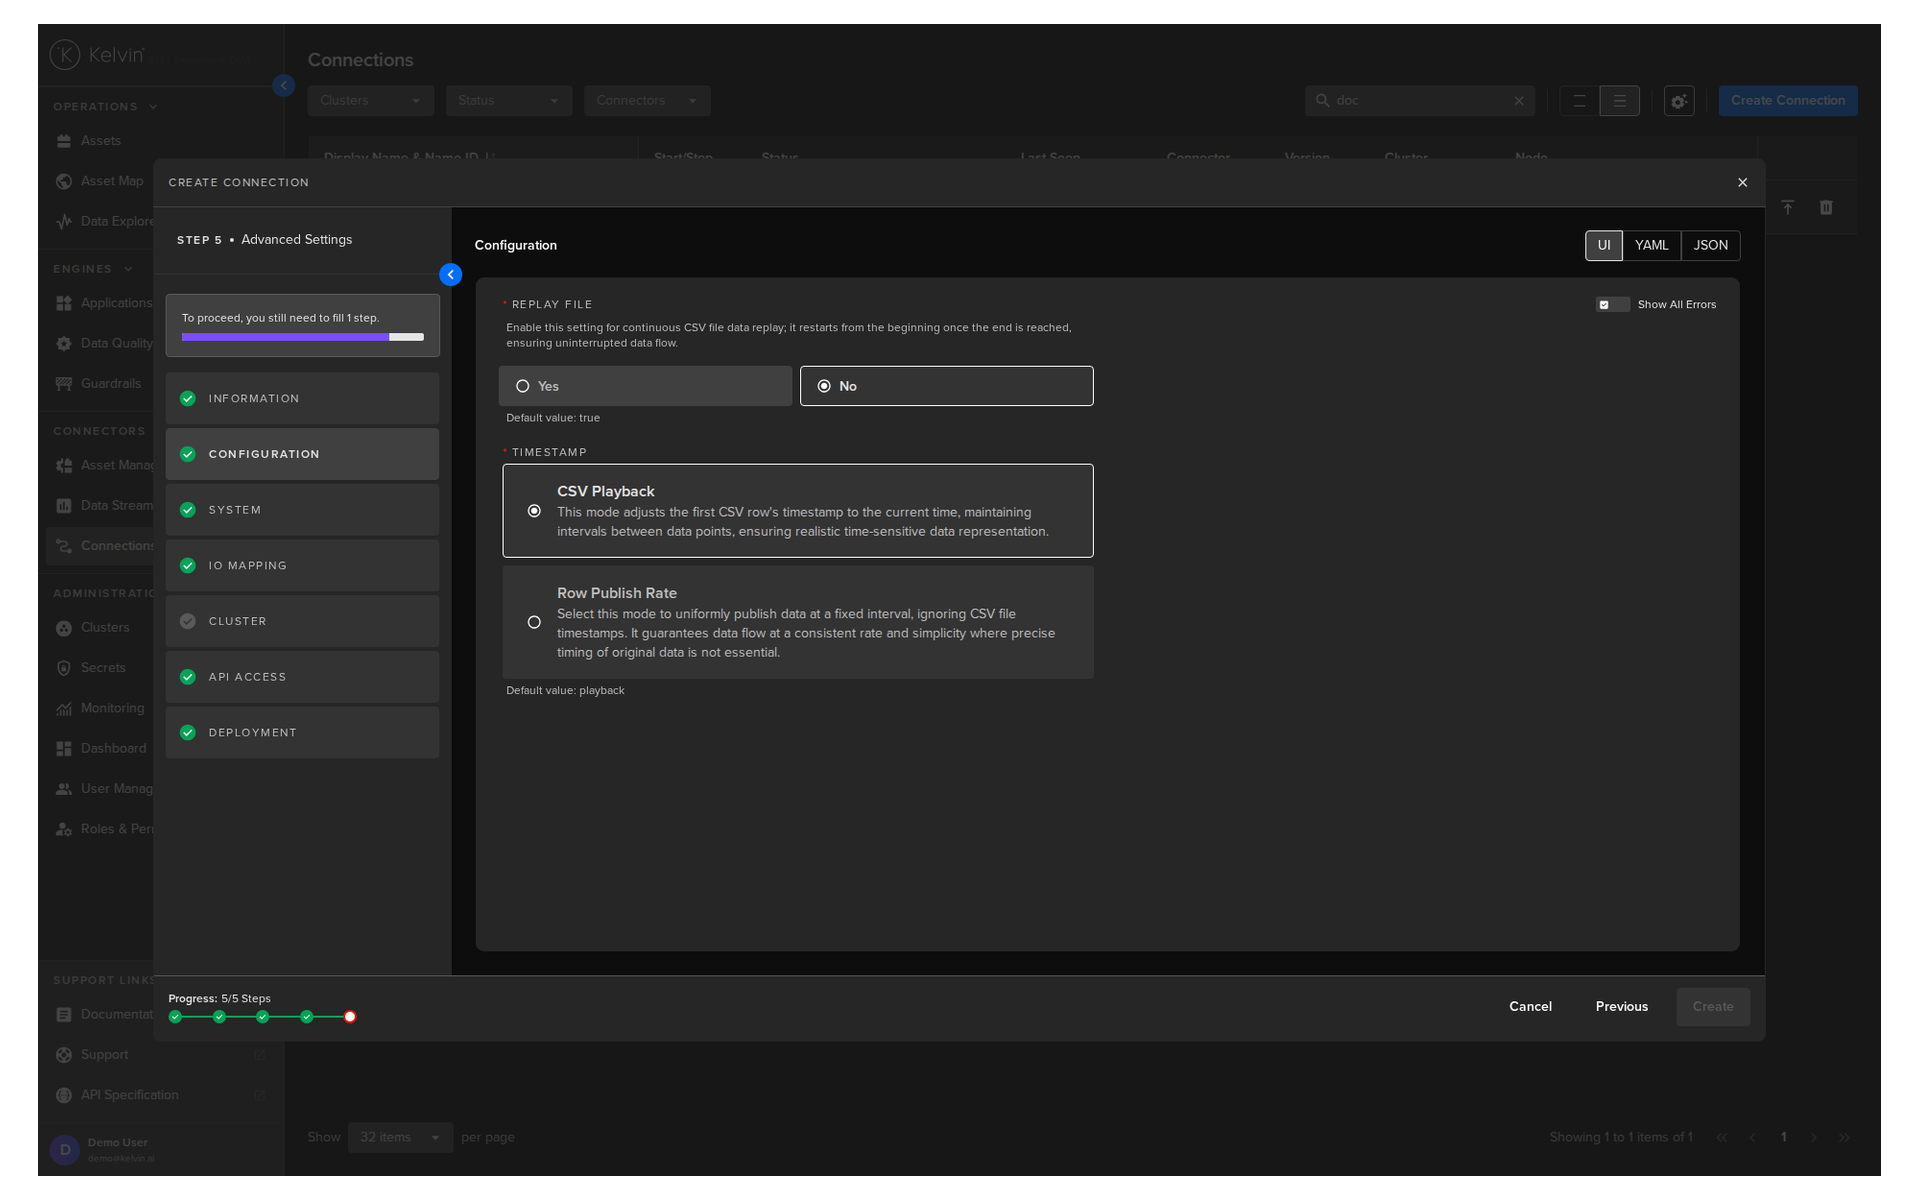
| Parameter | Setting | Description |
|---|---|---|
| Replay File | Yes | Loops the data to produce an infinite amount of data. |
| Timestamp | CSV Playback |
Time interval to use to send data to the Asset / Data Stream pairs. |
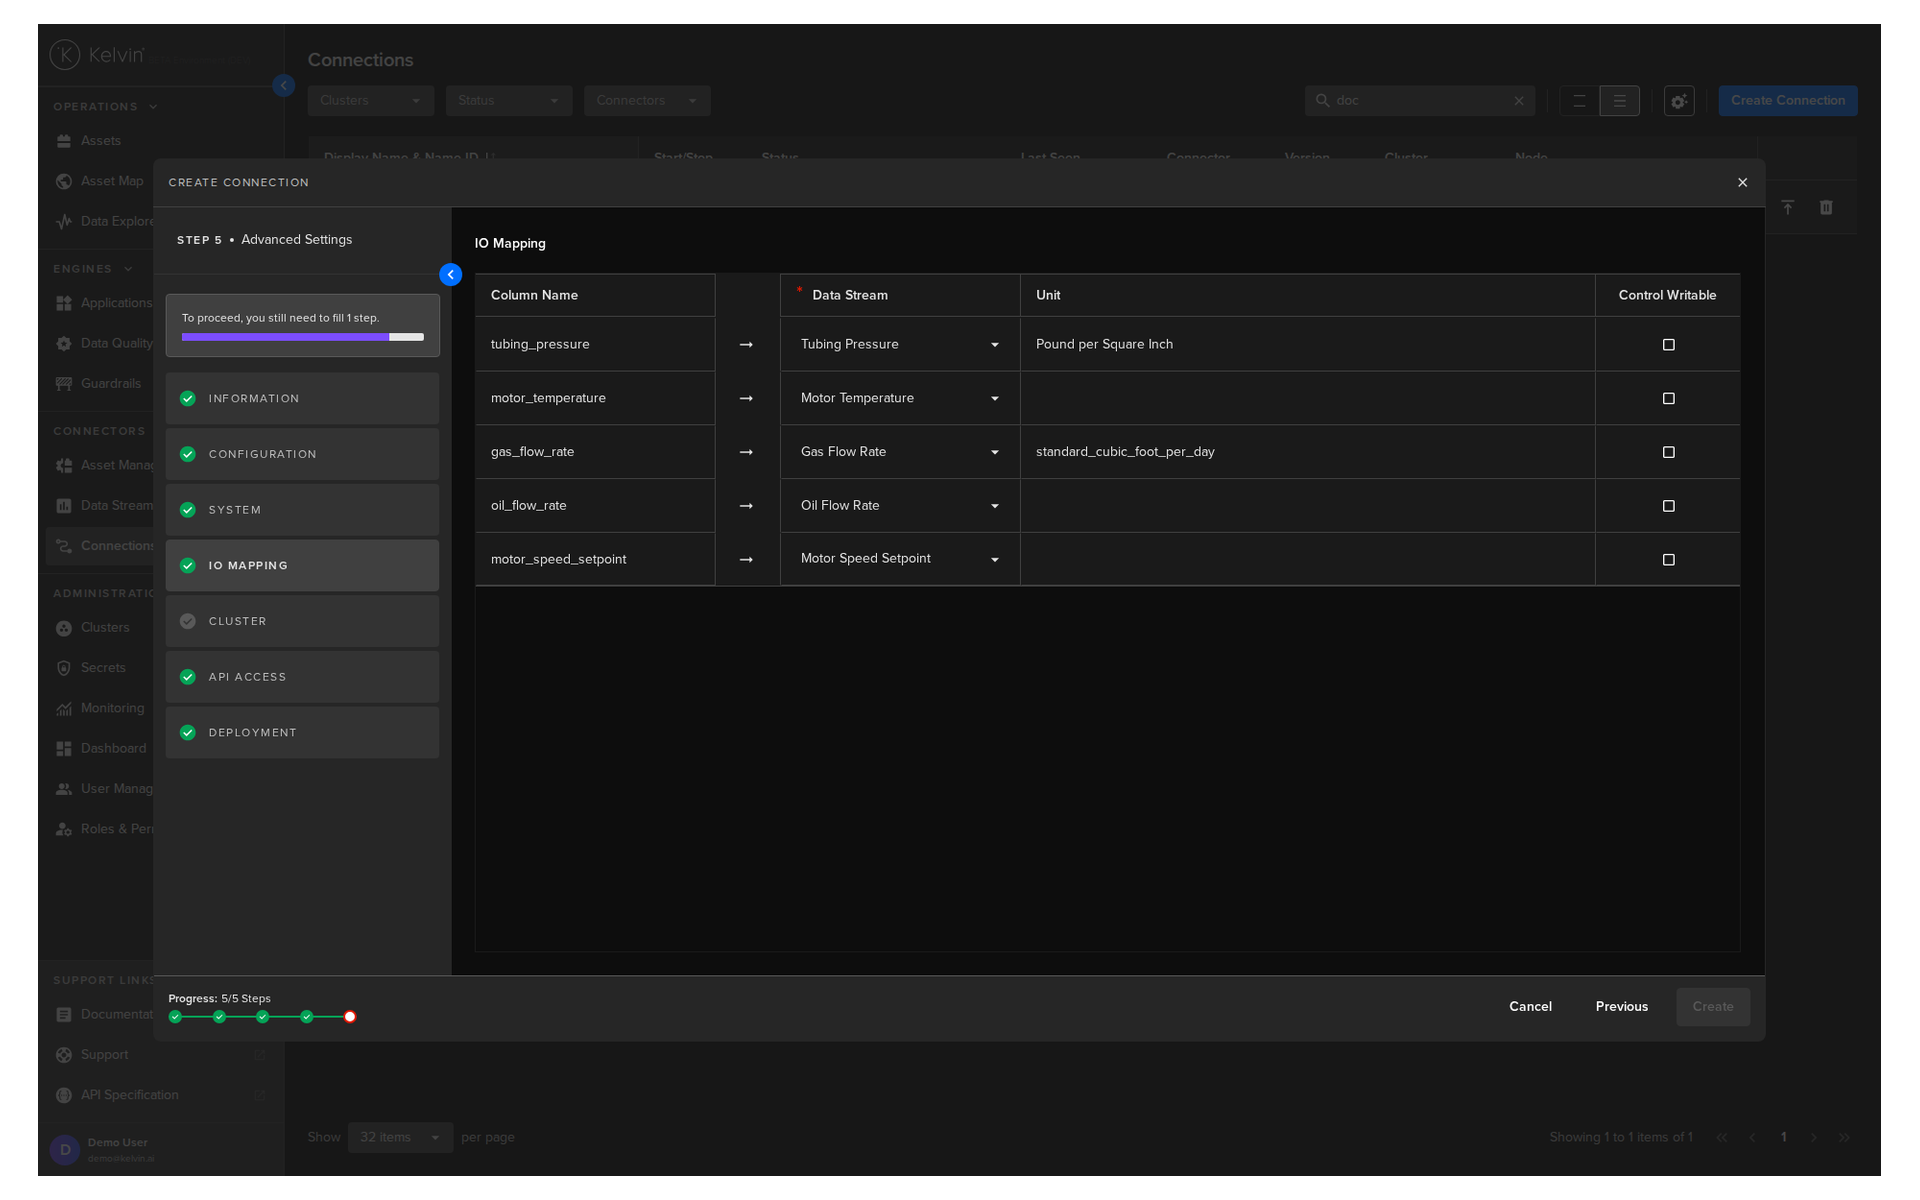
IO Mapping
For each Data Stream column name in the uploaded file, select the Data Stream on the Kelvin Platform where the data in the rows will be sent.
Note
Make sure you set the Data Stream motor_speed_set_point as Control Writable to ensure you can write the value to the Asset.
Cluster
Then select which Cluster to deploy the new Connector to.
Optionally you can also select the Node in the Cluster. If you do not then the system will automatically assign the Node.
It is important that the asset is reachable from the selected Cluster and Node.
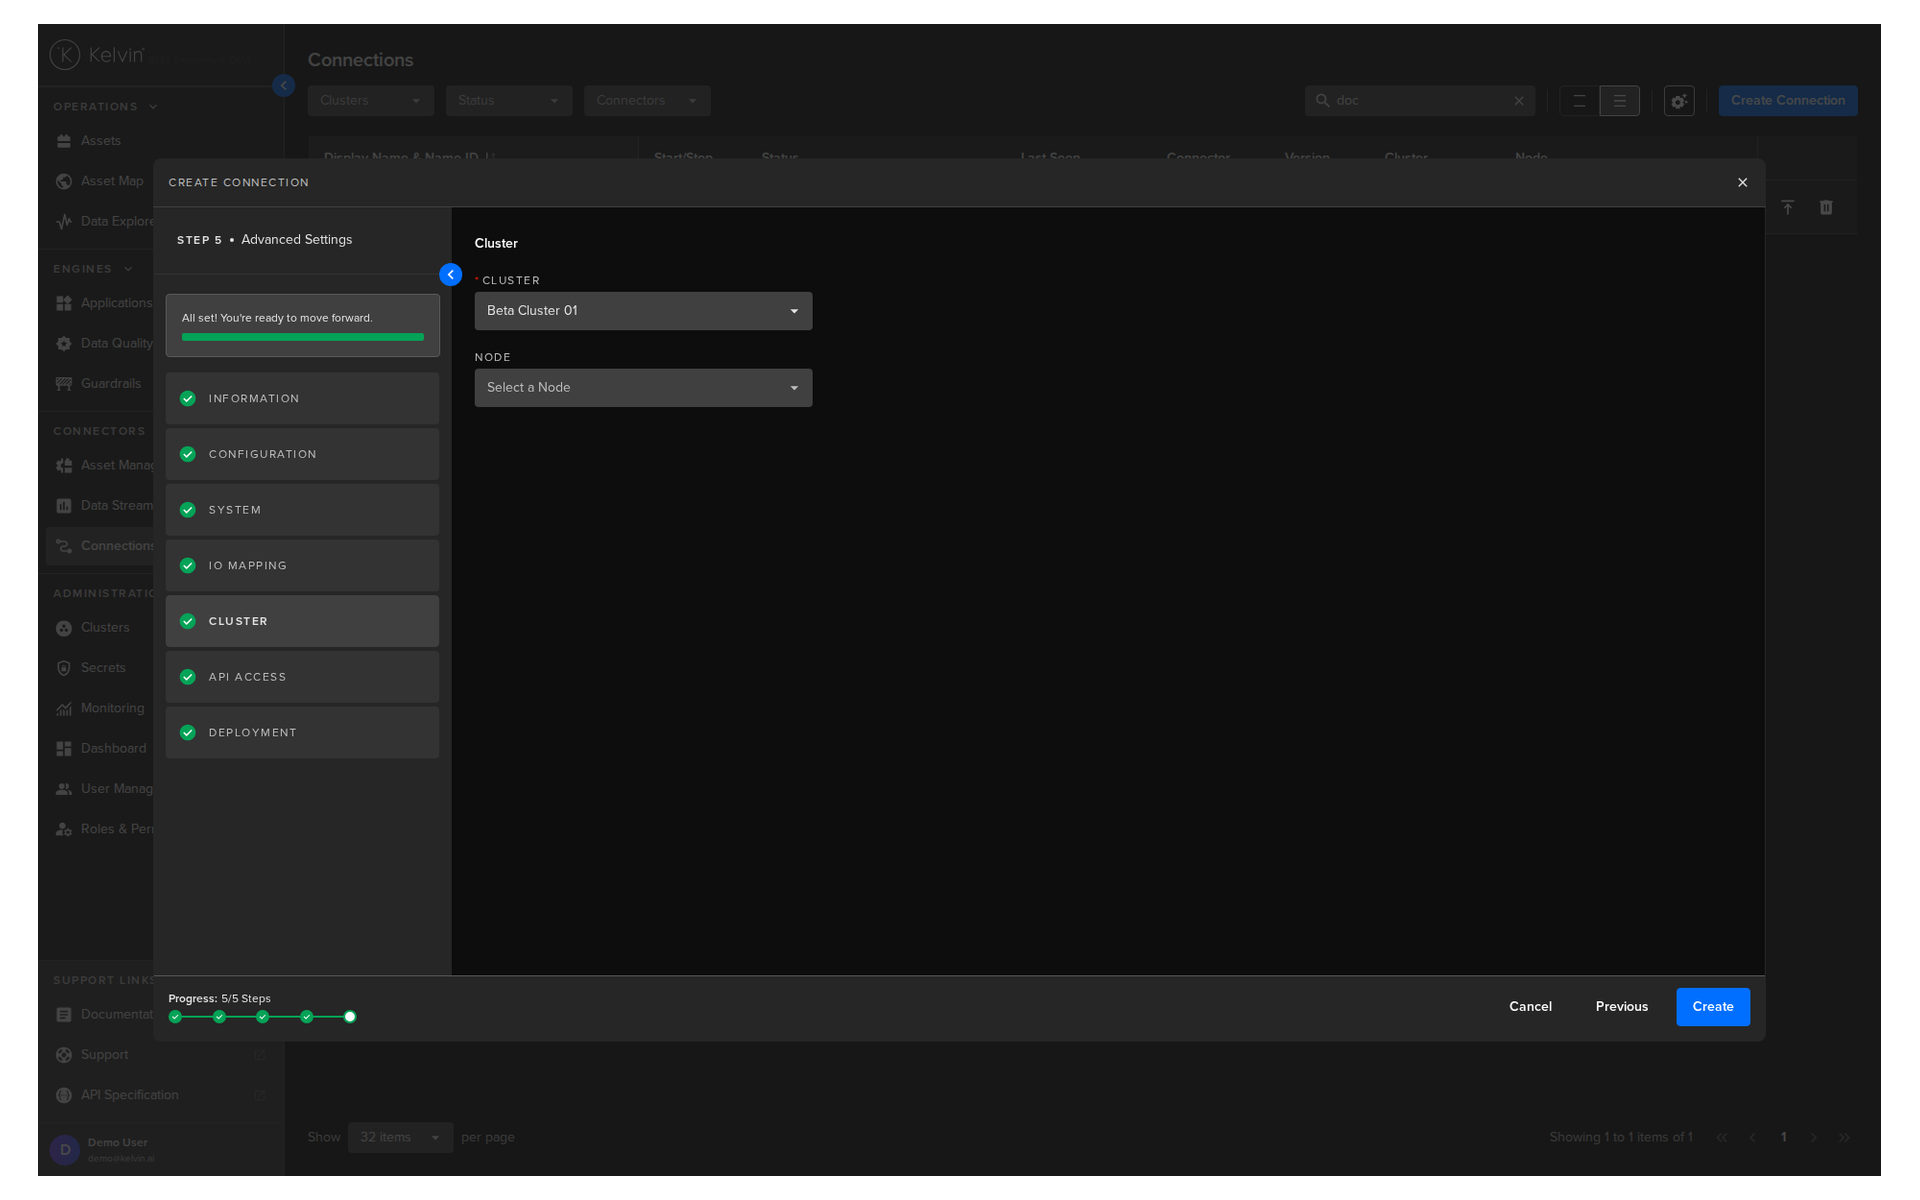
Click on the Create button to deploy the connection.
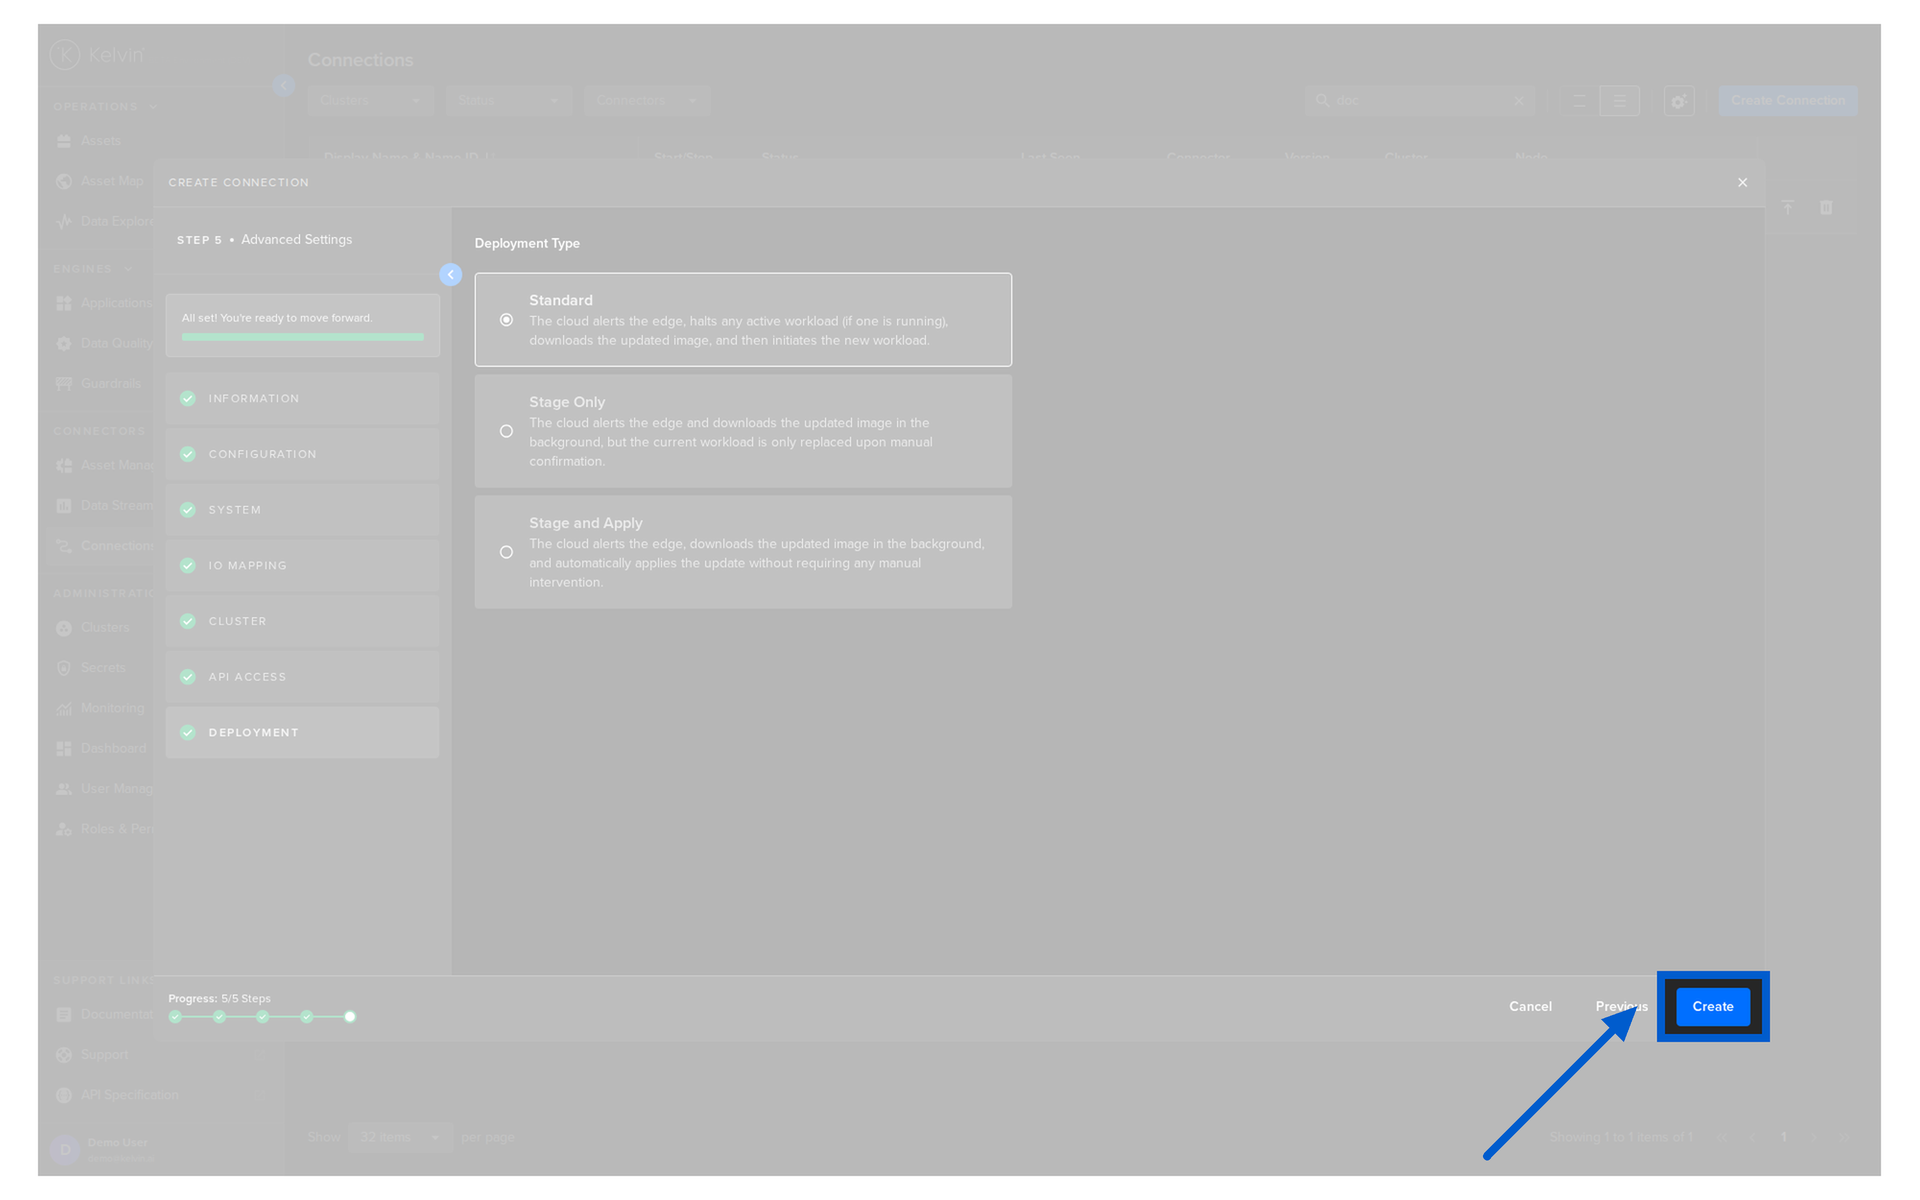
Wait a few seconds for the connection to be deployed and you should see the connection status change to Running.
Then if you are interested, proceed to click on the connection name to see the connection details. This will show you the data stream feed and when the data stream values were last updated.
Important Reminder
This connection will only publish data for one single asset. If you need additional data for the other assets you need to create a new connection for each asset. This allows you to test different scenarios and configurations for each asset.
Success
Congratulations! You have successfully configured your CSV Publisher connection.
The next step is to deploy your Application to the assets.
6. Deploy Application

Now that you have your first Application uploaded, you can deploy it to the assets that you previously created in your Kelvin Cloud instance.
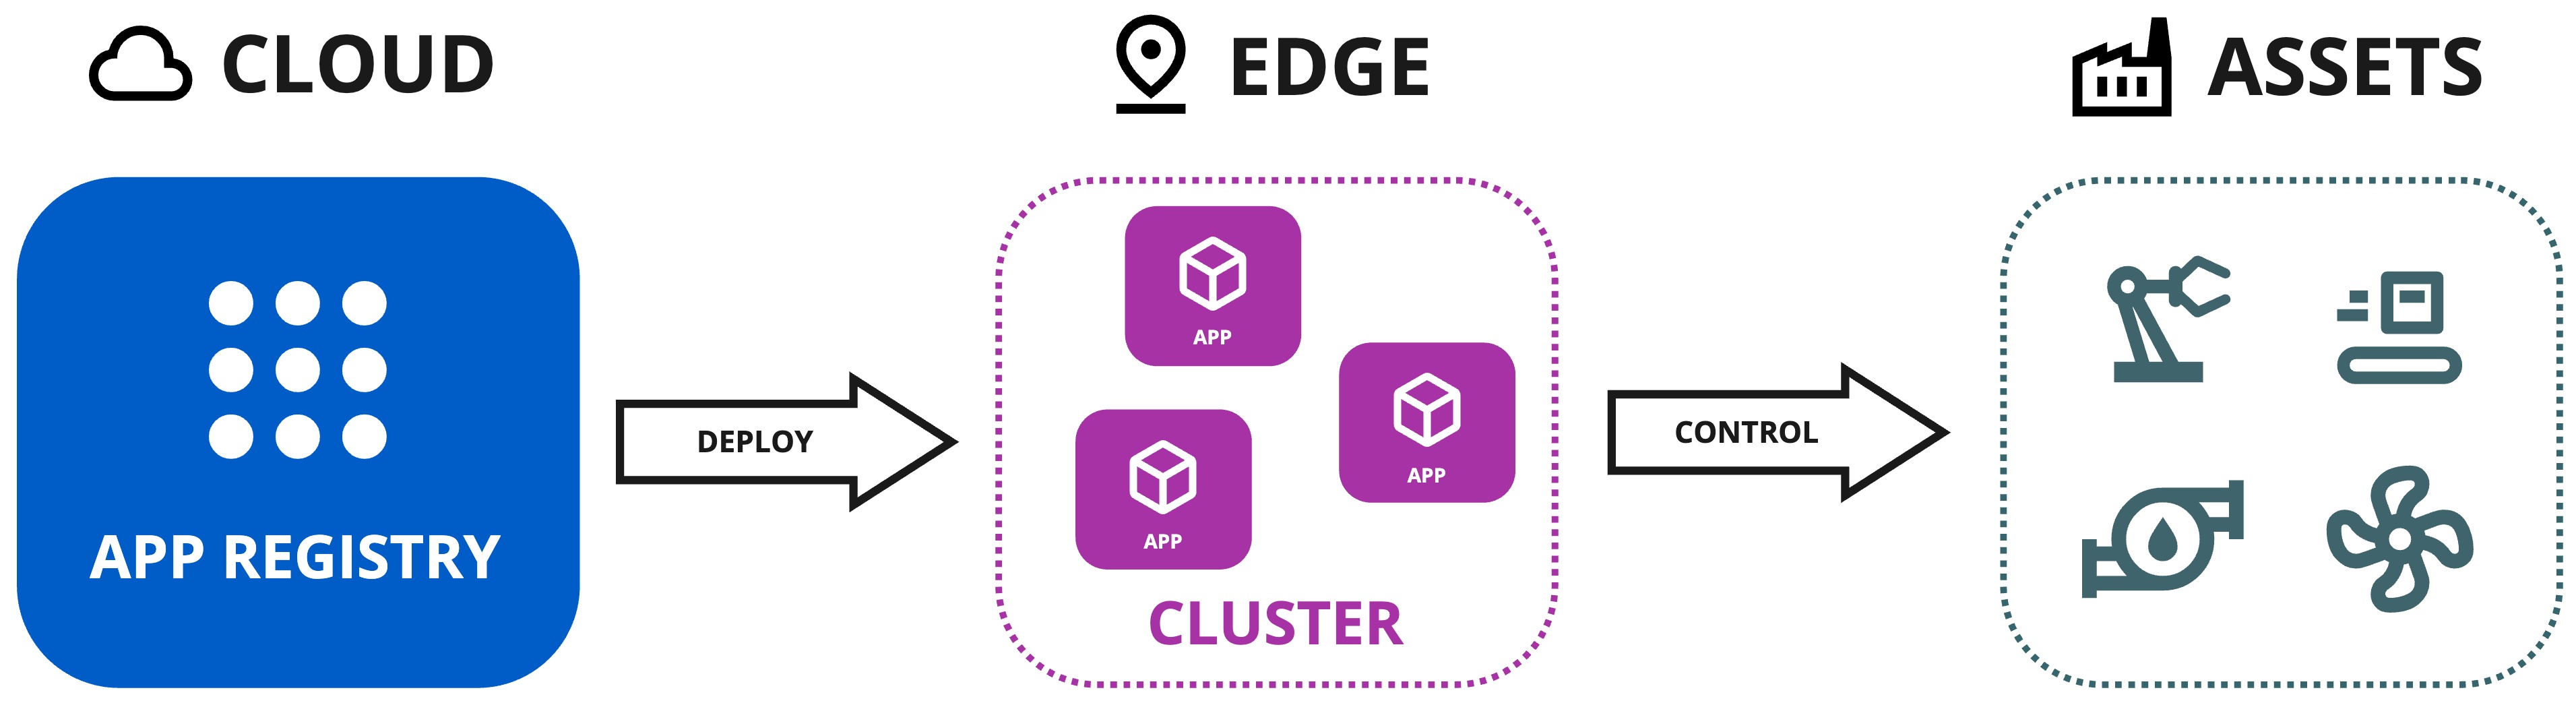
Before proceeding to add Assets to the Application in the Kelvin UI (which deploys a Workload to a Cluster in the background), make sure you have an active Cluster on your Instance and the default Cluster setting for Applications deployment is set.
This demonstration video was done in v5.9.
There may be slight differences with the latest version.
Check the latest documentation for the specific tasks should any feature not quite work as expected.
Video Guide
Watch this quick start guide performed in real time in less than 2 minutes.
Written Guide
Open your browser and navigate to https://<instance>.kelvin.ai. Login with your credentials and you will be presented with the Kelvin UI.
Go to Applications and select the Event Detection app you just uploaded.
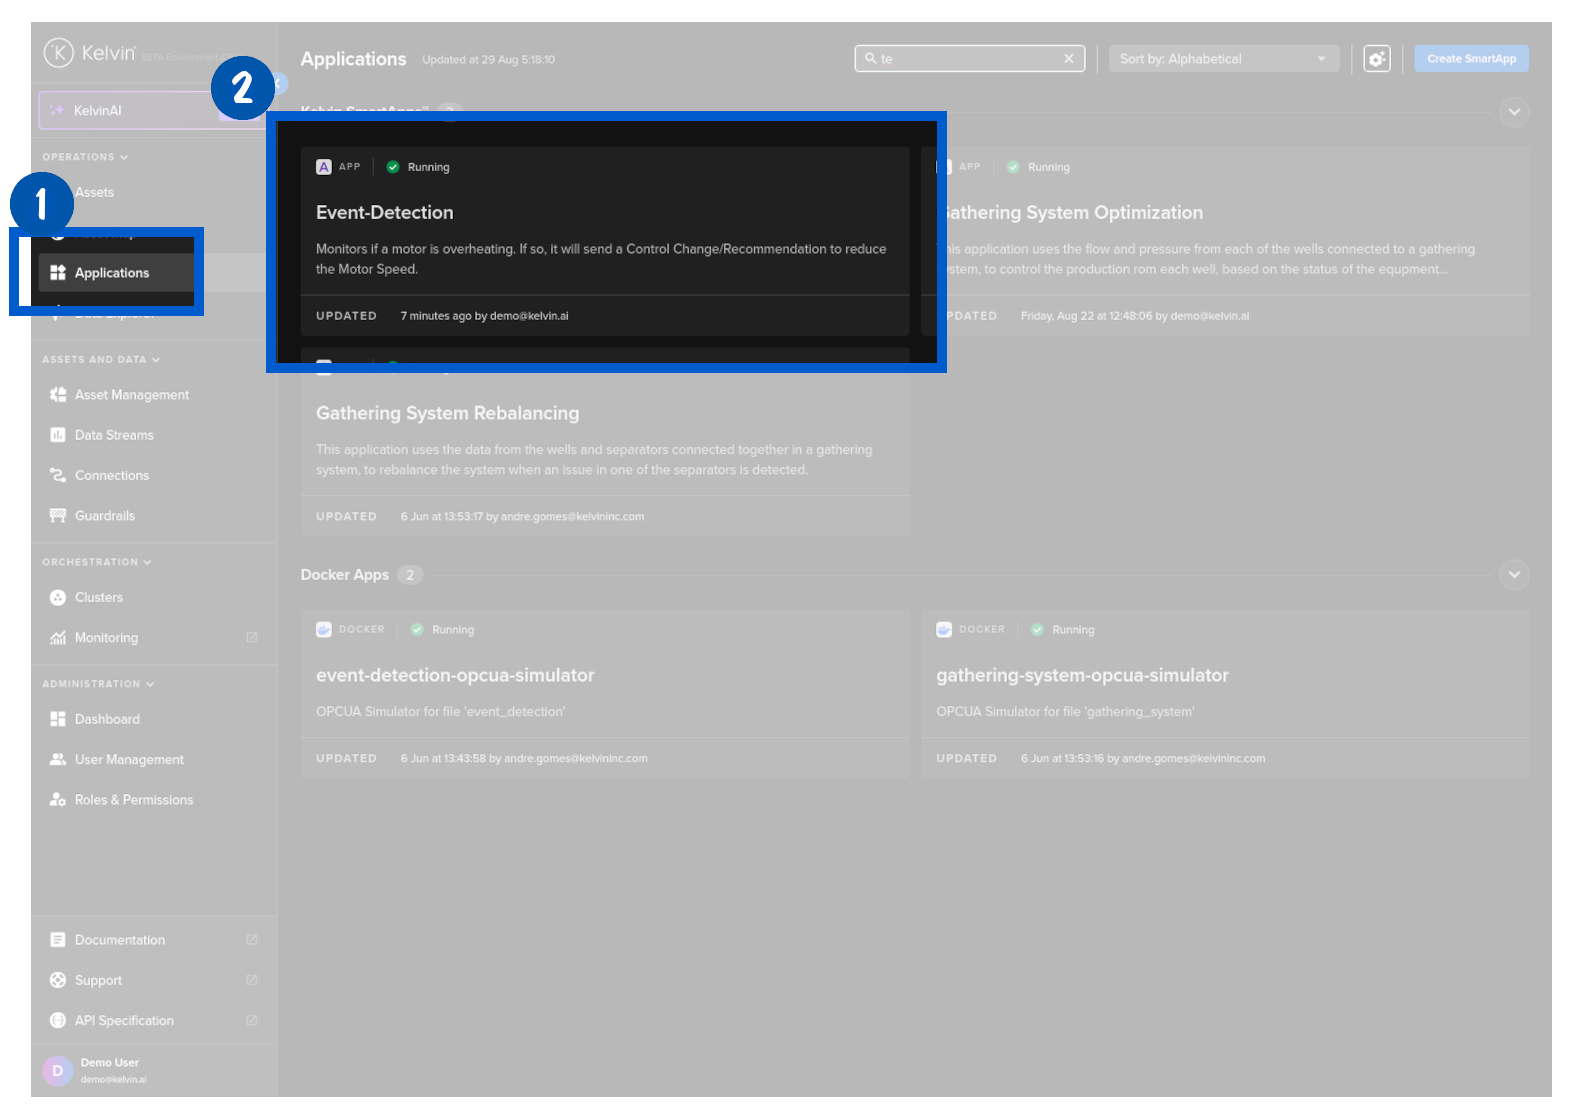
The next step is to deploy the app to assets. Click on the Workloads tab an then on the Deploy Workload button.
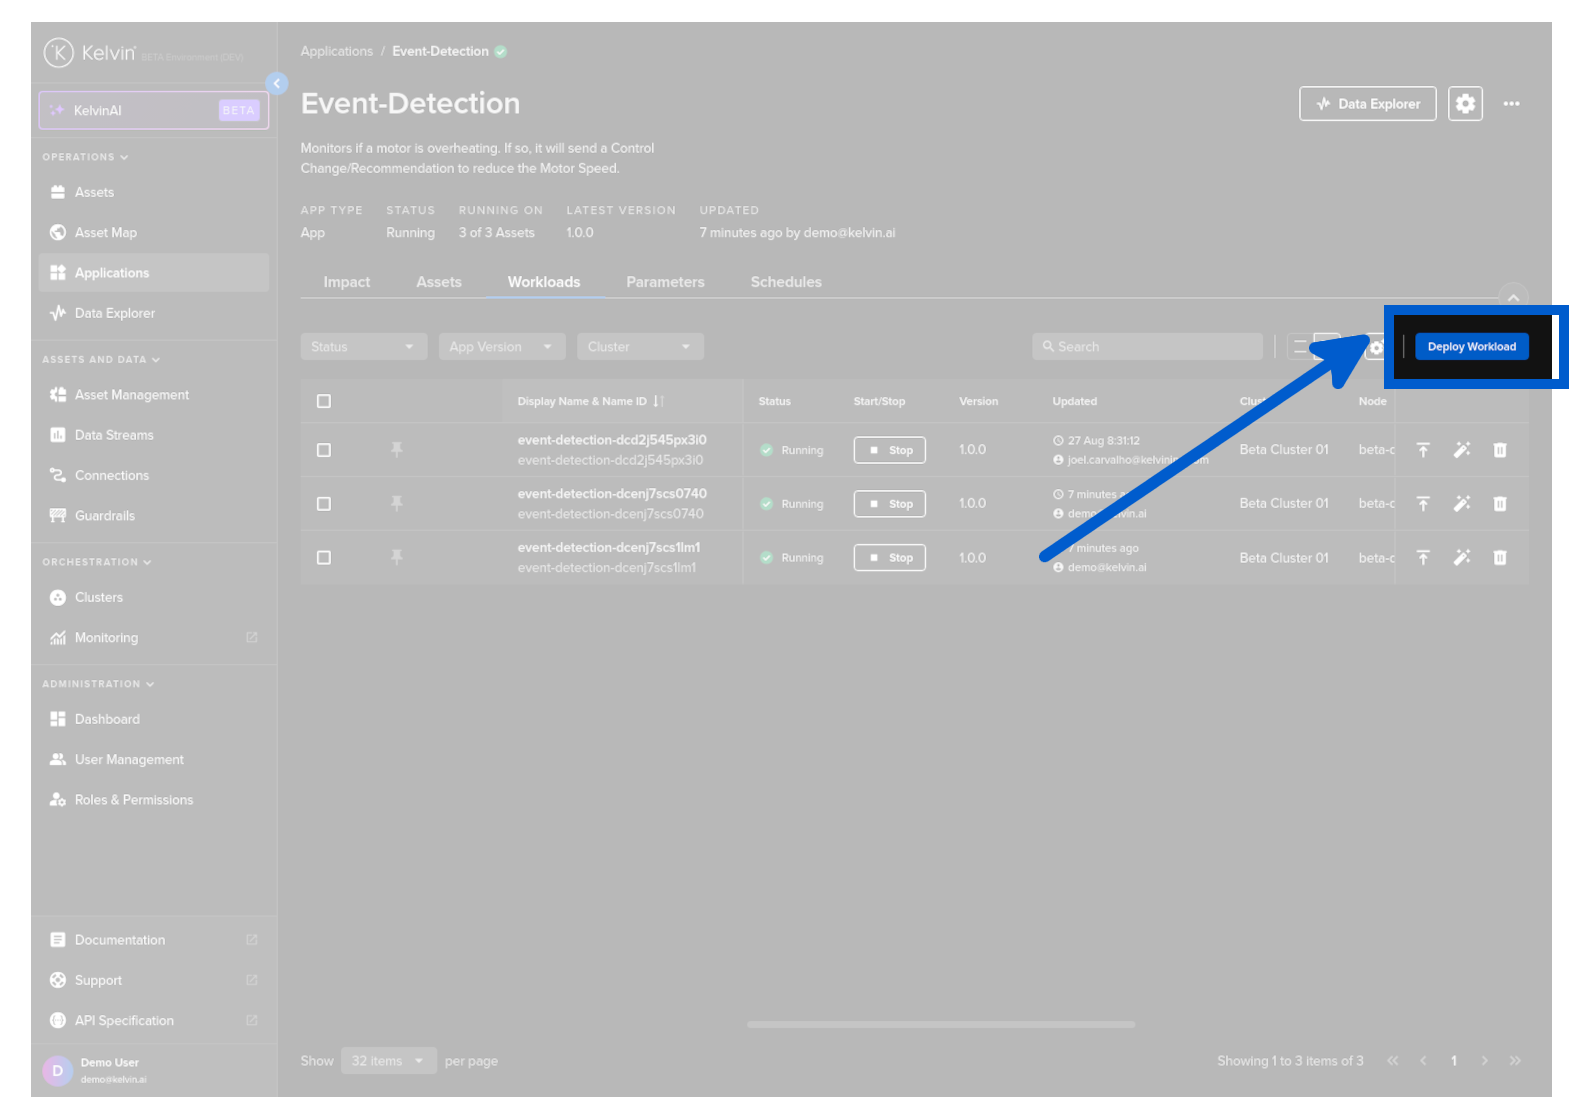
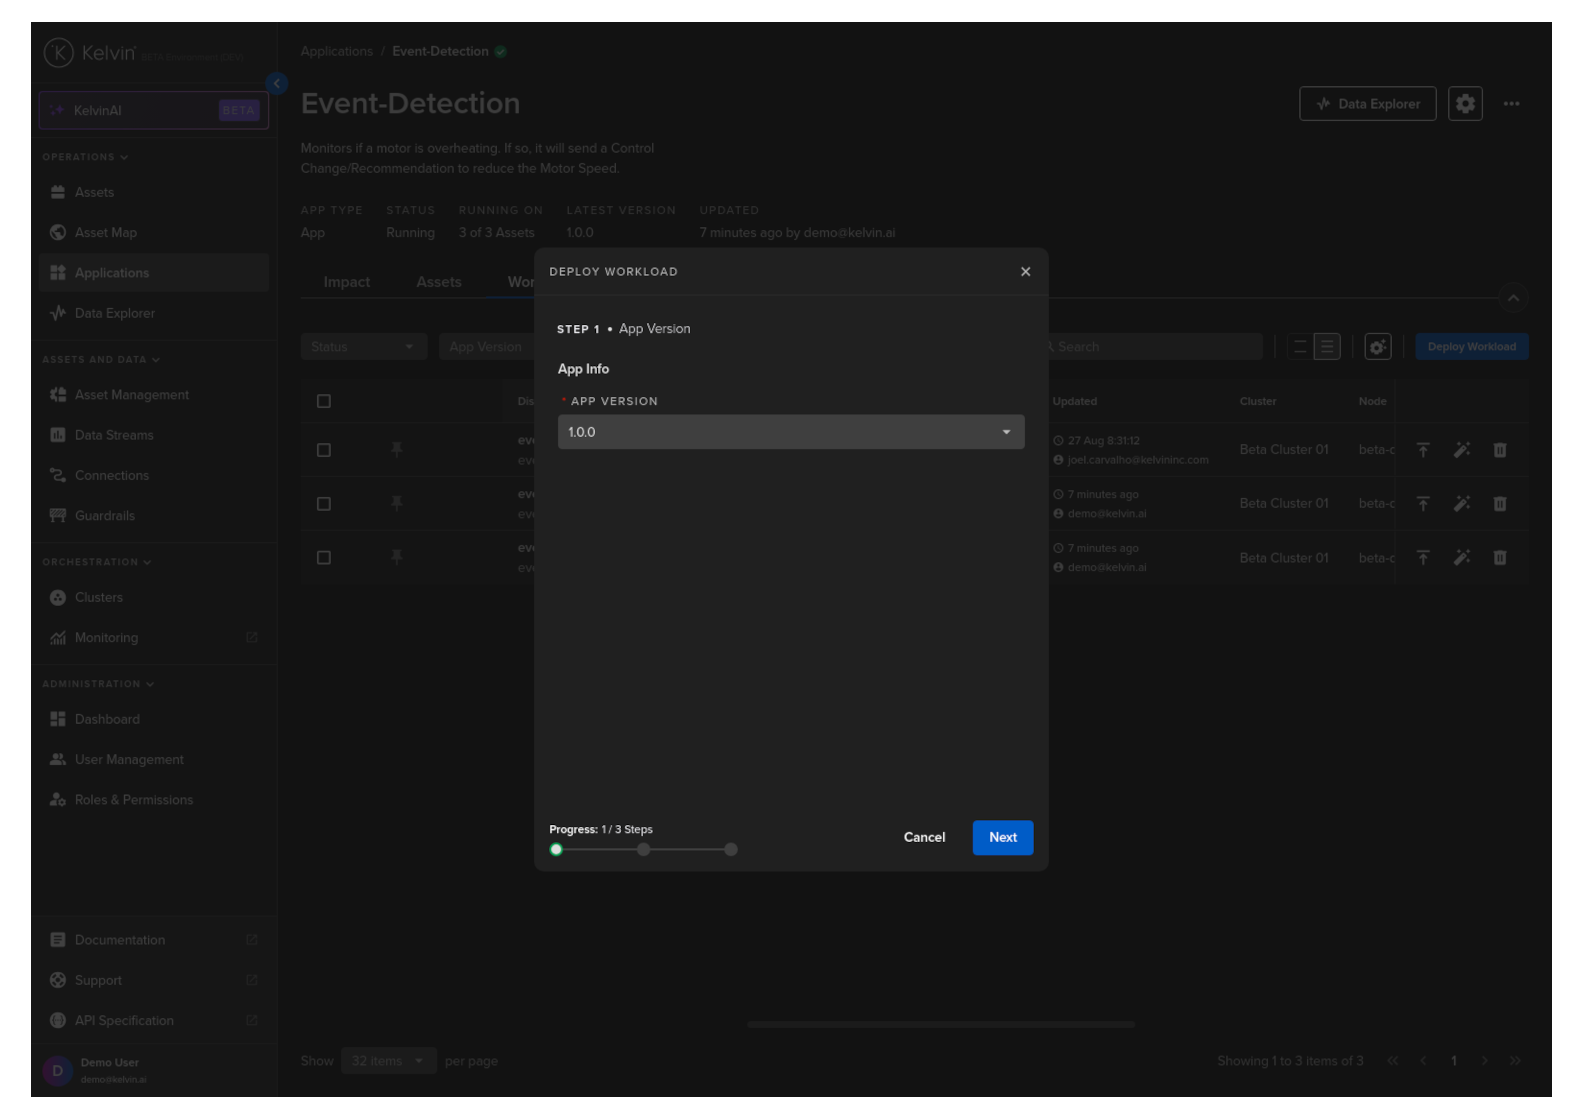
Choose the app latest version and then click the Next button.
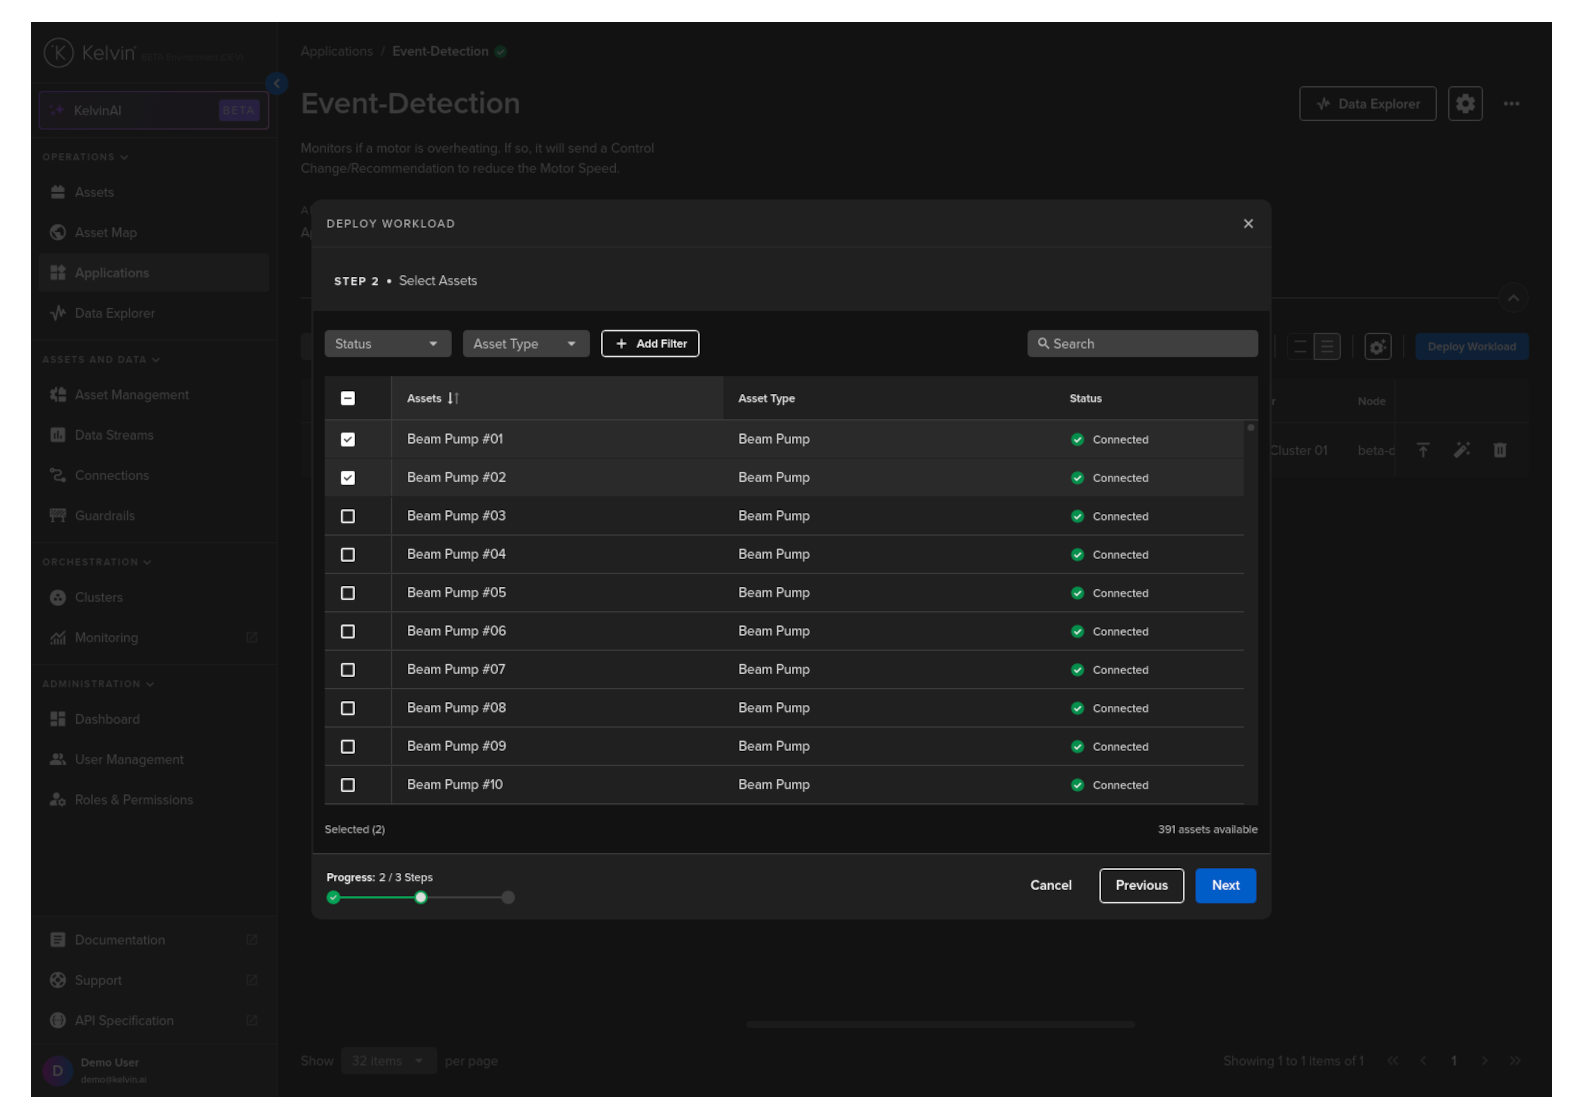
Select the assets you want to deploy to the app. In this case we will select the assets with the name Beam Pump #02 and Beam Pump #03 and then click the Next button.
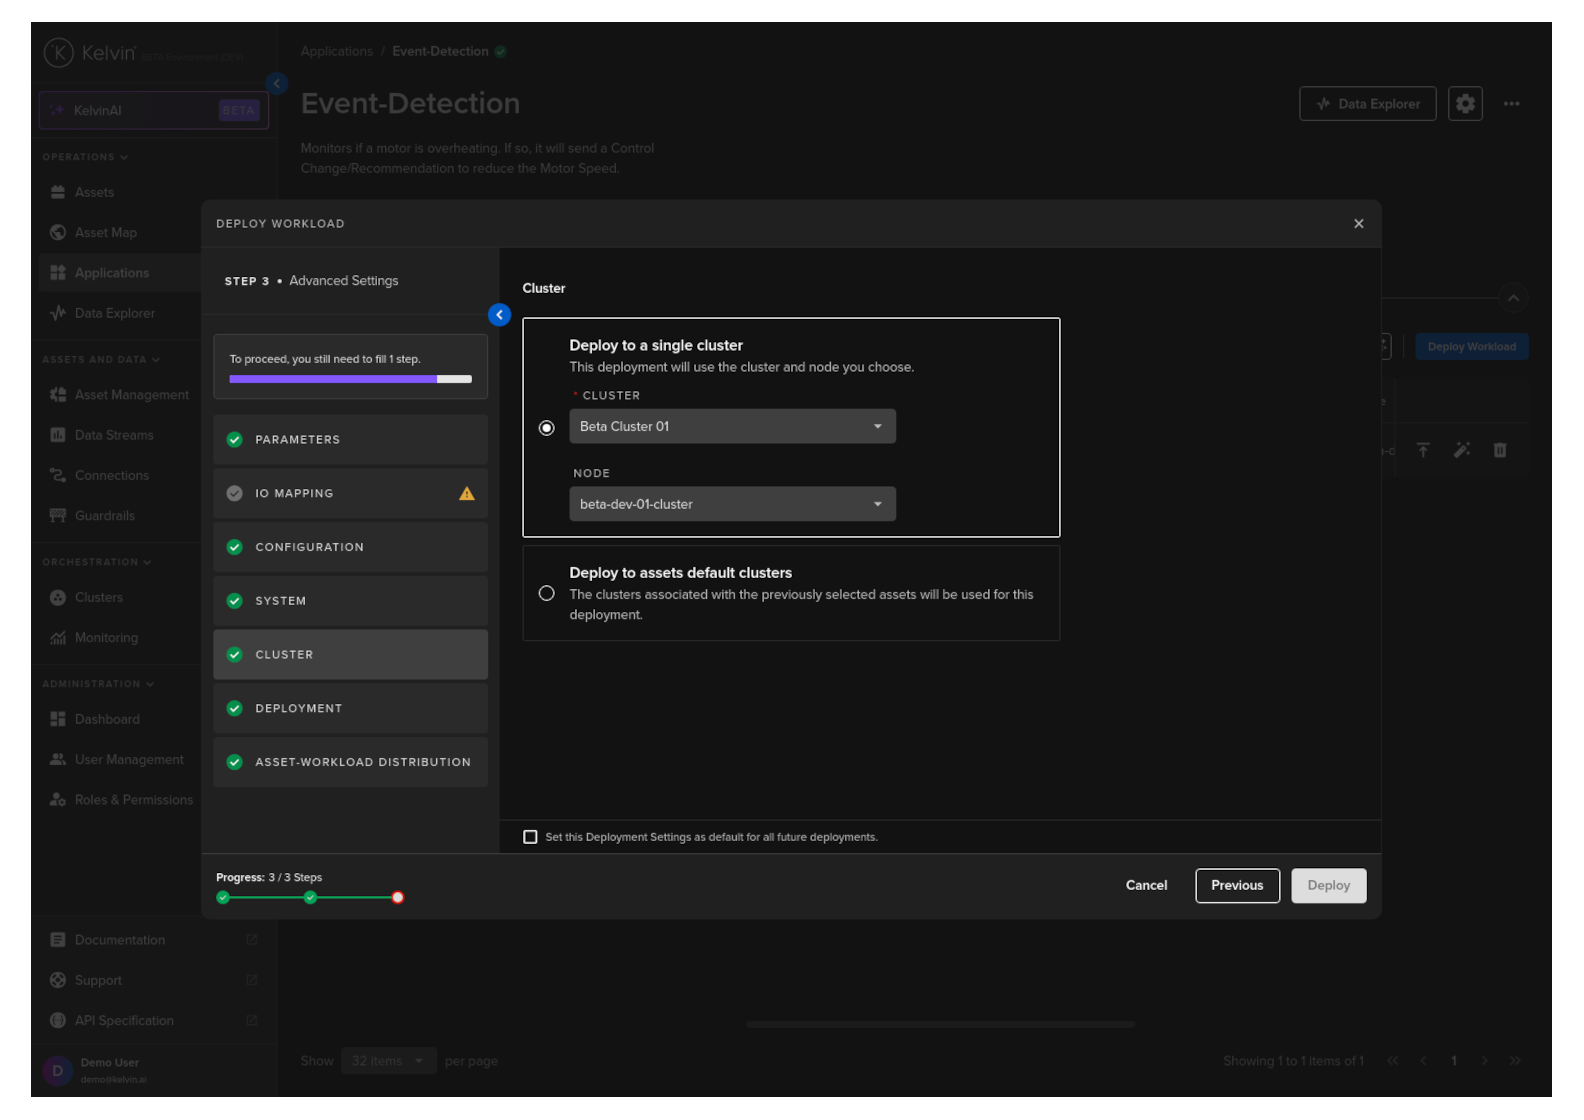
In step three there are a number of settings available. We will only focus on two of the areas;
Cluster
Select the cluster to deploy the workload assets to.
IO Mapping
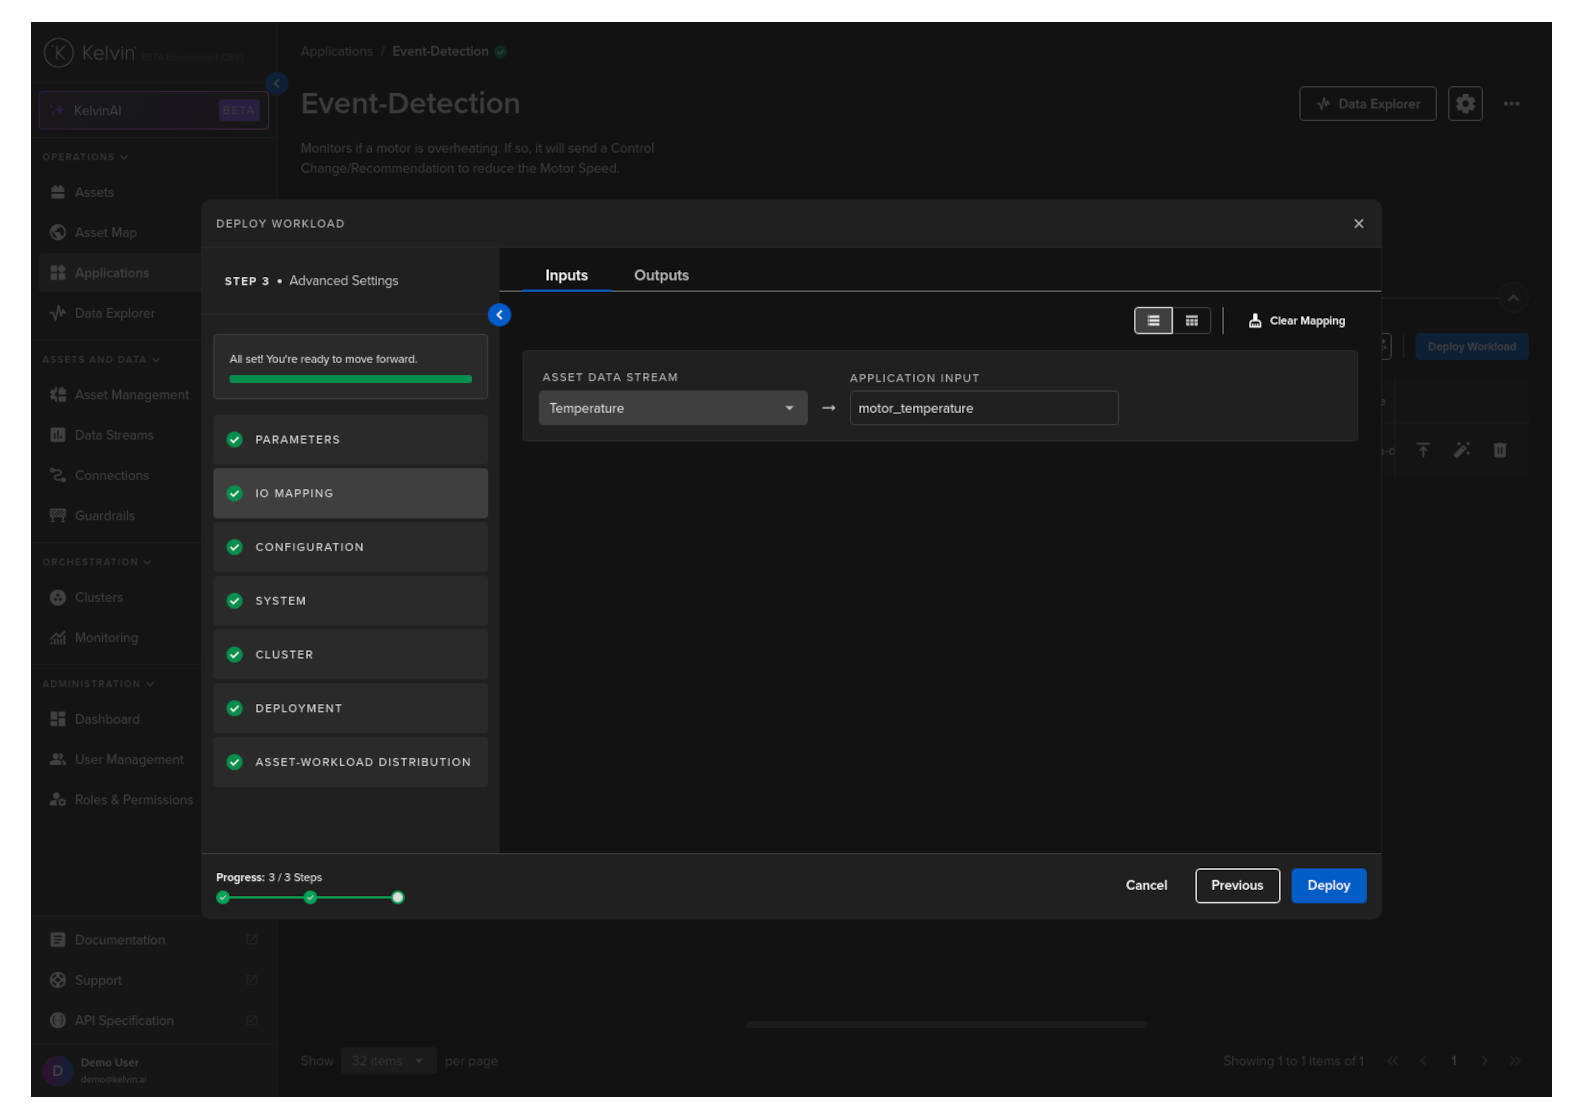
Now we'll map the asset data streams to the Application inputs and outputs. This entails channeling the live data from the assets directly into the application.
Kelvin will oversee the data routing to the Application; your role is to ensure the correct data stream is selected to feed into the Application inputs.
For the Event Detection Application, we have a singular input named motor_temperature. Thus, we'll be selecting the Temperature data stream from the asset.
Like the input, the output should already be automatically selected to the closest type of Data Stream name available. Normally this should be ok.
And the final step is to click on the Deploy button to deploy the app to the assets.
You can observe the workload being deployed to the assets. And in a couple of seconds the app will be running for the assets.
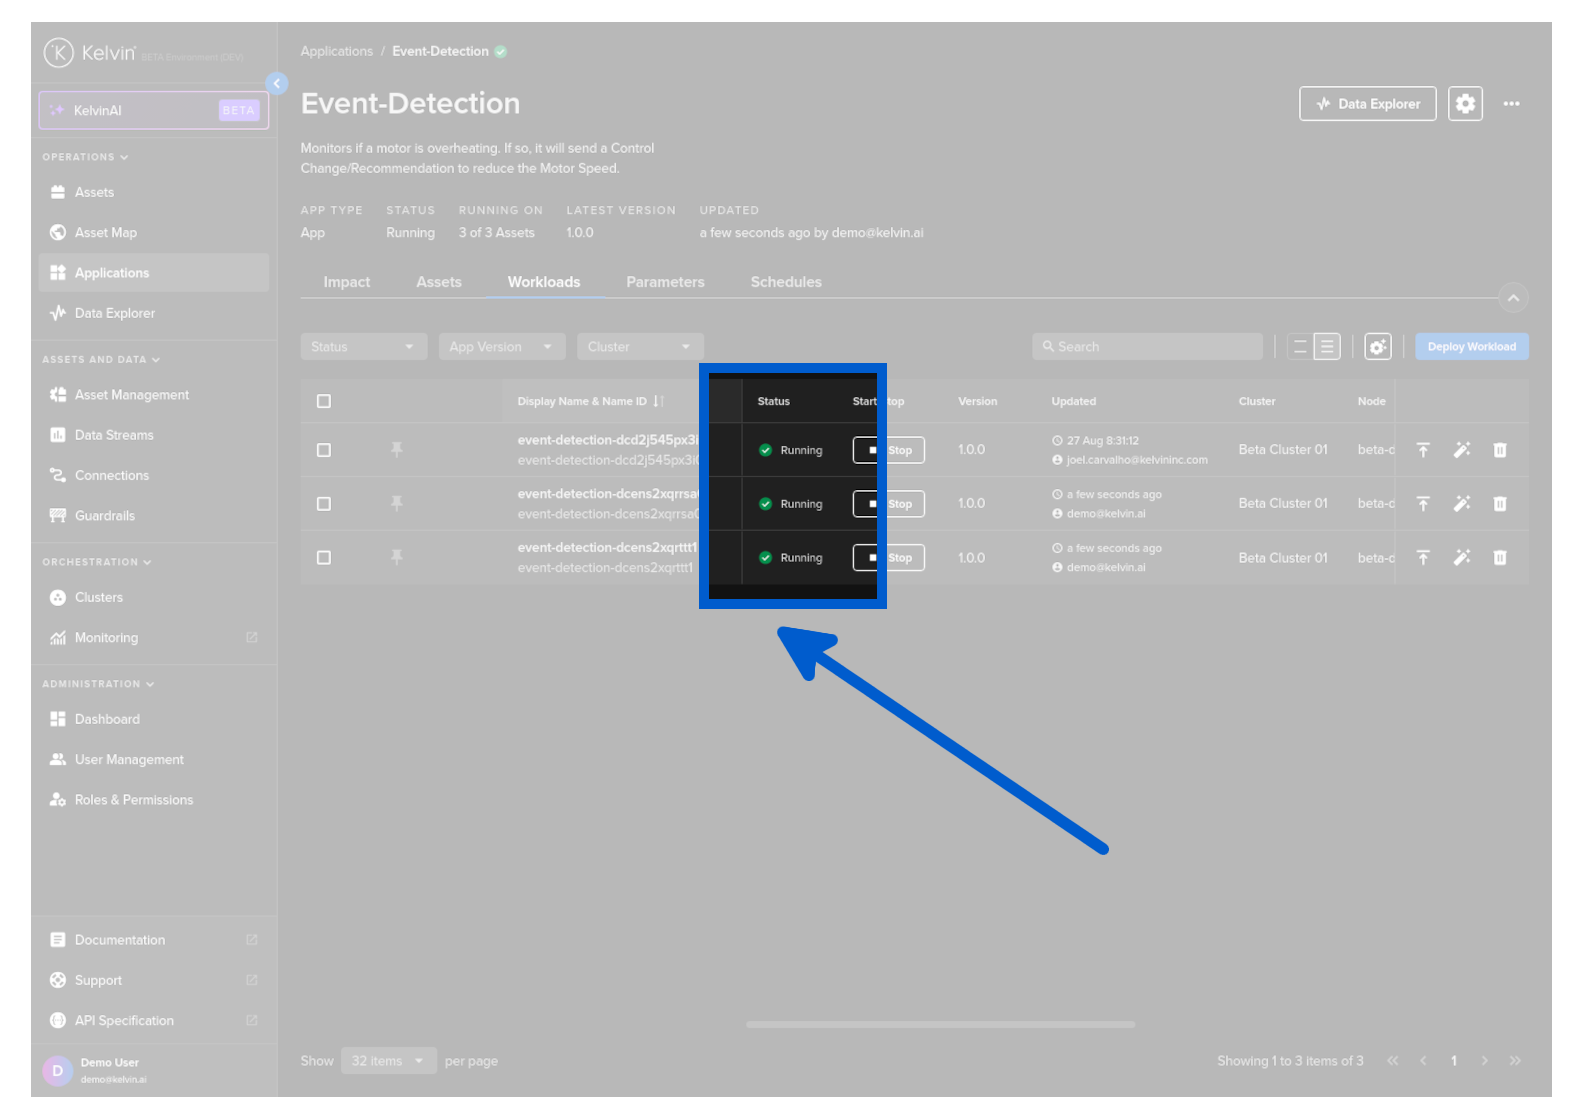
Congratulations! You've successfully deployed your Application to your assets.
Now that you have your first Application deployed to your assets, you can visualize the recommendations, control changes and monitor the logs and telemetry of your app.
7. Monitor Application

Now that your Application has been successfully deployed, it's time to see it in action. We'll guide you through how to visualize the recommendations and data, as well as provide troubleshooting with logs and telemetry of your Application.
Visualize Application Recommendations
To visualize the recommendations made by your Application, go the the Application details.
And click on the Assets tab.
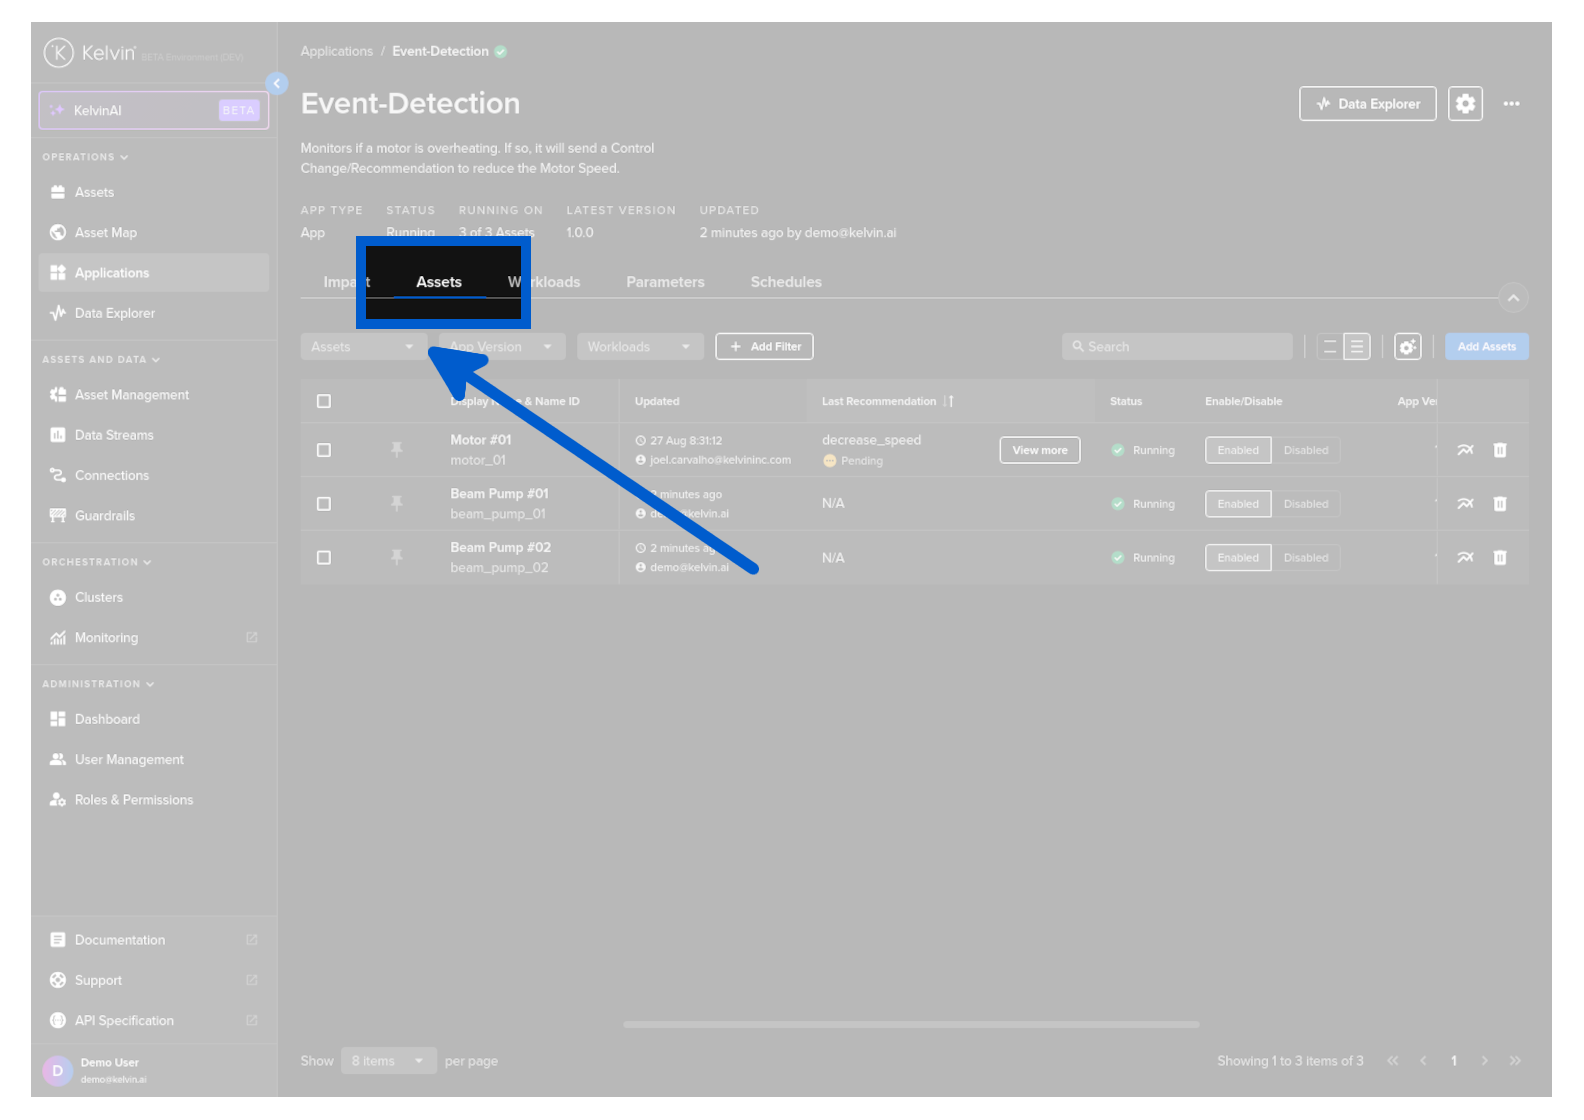
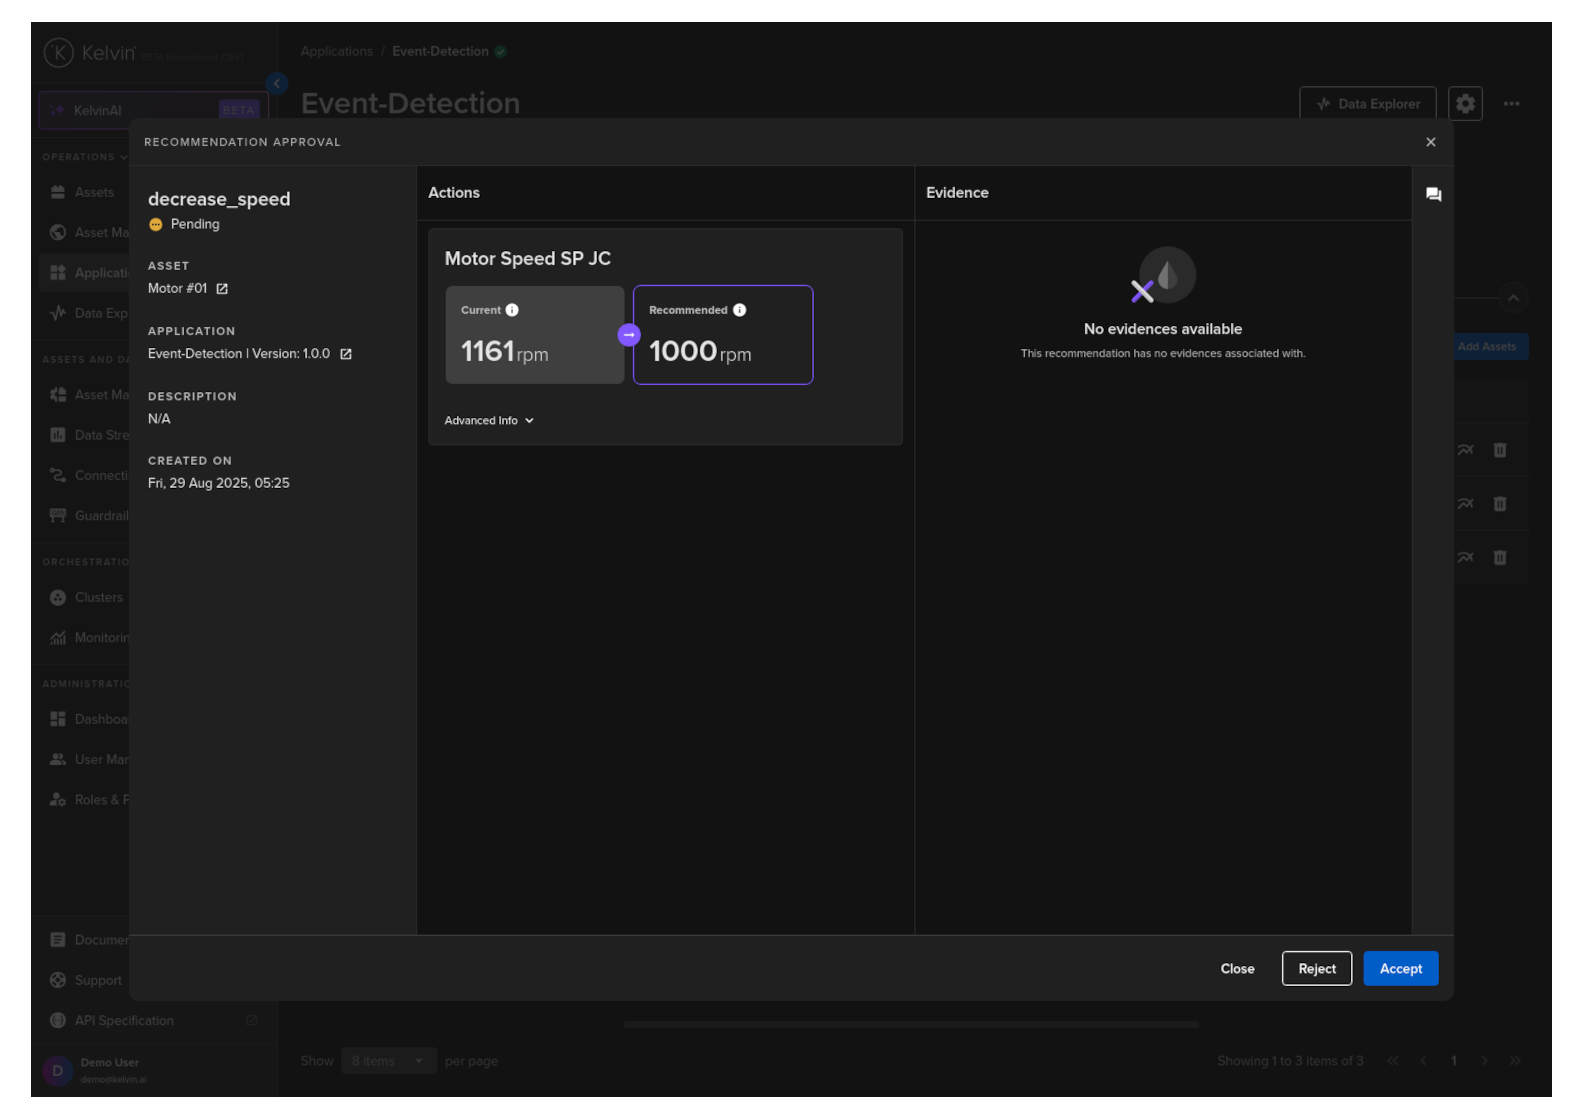
The Last Recommendation column shows you the latest Recommendation for each Asset:
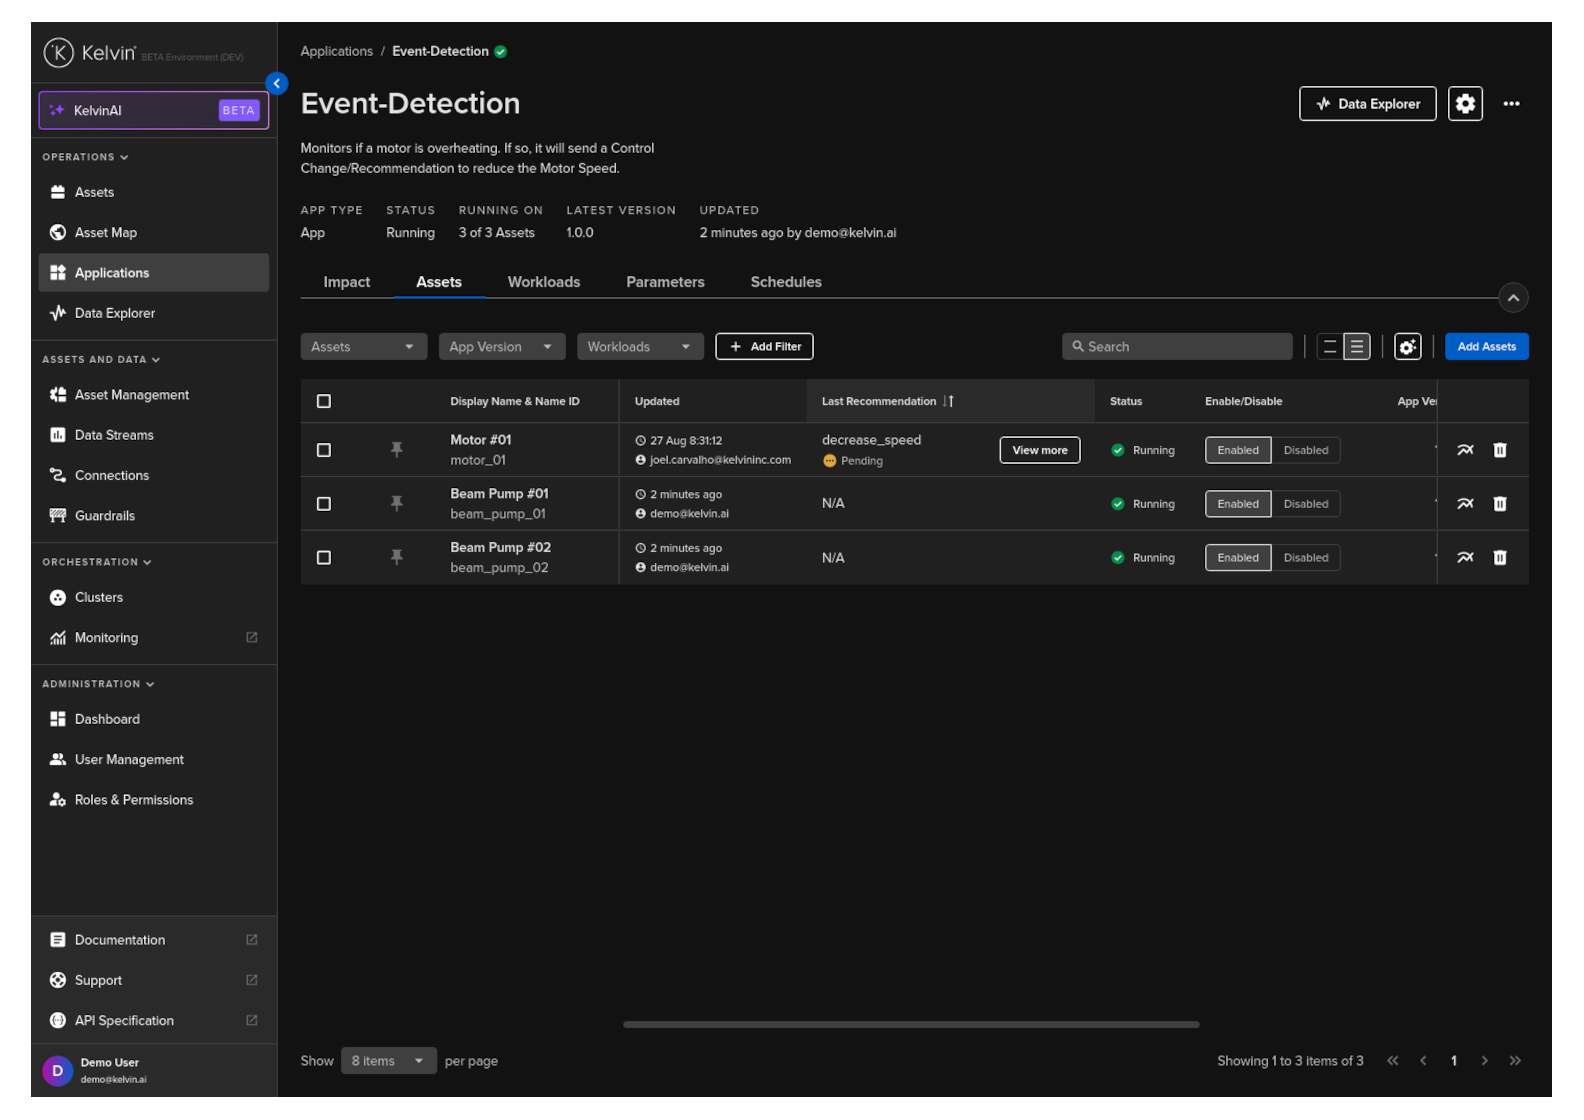
You can see the recommendation in the Asset list.
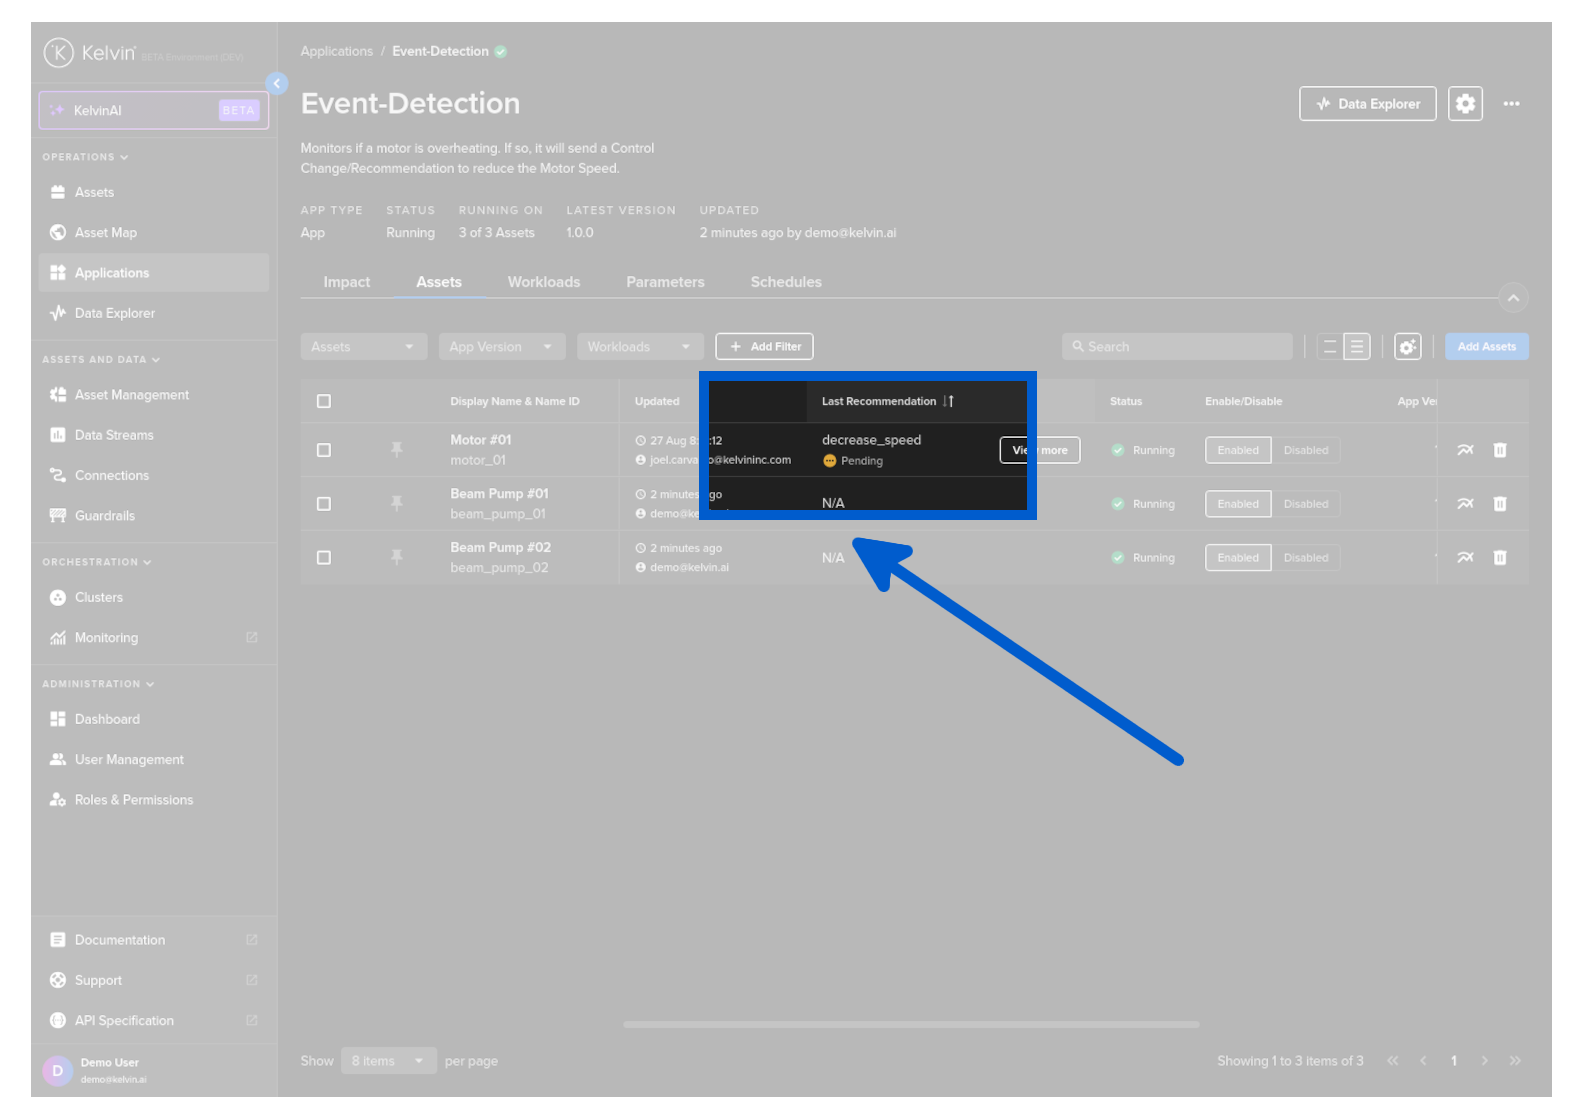
There is also a View More button to the right of the recommendation which you can see the details of the recommendation.
Visualize Application Inputs and Outputs
Another important aspect of seeing your app in action is to visualize the data that your Application is processing.
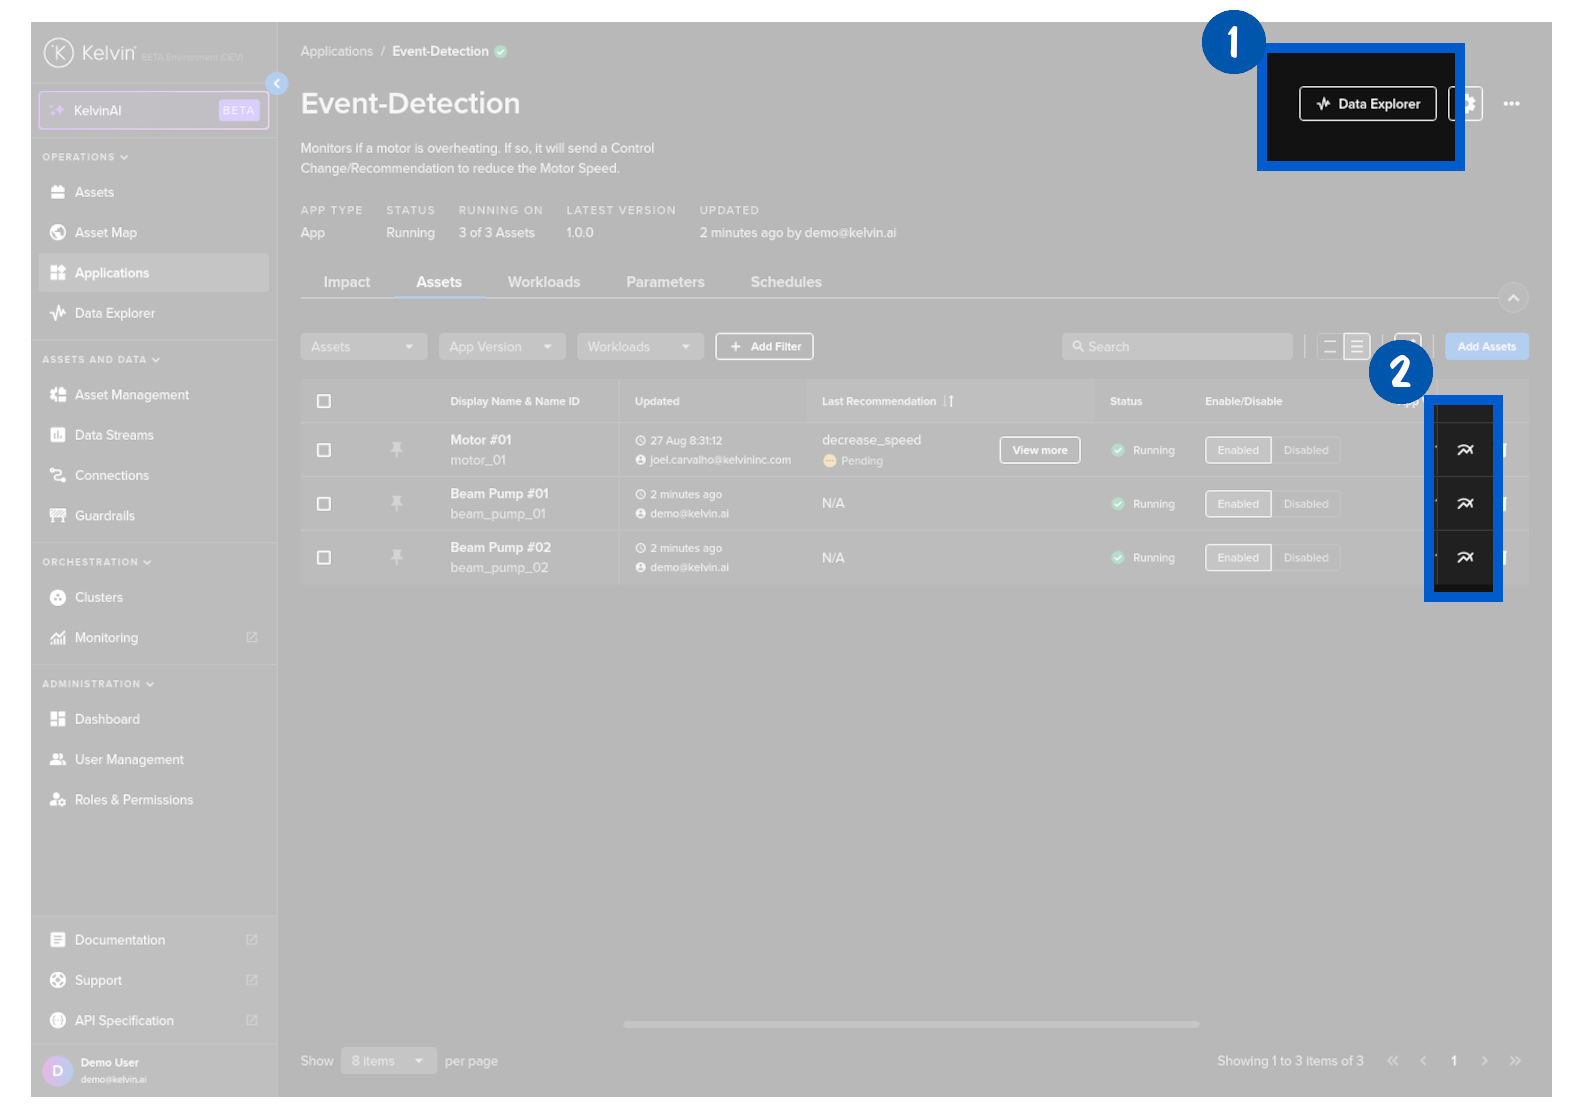
For that task, you can use the Data Explorer, a powerful tool that allows you to plot timeseries data and also visualize the control changes published by your Application.
To do this, go to the Assets tab
And click on Data Explorer button at the top or a Data Explorer Icon  on the Asset row you want to visualize the data.
This will open Data Explorer with the asset automatically selected.
Info
If you do not see any data, click on the Data Streams tab on the right hand side and select the data streams that we can connected in the Inputs/Outputs during the Deployment phase earlier.
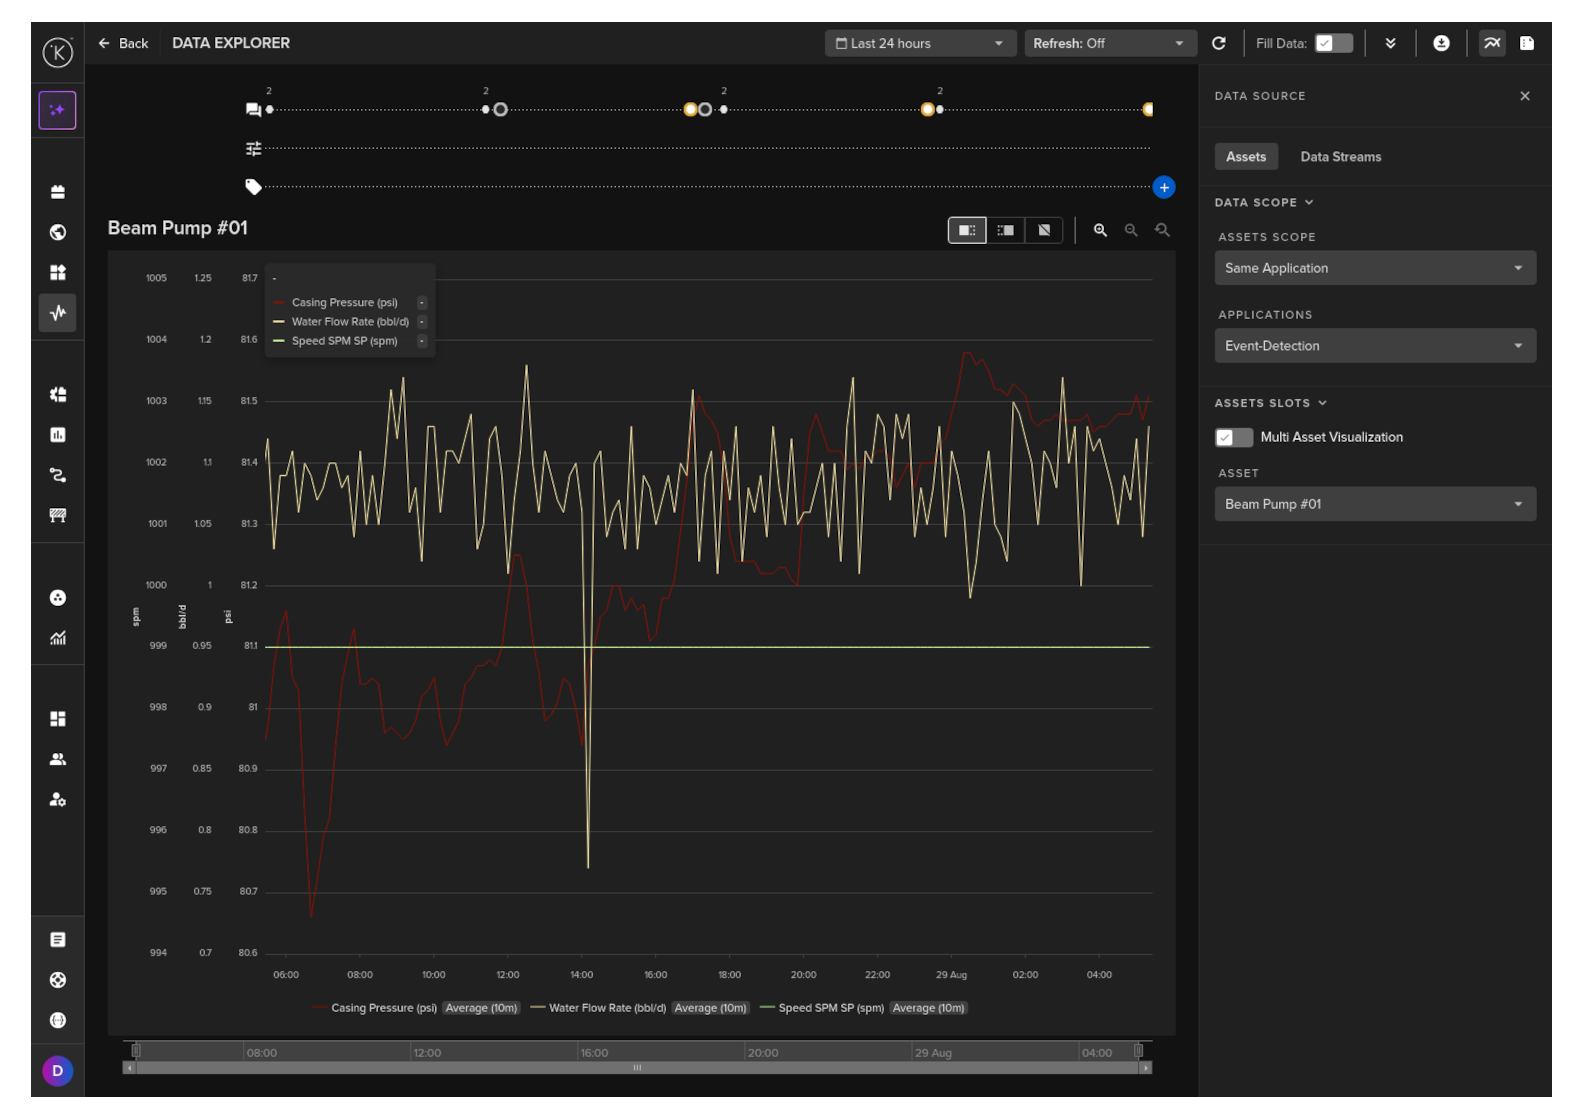
To understand more about the Data Explorer page
Congratulations! You've successfully visualized the data processed by your Application using Data Explorer.
Troubleshoot: Visualize Application Logs
Application logs are automatically uploaded to the Kelvin Cloud.
To see the app logs, click on the Workload tab and then on the wanted workload name.
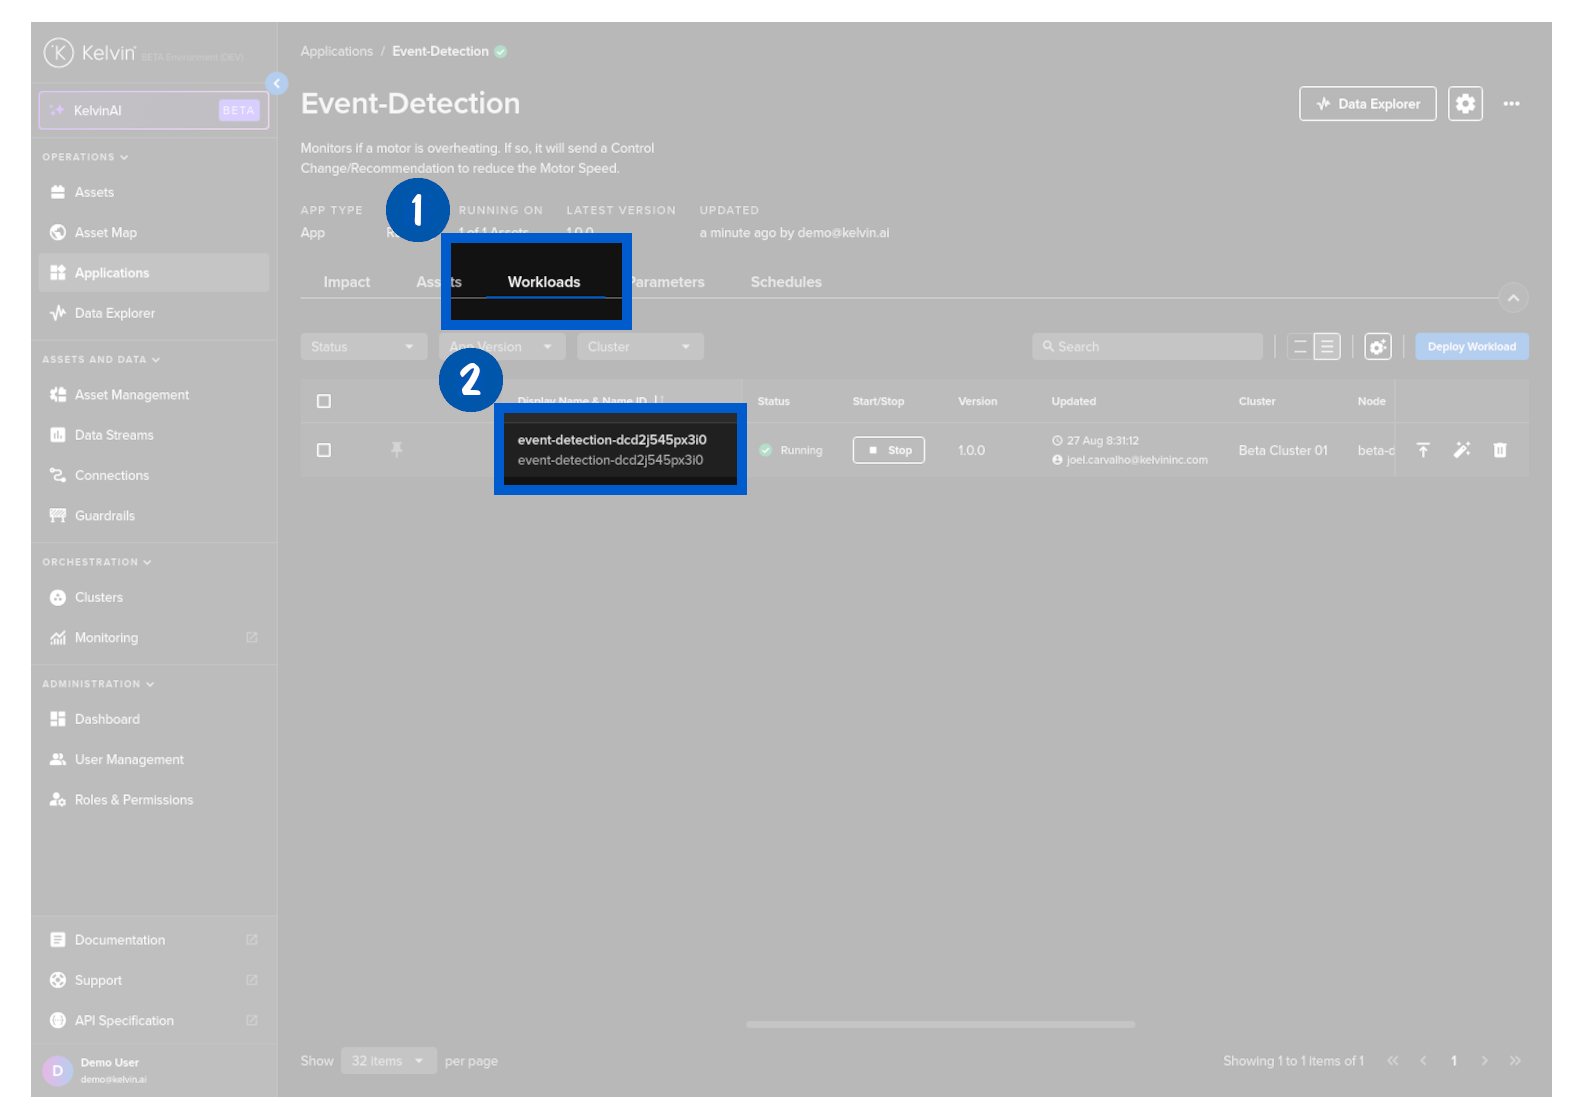
The Logs tab is automatically selected and will show you the logs.
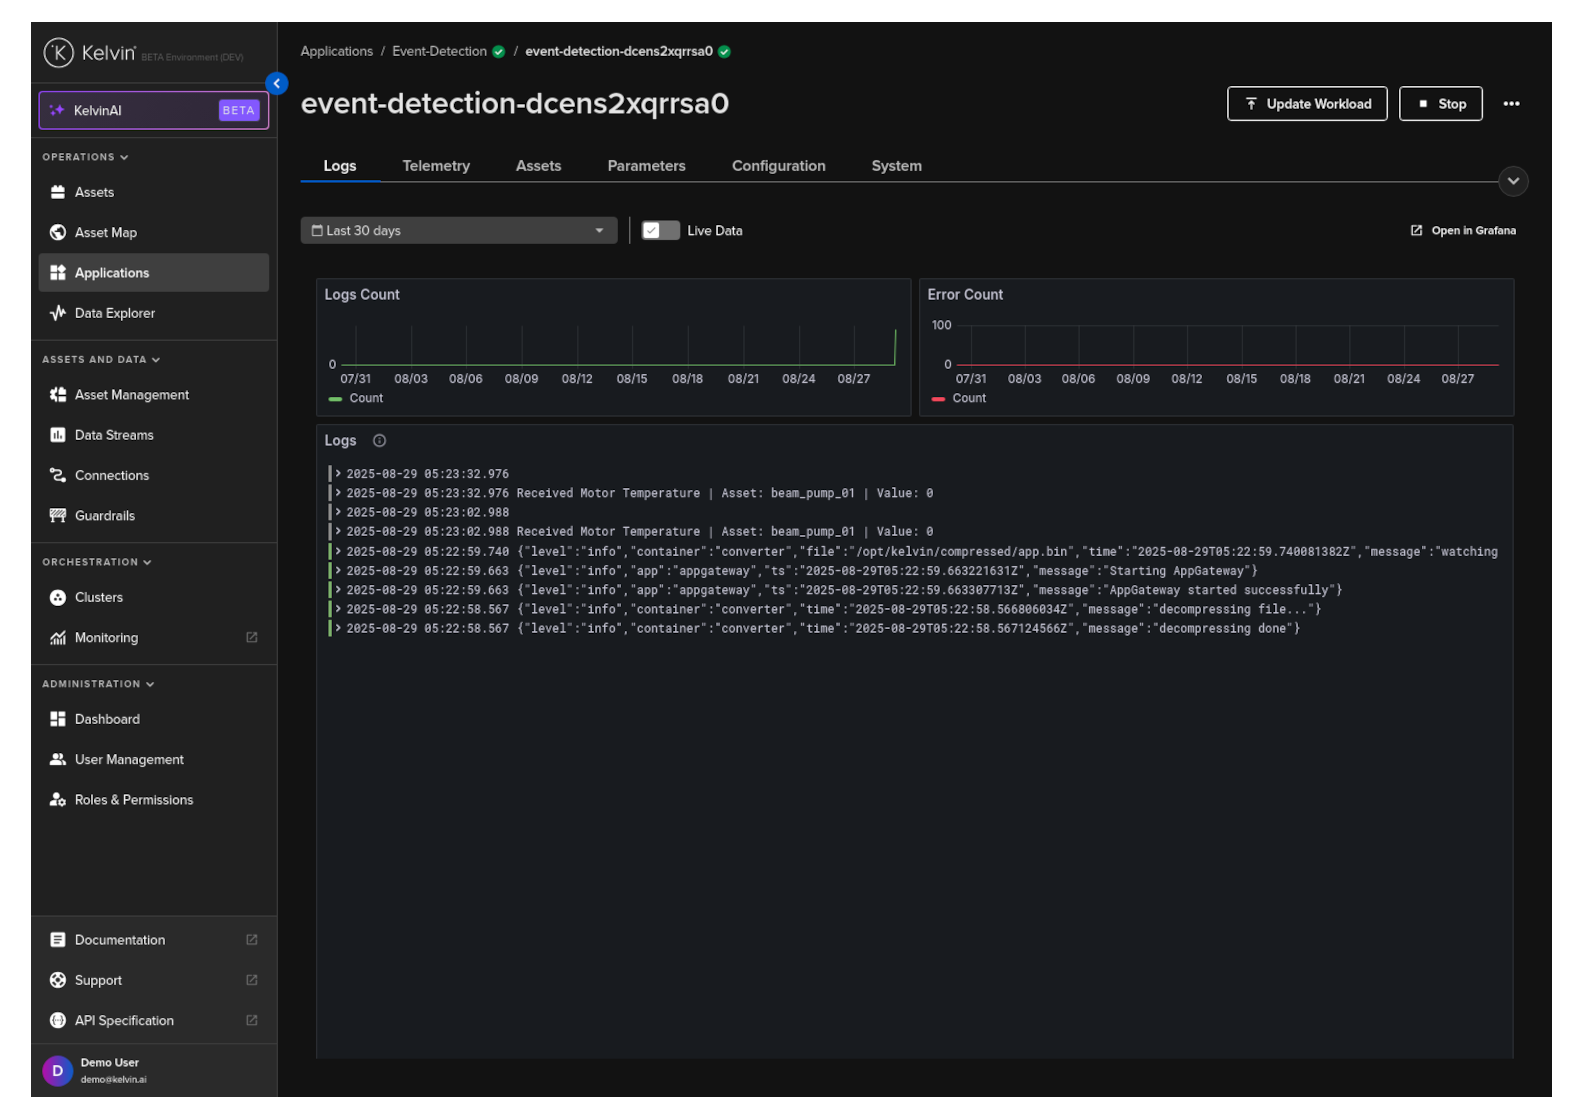
Congratulations! You've successfully visualized the logs of your Application.
Troubleshoot: Visualize Application Telemetry
Another aspect of monitoring your Application is to monitor telemetry data.
Applications automatically upload information related to CPU, Memory and Network usage. These metrics can be used to assess the performance of your app and to debug any issues.
To see the app logs, click on the Workload tab and then on the wanted workload name.
Then click on the Telemetry tab which will show you the telemetry for the workload.
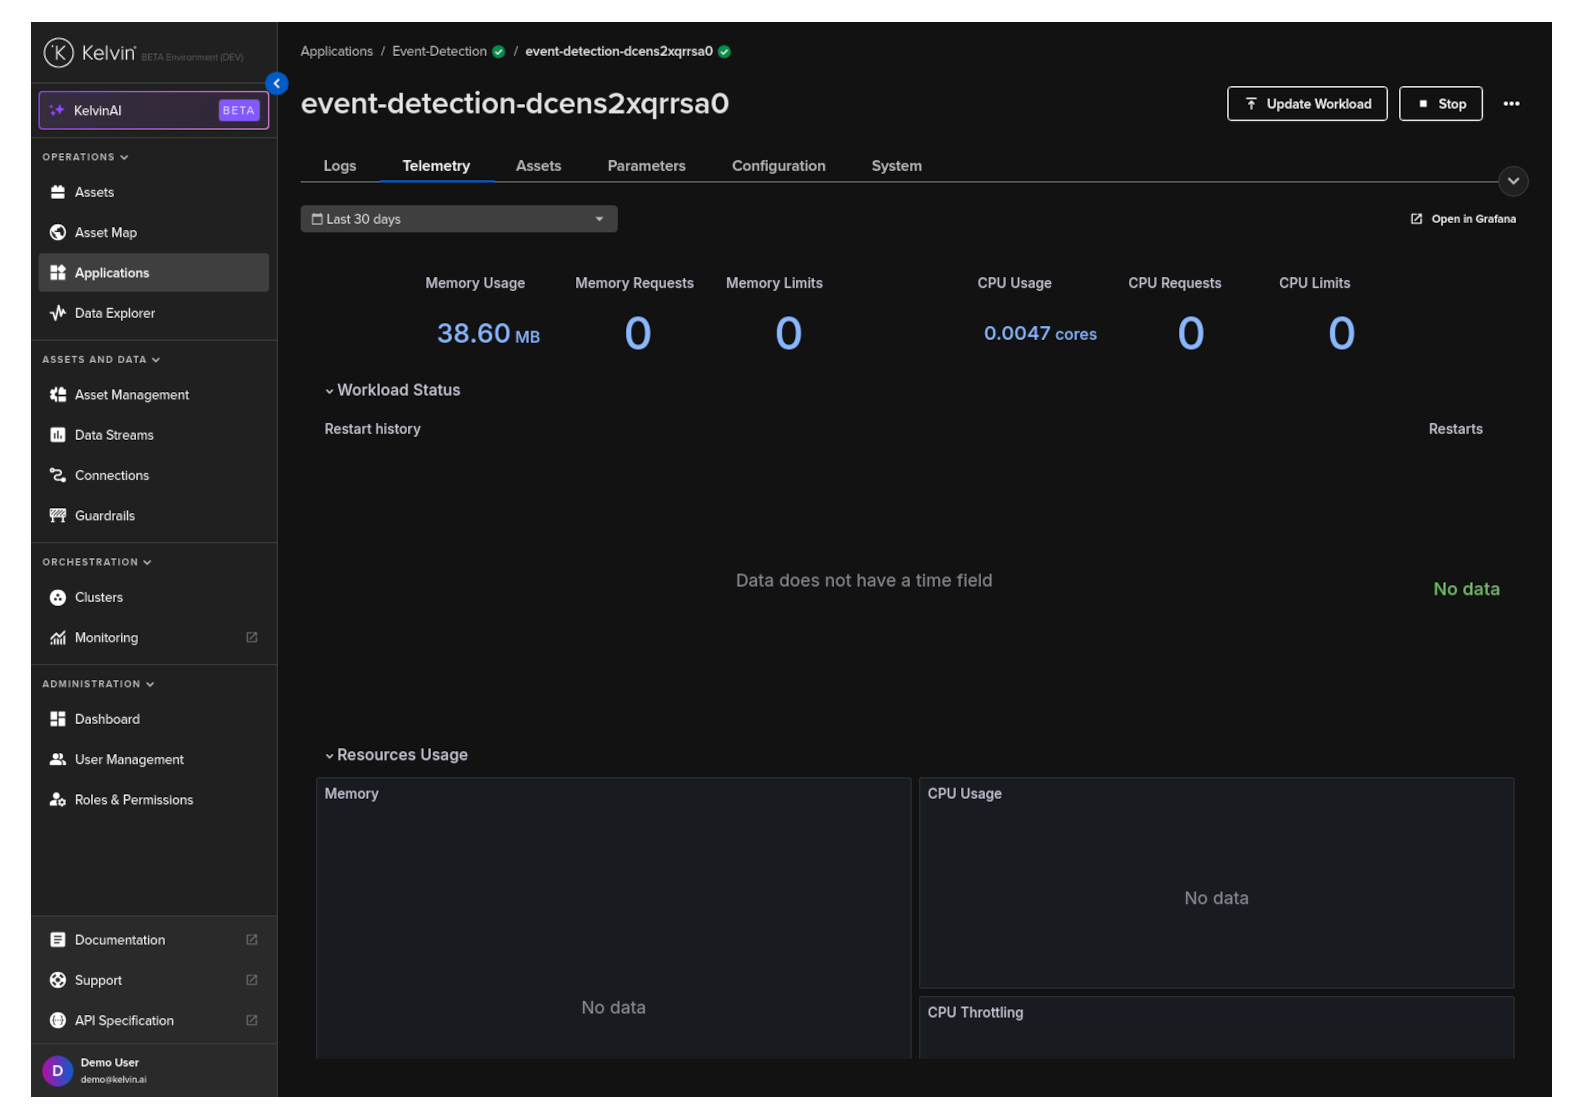
Congratulations! You've successfully visualized the telemetry of your Application using Grafana.
All done!
Congratulations! You've successfully created, uploaded and deployed your first Application. You are now ready to start exploring other topics within Kelvin.
8. Quick Start Quiz
Congratulations on completing the Quick Start!
Test your understanding with this quiz. All answers are based on what you have learned in Steps 1 through 7.
Test Your Knowledge
1. What software do you need installed before you can start building Applications?
Answer: You need three things:
- Python (3.10+)
- Docker (installed and running)
- Kelvin SDK (
pip install kelvin-sdk)
Docker is required for packaging and uploading your app. The Kelvin SDK provides the CLI tools for creating, testing, building, and uploading.
2. What command do you use to create a new Application from a template?
Answer: kelvin app create
This scaffolds a new Application project with the required file structure including the app.yaml configuration file and a starter Python script.
3. What is the app.yaml file and why is it important?
Answer: The app.yaml file is the configuration file for your Application. It defines:
- The app name, title, description, and version
- Input variables (data the app reads from assets)
- Output variables (data the app writes back to assets)
- Asset parameters (configurable values that Operations can tune per asset)
- App configuration (developer-level settings)
Without a properly configured app.yaml, the Application cannot be uploaded or deployed.
4. How do you test your Application locally before uploading?
Answer: The Kelvin SDK provides two local testing methods:
- Simulator (
kelvin app test simulator) — generates random data based on yourapp.yamlinputs - CSV (
kelvin app test csv) — publishes data from a CSV file you provide for controlled, repeatable testing
Both methods run the Application locally on your machine without needing a Kelvin Cloud connection.
5. What single command uploads your Application to the App Registry?
Answer: kelvin app upload
This command builds the Docker image and pushes it to the App Registry on your Kelvin Cloud instance. Docker must be installed and running. You must be logged in via kelvin auth login first.
6. What happens if you try to upload an app with the same version number as one already in the App Registry?
Answer: You get an error. Every upload must have a unique version number. Always increment the version in app.yaml (e.g., from 1.0.0 to 1.0.1) before uploading again.
7. In the Configure step, what three things do you set up in the Kelvin UI?
Answer:
- Assets — import or create the assets that your Application will process
- Data Streams — import or create the data streams associated with each asset
- Connection — create a connection (e.g., CSV Publisher for testing, or OPC UA / MQTT for production) that feeds data into the asset's data streams
8. When deploying, what does 'mapping inputs' mean?
Answer: Mapping inputs means linking the Application's input variables (defined in app.yaml) to the actual data streams on the asset. For example, if your app has an input called motor_temperature, you map it to the asset's Motor Temperature data stream. This tells the Application where to read its data from.
9. What is the difference between mapping inputs and mapping outputs?
Answer:
- Inputs = data the Application reads from the asset (e.g., sensor readings)
- Outputs = data the Application writes back to the asset (e.g., setpoint changes, computed values)
Both need to be mapped to actual data streams on the asset during deployment.
10. After deployment, where can you monitor your Application's behaviour?
Answer: Multiple places in the Kelvin UI:
- Assets page — see asset status, add recommendation and data stream columns
- Data Explorer — see historical data with control change and recommendation markers on the timeline
- Applications page — see workload status, logs, and telemetry
- Asset Details — see recommendations, control changes, and parameters for a specific asset
11. What deployment statuses will you see after clicking Submit, and in what order?
Answer: Pending → Deploying → Running
If the target cluster is offline, the status stays at Pending until the cluster comes back online, then proceeds automatically.
12. Can Operations Engineers deploy your Application to additional assets after you have uploaded it?
Answer: Yes. Once your Application is in the App Registry, Operations Engineers can independently add any number of assets to it through the Kelvin UI — without needing any developer involvement or technical knowledge. This is one of the core design principles of the Kelvin platform.
How Did You Do?
| Score | Level |
|---|---|
| 12/12 | You are ready to build production Applications |
| 9-11 | Great foundation — review the steps you missed |
| 6-8 | Good start — go through Steps 2-6 again with the documentation open |
| Below 6 | No worries — the Quick Start is designed to be repeated. Go through it again hands-on. |
Next Steps
Now that you have completed the Quick Start, explore the full developer documentation for deeper topics:
- Consume Data — learn about windowing, data quality, and advanced data consumption
- Produce Recommendations — build rich recommendations with evidence
- Produce Custom Actions — create email notifications, work orders, and more
- Define Asset Parameters — let Operations tune your Application per asset